5. S
ET THE
L
EVELS
To get the best performance from the system it is
important that the signal levels are correctly matched
to the console. Experiment by adjusting Channel 8 to
match the CD player.
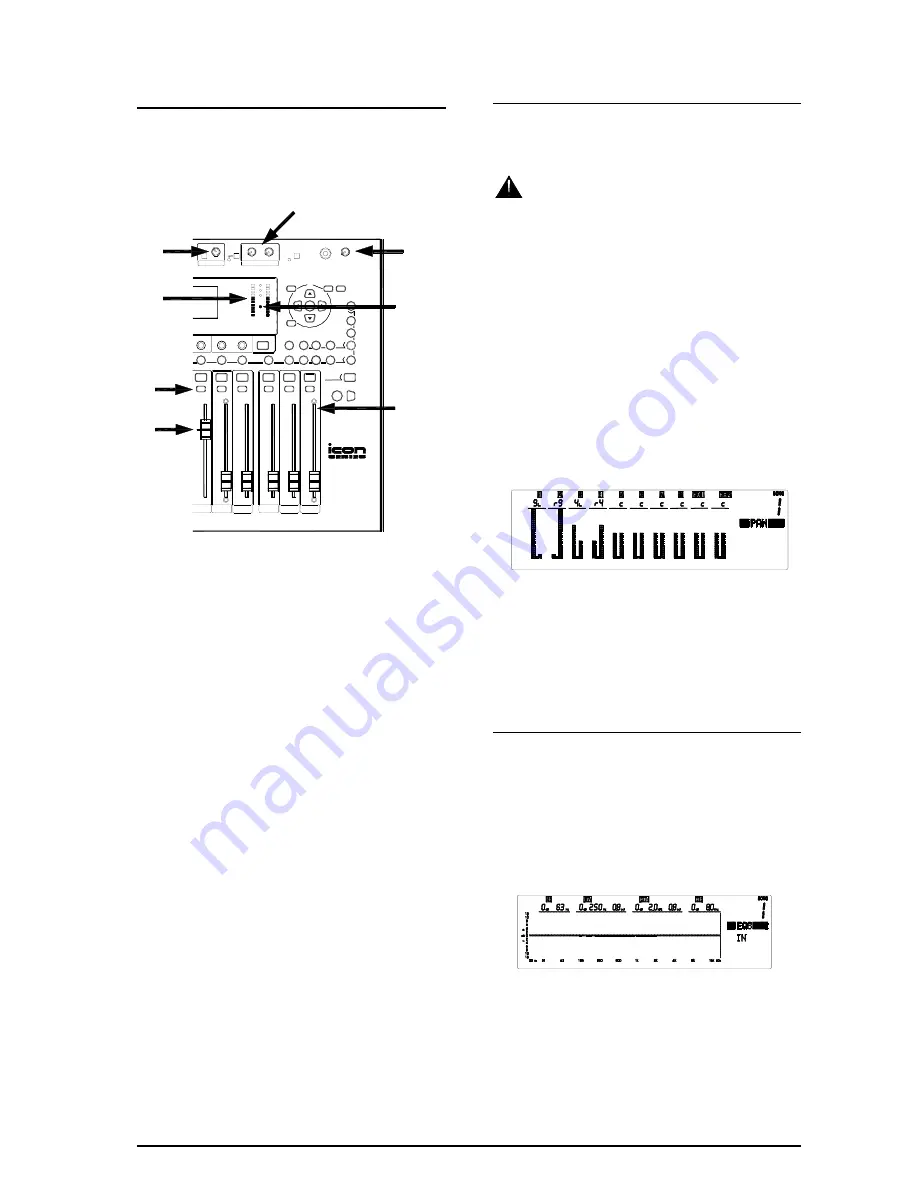
Press
PFL
n
. The key illuminates red and the
PFL
active indicator
o
lights to show that the meters now
read the selected channel pre fader signal.
Adjust the
GAIN
control
p
until the meters
q
read
around ‘0’. The loudest peaks can read up to ‘+6’. If
the red meter indicator lights then the gain is set too
high and signal clipping may result.
Adjust the
HEADPHONES
r
for comfortable listening
volume and check the quality of the channel signal.
This monitors the signal in mono or stereo depending
on the source. Press the
MONO
switch
p
to compare
between stereo and mono.
Having set the channel signal level raise the
FADER
s
to the normal ‘0’ position to route it to the
LR
mix.
Press the
LR PFL
key to check the signal pre
LR
fader.
Press the
PFL
switch again to turn
PFL
off. The
AB
meters now monitor the configured output, in our
case
LR
. Raise the
LR FADER
t
to its top ‘0’
position. The meters should now read around ‘0’.
Having set the
LR
mix levels raise the
AB OUTPUT
LEVEL
u
controls for the required amplifier volume.
This should be set to produce the loudest volume
required for signal averaging ‘0’ with occasional ‘+6’
peaks on the meters. Normal operating position of
these controls is around 12 to 3 o’clock.
Now pull back the
LR FADER
t
for comfortable
listening volume while continuing with your
experiments.
6. B
UILD THE
M
IX
With the levels correctly set for the Channel 8 stereo
source repeat the process for the other channels. For
example plug a microphone into Channel 1.
Refer to Section 4 for instructions on using
microphones with phantom power.
u
Be careful to avoid acoustic feedback when using
microphones close to loudspeakers. Use directional
mics such as those with a cardiod pattern and point
them away from the speakers. Having set the
channel gain, raise the fader carefully listening for
the start of ringing or feedback. Reduce the fader
level or reposition the mic if this occurs.
p
r
q
o
Listen to signal quality and set gain using
PFL
.
Adjust the balance between the sources using the
channel
FADERS
. Turn the channels on or off using
the
MUTE
keys. These illuminate red when the
channel is off (muted).
n
t
s
Press the
PAN
select key to adjust the position of the
signals in the stereo LR mix.
The ‘soft strip’ of rotary controls beneath the display
becomes the row of
PAN
controls, one for each
channel. Adjust these to balance the signal between
left and right mix. Press
RESET
to set them all to
centre image.
7. A
DJUST THE
EQ
You can now experiment with the processing power
of the
icon
. A good starting point is to adjust the
tonal characteristic of the sound using the channel
EQUALISER
. This is a parametric type which lets you
precisely adjust the parameters of four frequency
bands. Select the equaliser for Channel 8 by pressing
EQ8
once. The following screen displays the default
EQ flat setting:
The soft strip beneath the display becomes the gain,
frequency and width controls together with an
illuminated in/out switch. Adjust these controls to
experiment with the effect of boosting or cutting
selected frequencies.
5 - 2
icon
SERIES
Содержание DL1000
Страница 1: ...ALLEN HEATH USER GUIDE Publication AP3299 ...
Страница 8: ...CONNECTING THE SYSTEM mains viii icon SERIES ...


