20
4. inStALLAtion
• Carefully remove the packaging/unpack the parts.
• Make sure that there is no damage.
• The press is delivered on the base cabinet with the hydraulic unit installed and the hydraulic hoses
connected.
• Check the hardened ball guide shafts and other bare machine parts.
If necessary, clean with polishing paper and oil carefully.
• Check the oil level in the hydraulic unit and top up with hydraulic oil if necessary.
(Please use only brand-name oil, viscosity HLP 32)
• Set up the punching frame according to the required space of approx. 2000 mm x 3000 mm.
The machine must be freely accessible from all sides.
the machine must be erected on a level surface in a way that prevents it from tipping over. there must be
no obstructed lines in the immediate vicinity.
Ensure that the working area is free of obstacles and accessible!
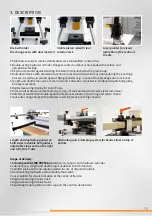
• Carefully push the stop rail together with the angle for the workpiece support into the hardened guide
rollers and secure it against overrunning by screwing on the stop plate.
• Push the quick-release clamps onto the guide rail on the right and left.
5. commiSSioning
• Plug in the mains plug
• Switch on the main switch on the lower cabinet.
• Check the safety lock on the hold-down device.
• Check the up and down motion of the pistons when actuating the foot switch.
the safety switch on the hold-down must not be manipulated under any circumstances!
!
6. woRking with thE Punching unit
• Insert the punch into the corresponding punch holder and insert it into the punching cylinder (do not
tighten the grub screw too much)
• Insert the die into the die bed and lock it securely.
in order to avoid the risk of injury due to tool breakage caused by incorrectly inserted tools, special care
must be taken each time a tool is used:
•
the dimensions of the punch and die must coincide
•
the square, rectangular and special punches must be inserted in accordance with the anti-rotation device
and positioned analogous to the die.
we recommend an "empty punch" to check the accuracy of fit.
• Insert the workpiece. Make sure that the door height is correct. If necessary, adjust the height by turning
the workpiece supports. The workpiece should run horizontally directly above the die.
• Bring the workpiece into the desired position and align it.
• Clamp the workpiece using the workpiece clamp.
• Swing down the downholder and clamp it in the vertical position.
• For punching, the foot switch must be actuated and held.
the cylinder piston stops immediately as soon as the foot switch is released.
•
do not use blunt or damaged tools.
•
the working area must be clean and free from chips.
•
the punching process can be interrupted immediately by releasing the foot pedal.
the cylinder piston stops immediately!
•
during the punching process, never reach into the punching area between the die, workpiece and punch.
•
Punching may only be carried out with the hold-down completely folded down and secured!
Содержание 03090
Страница 9: ...9 Batteriebetriebene Positionsanzeige mit externem Sensor SERIE IZ16E 000 ...
Страница 23: ...23 Battery powered position indicator with external sensor SERIES IZ16E 000 ...
Страница 37: ...37 Affichage des positions à piles avec capteur externe SÉRIE IZ16E 000 ...
Страница 51: ...51 Indicatore di posizione a batteria con sensore esterno SERIE IZ16E 000 ...
Страница 66: ...66 AP 600 Zylinder AP 600 Cylinder AP 600 Cylindre AP 600 Cilindro ...
Страница 71: ...71 ...


