background image

4

5

Before you install/remove the SIM card or microSD card, insert the 
SIM  card  tool  provided  into  the  small  opening  on  the  side  of  the 
device. The SIM/microSD card tray will pop out.

Your phone only supports micro-SIM cards. Do not attempt 

to  insert  other  SIM  types  like  mini  and  nano  cards; 
otherwise this may cause damage to your phone.
To avoid data loss and SD card damage, before removing 
the SD card, please ensure that the SD card is unmounted 
(Settings\Storage\Unmount SD card).

Charging the battery

Connect  USB  cable  provided  to  your  phone  and  charger.  Then, 
connect charger to an electrical outlet. The LED indicator will light 
while charging. 

To reduce power consumption and energy waste, when the 

battery is fully charged, disconnect your charger; switch off 
Wi-Fi, GPS, Bluetooth or background-running applications 
when not in use; reduce the backlight time, etc.

1�2�2 

Power on your phone

Hold down the Power key until the phone powers on. It will take a 
few seconds before the screen lights up.
Set up your phone for the first time
The first time you power on the phone, you should set the following 
options: Language, Google Account, etc.
Even if no SIM card is installed, your phone will still power on and 
you will be able to connect to a Wi-Fi network, sign into your Google 
Account and use some of the phone's features. 

1�2�3 

Power off your phone

Hold down the Power key from the Home screen until the phone 
options appear, select Power off.

1�3 

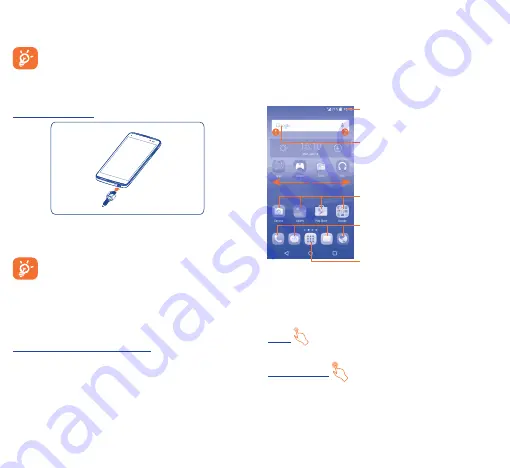
Home screen

You  can  move  all  of  the  items  (applications,  shortcuts,  folders  and 
widgets)  you  use  most  frequently  to  your  Home  screen  for  quick 
access. Touch the Home key to switch to the Home screen.

Touch to enter application list.

Status bar

• 

Status/Notification indicators 

• 

Touch and drag down to open 

the notification panel.

Touch an icon to open an application, 

folder, etc.

Favorite tray applications

• 

Touch to enter the application.

• 

Touch and hold to move or 

change applications.

Search bar

• 

Touch 

 to enter text search screen.

• 

Touch 

 to enter voice search screen.

The Home screen is provided in an extended format to allow more 
space for adding applications, shortcuts etc. Slide the Home screen 
horizontally left and right to get a complete view. 

1�3�1 

Using the touchscreen

Touch 
To access an application, touch it with your finger.

Touch and Hold 
To enter the available options for an item, touch and hold the item.

Содержание ONETOUCH IDOL 3 6045B

Страница 1: ...e factory settings by pressing and holding the Power key and Volume up key until the startup screen appears Then select reboot system now and press the Power key to confirm Note Please take care when...

Страница 2: ...Y 34 Troubleshooting 36 PROTECTYOUR HEARING To prevent possible hearing damage do not listen at high volume levels for long periods Exercise caution when holding your device near your ear while the lo...

Страница 3: ...off Restart Airplane mode Press and hold the Power key and Volume up key to reset Press and hold the Power key and Volume down key to capture a screenshot Press and hold the Power key for at least 10...

Страница 4: ...should set the following options Language Google Account etc Even if no SIM card is installed your phone will still power on and you will be able to connect to aWi Fi network sign into your Google Acc...

Страница 5: ...g the phone sideways to have a better view 1 3 2 Status bar From the status bar you can view both phone status to the right side and notification information to the left side Status icons GPRS connect...

Страница 6: ...xceeded More notifications are hidden Touch and drag the Status bar down to open the Quick setting panel or Notification panel Drag up to close it When there are notifications you can touch them to ac...

Страница 7: ...set the ringer media and phone ringtone volumes to your preference by pressing the Volume up down key or touching Settings Sound notification Media volume to set the volume 2 Text input 2 1 Using Onsc...

Страница 8: ...and select Call Touch to send message to the previewed number Touch to call the previewed number Slide to access the RECENT and CONTACTS menu Touch to hide display keyboard Display the suggested numb...

Страница 9: ...phone to your ear During an active call if the phone must be taken away from your ear eg switching hands or to the other ear please use caution not to use the phone in an orientation opposite that of...

Страница 10: ...your SIM card touch the icon from the Messaging screen then touch Settings Manage SIM messages 5 1 Write message On the message list screen touch the new message icon to write text multimedia messages...

Страница 11: ...t of the message Touch to add an attachment Finally touch to send If you do not want to send the mail right away you can touch the icon and Save draft keys or touch the Back key to save a copy 7 Getti...

Страница 12: ...etc 7 4 Sharing your phone s mobile data connection You can share your phone s mobile data connection with a single computer via USB cable USB tethering or with up to eight devices at once by turning...

Страница 13: ...system and application settings and any downloaded applications If you reset the phone in this way you re prompted to re enter the same kind of information as when you first started Android If you are...

Страница 14: ...e of wireless mobile phones and their accessories in the areas where you drive Always obey them The use of these devices may be prohibited or restricted in certain areas When driving do not use your m...

Страница 15: ...rtant information stored in your mobile phone Some people may suffer epileptic seizures or blackouts when exposed to flashing lights or when playing video games These seizures or blackouts may occur e...

Страница 16: ...HONE MEETSTHE GOVERNMENT S REQUIREMENTS FOR EXPOSURE TO RADIO WAVES Your mobile phone is a radio transmitter and receiver It is designed and manufactured not to exceed the emission limits for exposure...

Страница 17: ...t may cause undesired operation Your mobile phone is equipped with a built in antenna For optimal operation you should avoid touching it or degrading it As mobile devices offer a range of functions th...

Страница 18: ...y be compatible with their hearing devices This device is HAC M3 compatible Reference ANSI C63 19 2011 FCC ID 2ACCJN001 1 It depends on countries For more information please visit our Website http www...

Страница 19: ...ng guidelines Rooted devices Damage as result of physical abuse regardless of cause There are no express warranties whether written oral or implied other than this printed limited warranty or the mand...

Страница 20: ...he battery power is empty for a long time it may take around 20 minutes to display the battery charger indicator on the screen Make sure charging is carried out under normal conditions 0 C to 40 C Whe...

Страница 21: ...Check your phone memory availability as it might be full Contact your network operator to check service availability and check MMS parameters Verify the server center number or your MMS profile with...

Страница 22: ...owing prolonged calls game playing internet surfing or running other complex applications This heating is a normal consequence of the CPU handling excessive data Ending above actions will make your ph...

Страница 23: ...ion Ltd Copyright 2015 TCL Communication Ltd All rights reserved TCL Communication Ltd reserves the right to alter material or technical specification without prior notice All Signature ringtones embe...

Отзывы: