ALC AWF33-S2 Скачать руководство пользователя страница 4

— 2 —

IMPORTANT SAFETY INSTRUCTIONS

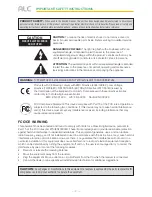
CAUTION:

 To reduce the risk of electric shock do not remove cover (or 

back). No user serviceable parts inside. Refer servicing to qualified service 
personnel.

DANGEROUS VOLTAGE: 

The lightning flash with arrowhead, within an 

equilateral triangle, is intended to alert the user to the presence of  
uninsulated dangerous voltage within the product’s enclosure that may be 
of sufficient magnitude to constitute a risk of electric shock to persons.

ATTENTION:

 The exclamation point within an equilateral triangle is intended 

to alert the user to the presence of important operating and maintenance 
(servicing) instructions in the literature accompanying the appliance.

Products with CE Marking comply with EMC Directive (2004/108/EC); Low Voltage
Directive (73/23/EEC); R&TTE(1999/5/EC); ROHS Directive (2011/65/EU) issued by 
the Commission of the European Community. Compliance with these directives implies 
conformity to the following European Norms:
 

EMC: EN 301 489     LVD: EN 60950     Radio: EN 300 328

PRODUCT SAFETY: 

 When used in the directed manner, this unit has been designed and manufactured to ensure your 

personal safety. Improper use of this product can result in potential electrical shock or fire hazards. Please read all safety and 
operating instructions carefully before installation and use, and keep these instructions handy for future reference.

WARNING: 

 TO PREVENT FIRE OR SHOCK HAZARD, DO NOT EXPOSE THIS UNIT TO RAIN OR MOISTURE.

CAUTION

RISK OF ELECTRIC SHOCK

DO NOT OPEN


FCC Compliance Statement: This device complies with Part 15 of the FCC rules. Operation is 
subjected to the following two conditions: (1) this device may not cause harmful interference, 
and (2) this device must accept any interference received, including interference that may 
cause undesired operation.


FCC/CE WARNING

This equipment has been tested and found to comply with limits for a Class B digital device, pursuant to 
Part 15 of the FCC rules and ETSI(EN) 300328. These limits are designed to provide reasonable protection 
against harmful interference in residential installations. This equipment generates, uses, and can radiate 
radio frequency energy, and if not installed and used in accordance with the instructions, may cause harmful 
interference to radio communications. However, there is no guarantee that interference will not occur in a 
particular installation. If this equipment does cause interference to radio or television equipment reception, 
which can be determined by turning the equipment off and on, the user is encouraged to try to correct the 
interference by one or more of the following measures:
•   Reorient or relocate the receiving Antenna.
•   Move the equipment away from the receiver.
•   Plug the equipment into an outlet on a circuit different from that to which the receiver is connected.
•   Consult the dealer or an experienced radio/television technician for additional suggestions.

CAUTION: 

 Any changes or modifications to this equipment not expressly approved by the party responsible for 

compliance could void your authority to operate the equipment.

Содержание AWF33-S2

Страница 1: ...s completely before operating this product Model AWF33 S2 Wireless Made Simple Remote Monitoring Anytime from Anywhere Waiting for Raul s pic Full HD 1080p Indoor Pan Tilt Security Wi Fi Camera with S...

Страница 2: ......

Страница 3: ...nnecting Via the Apple App 15 Installing the Door Window Sensors 19 ALC SightHD App Icons 20 To Set the Camera s Home Default Point s 23 To set the Door Window Sensors Home Positions 26 Activating and...

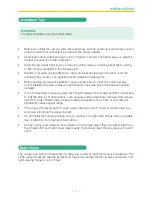
Страница 4: ...IT TO RAIN OR MOISTURE CAUTION RISK OF ELECTRIC SHOCK DO NOT OPEN FCC Compliance Statement This device complies with Part 15 of the FCC rules Operation is subjected to the following two conditions 1 t...

Страница 5: ...highly recommended that the video equipment be connected to a surge protector Doing so will protect the equipment from damage caused by power surges Surge protectors should bear the UL listing mark or...

Страница 6: ...fall causing serious damage to the product Use this camera only with a cart stand tripod bracket or table recommended by the manufacturer or sold with the product Any mounting of the product should f...

Страница 7: ...ns completely before operating this product Model AWF33 S2 Wireless Made Simple Remote Monitoring Anytime from Anywhere Waiting for Raul s pic Full HD 1080p Indoor Pan Tilt Security Wi Fi Camera with...

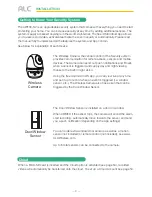
Страница 8: ...6 INTRODUCTION Getting to Know Your Camera Antenna Connector AC In Jack Wi Fi LED MicroSD Slot Light Sensor Microphone front of camera Speaker Siren bottom of camera Internet Jack Reset...

Страница 9: ...nsure a clear line of sight between the camera and Wi Fi router and to limit the amount of obstructions such as walls and tree branches between the camera and Wi Fi router Walls made of heavy building...

Страница 10: ...day and night viewing thanks to the built in night vision Using the free Android or iOS App you can view live at any time and set it up to record when an event is triggered i e window sensor etc The...

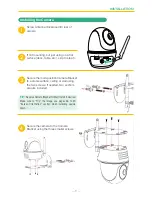
Страница 11: ...ecure the multi position Camera Bracket to a stable surface ceiling or wall using the two screws If needed two anchors are also included xSecure the camera to the Camera Bracket using the three smalle...

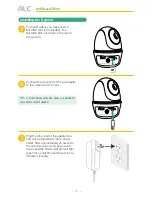
Страница 12: ...of the AC adapter to the camera s AC In Jack VPlug the other end of the adapter to a 120 volt AC standard indoor power outlet After approximately 20 seconds the unit will cycle around and up and down...

Страница 13: ...rtphone or tablet 4 4X or above Recommended Minimum Internet Upload Speed 512Kbps upload speed or bandwidth to achieve up to an average of 2FPS viewing speed Average viewing speed will depend on other...

Страница 14: ...follows APPLE DEVICE From your iPhone or iPad go to the App Store and search for ALC SightHD ANDROID DEVICE From your Android smartphone or tablet device go to Google Play and search for ALC SightHD...

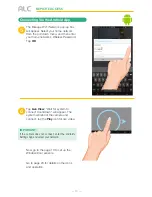
Страница 15: ...ns blinking the camera is ready to be set up Launch the ALC SightHD App and the Setup Wizard screen will appear Tap to add new system vTap WiFi Cameras wTap Next The App will start the connection proc...

Страница 16: ...k s Wireless Password Tap OK UTap Live View Wait for system to connect Countdown will appear The system will reboot the camera and connect tap the Play icon for live video Now go to the page 19 to set...

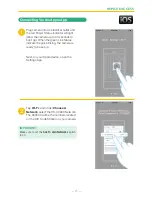
Страница 17: ...conds to boot up When the green Link Status indicator begins blinking the camera is ready to be set up Next on your Apple device open the Settings App vTap Wi Fi and under Choose A Network select the...

Страница 18: ...the Apple App REMOTE ACCESS wWhen asked for a password enter 12345678 Tap Join to connect xNow Launch the ALC SightHD App and the Setup Wizard screen will appear indicating the setup instructions Tap...

Страница 19: ...17 REMOTE ACCESS Connecting Via the Apple App yThe Apple Device will now search for the camera UOnce the screen indicates the camera is connected Tap Live View HD 000011 has been connected...

Страница 20: ...he Apple App REMOTE ACCESS XThe system will reboot the camera please give it up to 90 seconds until the App finishes the count down from 90 Tap still image for live video If camera does not connect ta...

Страница 21: ...oor Window sensors See page 23 to set the camera s home default points and page 26 to install the door window sensor home positions vSelect a location on a door or window The large section of the sens...

Страница 22: ...con to access the live video screen See the next page for icon descriptions Live View Screen The following icons appear when on the Live View Screen See next page for icon descriptions If desired rota...

Страница 23: ...this icon to refresh the camera s connection Tap this icon to enter the Setup PIN Lock Set the Notify Setting Set Video Hardware Acceleration or check the version information See page 42 Tap this icon...

Страница 24: ...Press to hear the sound of the camera s microphone through the SightHD App Tap again to mute the sound Tap to return to the Main screen Tap to Set the Record Point or to Go to the Record Point See ne...

Страница 25: ...in screen tap to remote view the live screen Follow steps 2 and 3 to set the desired base location which will be the camera s default base home point Usually best to set it to the center of the room v...

Страница 26: ...nd Tilt To move the camera simply slide your finger across the Android or Apple Device s screen up and down or from side to side xTap the PTZ icon and the Record Point box will appear To Set the Camer...

Страница 27: ...2 through 5 to set the Point 2 and Point 3 positions UTo Return to the Default positions To return the camera to the default positions tap the PTZ icon and then tape the desired Go to recent point ic...

Страница 28: ...s activated this unit will automatically go to the sensor s home point and record for 1 minute and then return to the default position You will also get a notification via email and or text depending...

Страница 29: ...EMOTE ACCESS To set the Door Window Sensors Home Positions wTap on the Advanced icon xEnter your Admin password Default was 123456 unless it was changed then tap OK The Advanced Settings screen will a...

Страница 30: ...yTap on Base Settings then tap Sensor Setup On this screen you can tap Add Sensor Device to add additional sensors you have purchased Up to 6 total sensors can be connected to the camera UTap on MAG 0...

Страница 31: ...ame the Sensor Name if desired Tap the Camera Pan Control icon and then set the position of the front door window sensor s position using the Pan and Tilt as shown on pages 23 and 24 WTap the Save ico...

Страница 32: ...twice top left to go back to the Setting screen atSave the changed settings by tapping the Save icon in the top right If any changes were made tap Yes to update the system when the notification appear...

Страница 33: ...e When ARMED if the sensor trips the camera will sound the alarm start recording automatically move towards the sensor and send you a push notification depending on the App settings From the main scre...

Страница 34: ...assword pop up box will appear xEnter your Admin password Default was 123456 unless it was changed then tap OK The unit will now be armed If the sensor trips the camera will sound the alarm start reco...

Страница 35: ...33 REMOTE ACCESS To Take Snapshots uFrom the Main screen tap the Play icon to access the Live Video screen vPINCH AND ZOOM To zoom in or out use the simple pinch and zoom gesture...

Страница 36: ...the Snapshot icon to take a snapshot of the current image Snapshot is successful will appear briefly To View Snapshots FOR iOS Your snapshots will be named with the time stamp and saved into the Camer...

Страница 37: ...35 REMOTE ACCESS To Take Videos uFrom the Main screen tap the Play icon to access the Live Video screen vPINCH AND ZOOM To zoom in or out use the simple pinch and zoom gesture...

Страница 38: ...Android or Apple Device s screen up and down or from side to side xTap the Record icon to start recording the Record icon will appear and the App will record for approximately one minute See the foll...

Страница 39: ...Videos uFrom the main screen tap the Edit Setting icon vTap the Events icon the Select Event Filter pop up will appear For Apple see note below APPLE You must tap the Search Magnifying glass icon to b...

Страница 40: ...Select the desired Start Time Date of the videos you want to view by tapping on the respective option date or time and then tapping or to adjust When finished tap Done xRepeat for Stop Time Date then...

Страница 41: ...icon to take a picture DOWNLOAD A VIDEO To download a video to your Android or Apple device tap the Download icon and it will download to your device UTo Set Display Filter To filter the Date Time ag...

Страница 42: ...delete a check mark will appear in the box to the right of the selected file then tap the Delete One icon A pop up box will appear asking you to confirm tap Yes APPLE Tap Delete One will appear next...

Страница 43: ...to confirm tap Yes uMUTE UN MUTE When in the SightHD App tap the Speaker icon to hear the sound of the camera s microphone through the SightHD App Tap again to mute the sound vMICROPHONE To speak thro...

Страница 44: ...42 REMOTE ACCESS Information Screen Options uFrom the main screen tap the Information icon a pop up will appear vTo view information Version etc tap About...

Страница 45: ...o Hardware Acceleration APPLE DEVICES u Launch Settings System Preferences from your Home screen on the Apple device v Tap Notification Center a list of Apps will appear w Scroll down to find ALC Sigh...

Страница 46: ...een Options yTo Setup the Pin Lock tap Setup PIN Lock UTap the Enable Lock When Starting switch to enable or disable the Pin Lock TIP Setting a PIN Lock code will prevent others from activating the ap...

Страница 47: ...REMOTE ACCESS Information Screen Options VUsing the keyboard enter a four digit code Then confirm this exact code WNow that the Pin is set and enabled whenever the App is opened you must enter this c...

Страница 48: ...46 REMOTE ACCESS Setting Screen uFrom the main screen tap the Edit Setting icon vTap the Setting icon the System Information Screen will appear...

Страница 49: ...47 REMOTE ACCESS Setting Screen wOn this screen you can change the name of your System camera and access the Advanced Settings menu...

Страница 50: ...48 REMOTE ACCESS Advanced Settings uFrom the main screen tap the Edit Setting icon vTap the Setting icon the System Information Screen will appear...

Страница 51: ...REMOTE ACCESS Advanced Settings wTap on the Advanced button xEnter your Admin password Default was 123456 unless it was changed then tap OK See the following pages for descriptions of advanced settin...

Страница 52: ...loud storage See page 50 to Setup a Cloud Account TIME ZONE Tap to change set the Time Zone where the camera is located WI FI SETTING The Wi Fi setting allows you to choose the home network and setup...

Страница 53: ...his camera is used outdoors not recommended LOW LIGHT ENHANCEMENT Tap to set the Low Light Enhancement 5 will provide the brightest enhancement and 1 the lowest SCREEN ORIENTATION Tap to select the de...

Страница 54: ...he tree branch is in the video uUse the Quick De Select and or Tap Screen option to manually mask a block anywhere on the screen the block will turn black To un mask a block simply tap it again vUse t...

Страница 55: ...is full Tap on Device Settings and the Device setting options will appear Perform the following on this screen PROFILE SETTING Tap and then select one of the following SAVE Tap to save the current Adv...

Страница 56: ...le Drive or Dropbox account To sign up for a free account go to www google com drive www dropbox com There is no charge from ALC to use this feature It is free Cloud Account Setup uAfter setting up yo...

Страница 57: ...ccount Setup REMOTE ACCESS xOn the Sign in screen tap Create yTo create your Cloud account enter a valid email address and create a password Agree to the privacy policy Enter the verification code and...

Страница 58: ...ccount Setup UAfter creating the account a welcome screen appears Tap OK to dismiss the message VWhen the Device List appears tap on the desired option Google Drive or Dropbox to create the binding RE...

Страница 59: ...Dropbox account Enter your email and password and tap Sign in Congratulations Your Cloud setup is complete Now you can access videos anywhere by simply going into the Google Drive or Dropbox website...

Страница 60: ...n the camera lens and glass it will affect the night vision capability The infrared light reflects off of the dust and grime limiting the camera s vision Use a microfiber cloth to regularly clean the...

Страница 61: ...properly configured in App Make sure the mobile device is connected to 3G 4G Wi Fi properly Clean the camera lens using a microfiber cloth Ensure the MicroSD card is inserted into the camera There mig...

Страница 62: ...rrect time zone Confirm the system date time of the mobile device to ensure correct operation Clock will set itself when connected to the internet Make sure the system is connected properly to the int...

Страница 63: ...150 M in open space Camera Resolution Single Camera 1920 x 1080 Operating Temperature 14 F 122 F 10 C 50 C Operating Voltage DC 5V 1 5A Current Consumption 500 mA MAX Night Vision 35 ft Dimensions 4 9...

Страница 64: ...62 WARRANTY One Year Limited Warranty...

Страница 65: ...63 WARRANTY...

Страница 66: ...Wireless Made Simple 050317_v1 1 ALCWireless com...

Страница 67: ...Wireless Made Simple www ALCWireless com...

Отзывы: