


User Manual Albrecht GP 1
26
7.
Taking a trial run with Your GP 1
Now that you are familiar with the GPS page features and what functions they convey, it’s time to take
a short trip to test your navigation skills. You’ll need a relatively open area to perform this exercise.
Let’s begin by marking your current location; this can be considered a waypoint, so it can be used to
guide you to your starting point on your return trip.
Please remember
: After switching on, the unit will
first show the last measured position together with “
SEARCHING
”.
You should wait, until
“
NAVIGATION
” appears in the display, before You start walking!
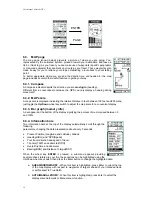
7.1.1. Mark Your first waypoint
Mark your current position as follows:
•
Make sure all desired parameters for your trip are arranged using the SETUP
menu.
•
Press the Mark (M) button; the
MARK (WAYPOINT)
page appears. Since the
GMR-GPS unit has now fixed your location, the display will show a default mark of
001, followed by the coordinates specifying your initial position.
•
Highlight the
SAVE
field and press Enter.
Tip:
If You want to prepare waypoints for Your later trips already at home, You can
repeat this
MARK
procedure for the number of waypoints You will need. You can later
edit these waypoints according to 7.1.3. or 7.1.4.
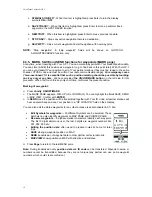
7.1.2. Transmitting data via radio link to others:
If You like, You may now transmit the just marked waypoint to Your partner stations. Highlight the
SEND field with
UP/DOWN
and confirm with
ENTER
. To have a good communication range, take care
that the antenna is in the upright position and hold Your GP 1 as high as possible during SEND
procedure. Within of less than 2 seconds Your GP 1 will transmit Your ID code together with the just
marked position to Your partner(s). All people in Your communication range, working on the same
chennel and with the same CTCSS code, will automatically receive Your call with a beep tone. They
will all see a GP LOCATOR window with Your ID code and Your present position data.
In emergency cases:
Die
MARK(M)
button can be used
anytime
, regardless of the menu You are
just using, to capture Your actual position. Sailors now this mode well under “Man-Over-Board“ mode.
The next Stepp is only highlighting the SEND field with
UP/DOWN
and confirm with
ENTER
.
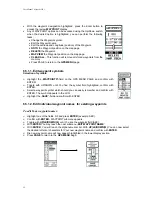
7.1.3. Select a descriptive symbol for Your waypoint
To make your trip more enjoyable, let’s give your initial position a more descriptive symbol and name
before you commence your trip.
To Change the Location Symbol:
•
With the
MARK (WAYPOINT)
page displayed, use the Up/Down wheel key to
highlight (box) the position symbol; then press the Enter button.
•
The Symbols screen appears with the current symbol highlighted.
•
Scroll through the symbols using the Up/Down wheel key and select one that
more closely describes your location. Then press Enter. The
MARK
display
reappears with the new symbol adjacent to the location name.
•
Highlight the
SAVE
field and press Enter; the
MARK
screen reappears.
Содержание GP 1
Страница 1: ...User Manual Albrecht GP 1 1 Instruction Manual GP 1 ALAN Electronics GmbH www albrecht online de ...
Страница 33: ...User Manual Albrecht GP 1 33 ...
Страница 34: ...User Manual Albrecht GP 1 34 ...
Страница 35: ...User Manual Albrecht GP 1 35 ...
Страница 36: ...User Manual Albrecht GP 1 36 ...