32
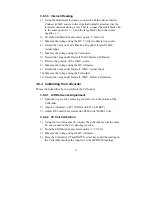
NOTE
: Rapidly pressing the arrow keys changes the value displayed
by large increments. If a small change is needed, press the arrow
keys for about a second.
5) Select the Multimeter mode and verify the reading matches the input
level. If the reading is off by more than 0.1%, return to the
Calibration menu and readjust the calibration value with the arrow
keys. After readjustment, return to the Multimeter mode and repeat
this step.
6) Record the calibrated value displayed in the Multimeter mode on the
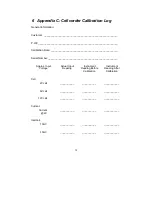
Calibration Log under Cell: 2V After Calibration.
3.8.4.3 6V Cell Calibration
1) Using the two voltage leads, connect the Cellcorder across the same
6V source used in the
Cell Readings
section.
2) From the Calibration menu, select option 2 - 6V Cell.
3) Measure the voltage using the HP voltmeter.
4) Press the UP and DOWN arrow keys until the reading on the
Cellcorder matches the HP DMM reading.
5) Select the Multimeter mode and verify the reading matches the input
level. If the reading is off by more than 0.1%, return to the
Calibration menu and readjust the calibration value with the arrow
keys. After readjustment, return to the Multimeter mode and repeat
this step.
6) Record the calibrated value displayed in the Multimeter mode on the
Calibration Log under Cell: 6V After Calibration.
3.8.4.4 12V Cell Calibration
1) Using the two voltage leads, connect the Cellcorder across the same
12V source used in the
Cell Readings
section.
2) From the Calibration menu, select option 3 - 12V Cell.
3) Measure the voltage using the HP voltmeter.
4) Press the UP and DOWN arrow keys until the reading on the
Cellcorder matches the HP DMM reading.


