


5
INSTALLATION GUIDE FOR
ALASKA THERMOSTAT SYSTEM
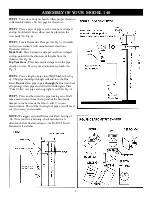
STEP 1
Locate wall thermostat and
thermostat control box. Plug timer control
box into Feeder/Feeders. Attach timer
control box securely to hopper or wall.
STEP 2
Light stove as described in stove
manual. Be sure thermostat wire leads are
not connected together. Adjust lower
knob, to number 4 and allow fire to
stabilize. Adjust lower knob down
allowing 15 to 20 minutes between
adjustments until you have about 1 inch
of burning coal on the grate from side to
side.
STEP 3
Connect thermostat wire leads
together. Adjust top know to number 4.
Allow fire to stabilize. Slowly adjust upper
knob higher, until desired fire size is
achieved.
STEP 4
Disconnect thermostat wire
leads. Run wire to desired location, attach
wall thermostat. Adjust wall thermostat to
desired temperature.
NOTE:
Low fire and high fire setting may
vary depending on desired heat output.
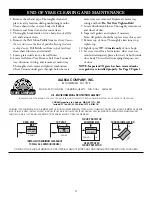
Locate
Glass Box
which will include gaskets and
instructions. Install glass. Re-hang door.
NOTE:
Some
models come with glass installed. If your stove is ordered
with the optional clean glass system, locate stainless steel
screen
(packed inside stove body).
This screen helps to
prevent fly ash from attacking the glass. Install the screen
so the bottom rests on the Channel inside the stove body
below the View door, and the top will lean against the
metal plate welded to the top of your stove.
NOTE:
Install screen after stove is lit. Use hearth or stove gloves
to install screen.
Top Vent Stove Only
- This unit is sent to you with a
brick
attached to the inside back of stove. This
component is removable which serves two purposes:
a) Slide
brick
, opens for cleaning of fly ash and to allow
you to adjust for better draft on warm days
(Keep
closed
in colder months. Slide
open
in warmer months.)
b) For access to clean the stove’s vent system. Please
locate
brick
at this time. Open viewing door, look inside
stove through door opening. The brick will be between
two metal channels, about 4" from the top of your stove.
Locate holes in back of stove body. This is where your
stove vents.
The two holes should be cleaned every 4
to 6 weeks with a vacuum or brush. NOTE: Entire
vent system should be cleaned every 4 to 6 weeks.
This may vary depending on chimney draft.
STEP 5 Attaching Power Cords
- Plug the female cord
from the rheostat into the male cord coming from the
blower.
NOTE:
The rheostat acts as a speed control and
an off/on switch for the blower. It can be attached to the
side of the hopper or wall using Velcro tape. Plug the
male end of the feeder cord into a 110v wall outlet
(See
Fig. 2 C.M.)
STEP 6 Position Stove
- Align stove pipe and screw
pipe to vent hole
(See Assembly of Stove Pipe).
STEP 7
Place the steel of optional cast top on stove. If
you have a Kast Console III model, the top comes in 3
pieces. Position the center piece first, then the sides.
Channing III has a single piece tope.


