


STARTING YOUR STOKER STOVE FIRE
10
CAUTION:
Dry out your masonry chimney before
starting your stove.
CHIMNEY SYSTEM
- Make sure it is clean and free of
any debris. Moisture in a new chimney or a cold chimney
does not allow for proper drafting of flue gas. Dry out
and warm up a chimney by:
• Open clean-out door, build a small wood fire for ten
minutes. OR place wadded newspaper on floor of
Stoker and burn paper for 10 minutes… Add paper as
needed.
• If you should smell
sulfur at any time
- Turn the unit
off - Open doors and windows.
• Initial burning of your stove will cause the paint to cure
(smoke).
Ventilate area by opening window.
• If your home is well-insulated, have a fresh air inlet
installed - open a window (1") while your stove is
operating.
• On your first day of operation, we suggest you start
your stove early in the day to allow the curing process to
occur and to allow time to understand your stove.
1) Fill hopper with dry coal
2) Dry out your masonry chimney with a separate wood
kindling fire for twenty minutes. Build this fire in
cleanout door or on bottom of stoker.
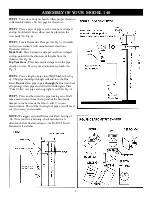
3) Mount your
Auto Heat control box
securely to a wall
near your stove.
Do not mount on stove body!
4) Place fire starter on grate, cover with coal, light tail
close viewing door and wait until starter head is
burning.
5) Plug power cord into your wall outlet.
6) Set your “Auto Heat” dial to setting #2.
7) In 20-30 minutes your fire becomes fully established.
8) Adjust your Auto Heat dial to your comfort -
REMEMBER - a setting of 1 is approximately a
low fire.
Always operate stoker with both doors closed.
Always test your gas alarm as per instruction.
BEFORE YOU CALL US…
Not Enough Heat
• Check to see if holes in grate are clogged… clean. Make
sure under grate is free of coal fines. This can be done
by lifting the grate off the feeder housing.
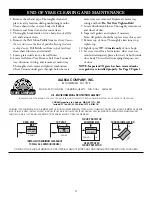
CAUTION:
Make sure when replacing grate, the gasket
material is in place both around the bottom of grate
and on rear of grate
(See Fig. 3).
• Make sure there are no cracks in grate.
• Make sure plastic wheel on gear assembly is intact and
clean of any dirt or dust
Black Dust
• Dirty coal or dry coal should be dampened.
• Turn off blower rheostat or unplug main cord when
pouring coal into hopper or changing ash buckets.
• Make sure air space is between top of stove and main
stoker body is clear of coal dust.
Sulfur Fumes
• Make sure hopper is not being filled with soaking wet
coal.
NOTE: Allowing moisture to build up in Hopper
will cause rusting and severely damage your feed
system, voiding all warranties.
• Make sure space between the hopper and stoker is clear
of coal.
• Make sure gasket is intact.
• Make sure stove pipe is clear of fly ash.
• Important - check elbow closest to stove.
• On Channing III clean behind draft tubes by grate.
Hopper Fire
• Do you have a Barometric Damper on Stove?
• Check grate - is there a crack?
• Is the gasket and/or strongback intact on grate?
• Is gasket between feeder and hopper missing?
• Check size of coal - it might be too large. You should
use rice coal.
Moisture in Hopper
• Check behind slide brick for fly ash buildup.
• Do you have excessively wet coal?
• Is your stove pipe blocked?
• Do you have good draft?
• Remove Pipe; clean exhaust holes.
INSTALL A GAS ALARM!!!


