3
INSTALL CYLINDER
1. Install Cylinder if not already installed at the factory.
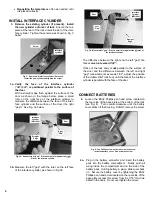
Screws A & B (see Fig. 1) are correctly set at factory. If
it is difficult to screw in the cylinder, loosen the two
screws near the actuator (A) one turn. If you find the
cylinder is still difficult to screw in, then loosen the other
screws (B) one turn.
Do not loosen the screws all the
way or it may be difficult to replace them properly!
Note:
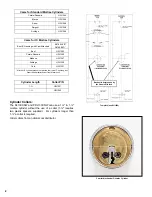
The trim is manufactured to use a 1-1/8" or
1-¼"
Alarm Lock
mortise cylinder with a HW-1302 cam.
If the cylinder that will be used is longer than 1-¼", a col-
lar must be utilized. Please see the collar information on
the previous page.
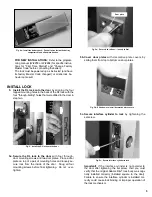
1a. Insert key
half-way
into the cylinder, then screw it in.
See Fig. 1a. If cylinder will not seat flush, the cylinder
back stop screw may require loosening. Cylinders that
are longer than 1-¼" will require a collar, which will stick
out from the surface when correctly installed. Please
see the cylinder infor-
mation on the previous
page.
1b. After the cylinder is screwed in all the way, center
the keyway toward the bottom
(see Fig. 1b). If an
interchangeable core cylinder is utilized, then center the
interface toward the bottom. Tighten the screws that
were loosened in step 1.
1c. Remove the key. Use a 1/16" hex wrench to screw
the cylinder
back stop
screw in fully. (See Fig. 1c)
The key should now only rotate
counterclockwise
.
NOTE:
To remove cylinder, reverse steps 1a-1c.
PREPARE DOOR FOR "THROUGH-
BOLTING"
2. Place template (WI1459) as shown.
Important
: Place
the template on top of existing cylinder hole and
parallel
to the door edge.
2a. Drill
completely
through the door for through-bolting
the four mounting holes and battery cover access
bolt hole.
IMPORTANT!--Drill the holes STRAIGHT
THROUGH the door, or the through-bolts will not
fit in the lock! THIS IS ESSENTIAL! Drill slowly
and
STRAIGHT
through the door.
Fig. 1a: Insert key 1/2 way into
cylinder and screw in
Fig. 1b: Center keyway toward bottom
Fig. 1c: Use 1/16" hex wrench to screw in the cylinder back
stop screw
Fig. 2: Template (WI1459)
through-bolt holes (circled)
Fig. 1: Install Cylinder if not already installed at the factory
A
B
Cylinder
back stop
screw
Содержание Networx DL1325NW
Страница 7: ...7 This page intentionally left blank...

