background image

-  13  -

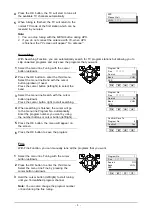
Press the MENU button.
Select the menu line Feature with the cursor
button (up/down).

Press the OK button to enter the second menu.
Press the cursor button (left/right) to select the
time.

Press the OK button, the menu will disappear.

Note:

1. Select the time to 0 MIN to cancel the sleep timer.
2. One minute before switching off a text

1 MIN OFF

will appear on the screen.

Sleep timer

With the sleep timer, you can set your television to switch off automatically after a period with one of
four default time intervals (30, 60, 90, 120 minutes).

Picture
Feature
Setup

Sleep Timer

60

Ok

M

I.P.C.(Intelligent Picture Control) Function

There are four different picture settings available.
Personal (adjustable picture level)
Natural (natural picture level)
Sharp (a daylight level)
Cinema (a setting for viewing in a dimly lit room)

Select the required setting from the four alternatives
by pressing the I.P.C. button repeatedly. The last
selection will be memorized.

Blue background

When no signal is received, the on-screen background
will be switched to blue background.

D.C.C.(Digital colour control) Function

You can enjoy the powerful screen colour by the D.C.C.
function. Press the D.C.C. button repeatedly on the
remote control to switch the DCC On or Off.

DCC On: tone up the colour.
DCC Off: tone down the colour.

Natural

DCC    Off

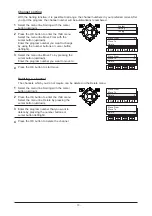
Press the MENU button.
Select the menu line Feature with the cursor
button (up/down).

Press the OK button to enter the second menu.
Select the menu line Language with the cursor
button (up/down).
Press the cursor button (left/right) to select the
language you prefer.

Press the OK button, the TV will store your
selection automatically.

Language selection (option)

Picture
Feature
Setup

Sleep Timer

0

Language

English

Ok

M


I.P.C


D.C.C

Содержание CT-T29P32S

Страница 1: ...COLOUR TELEVISION CT T29S32S Operator s manual Operator s manual 1 15 ...

Страница 2: ... sorting 10 Deleting a channel 10 Daily use 11 Switching the TV on and off 11 Child lock 11 Selecting a TV program 11 Sound controls 12 Picture controls 12 Sleep timer 13 Language selection option 13 Before calling a serviceman 14 Specifications 14 Please read this user manual before using your television By following the instructions and operating hints you will ensure top performance for many ye...

Страница 3: ...a 2 En Remove the power plug from the AC power outlet when not using the TV for a long period of time 4 En Warning To prevent fire or shock hazard do not expose this appliance to rain or moisture 1 En To prevent the TV from falling over Not for all models To prevent the TV from falling over due to earth quakes children playing etc place the TV on a stable horizontal surface and secure it by the ho...

Страница 4: ...iods For added protection for this appliance during a lightning storm or when it is left unattached for long periods of time unplug it from the wall outlet and disconnect the antenna or cable system This will prevent damage to the appliance due to lightning and power surges Object and Liquid Entry Never push objects of any kind into this appliance through openings as they may touch dangerous volta...

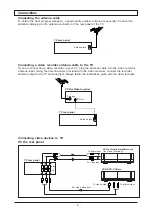
Страница 5: ... cable into the video recorder antenna input Using the antenna cable provided with the video recorder connect the recorder antenna output to the TV antenna input Always follow the instructions given with the video recorder Connecting video devices to TV TV rear panel VCR or Video recorder Antenna RF Out Antenna jack TV rear panel Antenna jack VCR or Audio Amplifiers etc for video recording VCR DVD...

Страница 6: ...ine 2 AUDIO input jacks AV1 3 VIDEO input jack AV1 4 Antenna jack 5 VIDEO output jack 6 AUDIO output jacks TV rear panel 1 Power button 2 Power indicator 3 Remote control sensor 4 Program buttons to select previous next program 5 Volume controls to increase decrease volume 6 MENU MENU OK button 7 AUDIO input jacks AV2 8 VIDEO input jack AV2 9 Headphones jack TV side panel TV front panel 2 1 5 6 4 ...

Страница 7: ...or button left to decrease the volume 11 Cursor button down to select the previous program Remark The MENU MENU OK button and VOLUME PROGRAM buttons on the TV front panel also have the same function available to the menu Fitting and changing the batteries Remove the cover of the battery compartment on the rear of the remote control Insert two 1 5V UM3 AA batteries into the compartment take care to...

Страница 8: ...TV can return to the normal TV mode by pressing the MENU button Picture Feature Setup System Sorting Tuning Colour AUTO Sound Ok M Colour AUTO Ok M Picture Feature System System selection Colour system reception is set to automatic selection AUTO at the factory but if you have any problem with the picture during reception you can manually set the colour and sound system which is available in your ...

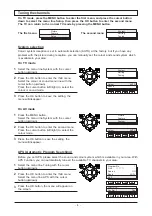
Страница 9: ...nna with TV when APS is finished the TV screen will appear No antenna Searching With Searching Function you can automatically search for TV program stations but allowing you to skip unwanted programs and only save the programs that you want Select the menu line Tuning with the cursor button up down Press the OK button to enter the third menu Select the menu line Band with the cursor button up down...

Страница 10: ...pressing the cursor button up down Enter the program number you want to move to Press the OK button to start move Move From 9 Move To Delete Ok M System Sorting Tuning Move From 9 Move To 14 Delete Ok M Select the menu line Sorting with the cursor button up down Press the OK button to enter the third menu Select the menu line Delete by pressing the cursor button up down Enter the program number th...

Страница 11: ...ock function you can lock all function buttons Press and hold the OK button and then press the button the TV screen will become black and any buttons on the main unit or the remote control become inoperative If you want to switch on the TV press and hold the OK button and then press the button again the TV will return to the normal TV reception Selecting a TV program A To select the program number...

Страница 12: ...y using the volume increase or decrease buttons Note If the headphones are connected to the TV the sound is sent to the headphones not to the speaker Picture controls To display the picture controls menu Press the MENU button Select the menu line Picture with the cursor button up down Press the OK button on the remote control the picture menu will be displayed on the screen Select the menu line Br...

Страница 13: ...ema a setting for viewing in a dimly lit room Select the required setting from the four alternatives by pressing the I P C button repeatedly The last selection will be memorized Blue background When no signal is received the on screen background will be switched to blue background D C C Digital colour control Function You can enjoy the powerful screen colour by the D C C function Press the D C C b...

Страница 14: ...re Coloured stains Remote control malfunction Distorted sound Normal sound Distorted sound Distorted or no sound No sound Normal sound Normal or low level sound Normal sound Check antenna direction location and or antenna connection Interference from electrical appliances cars motorcycles fluorescent lights Adjust the broadcast sound system Check volume level Check mute function Check the earphone...

Страница 15: ... 15 AKAI ELECTRIC CO LTD JAPAN www akai com ...

Отзывы: