background image

GB- 6

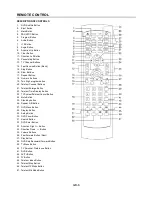
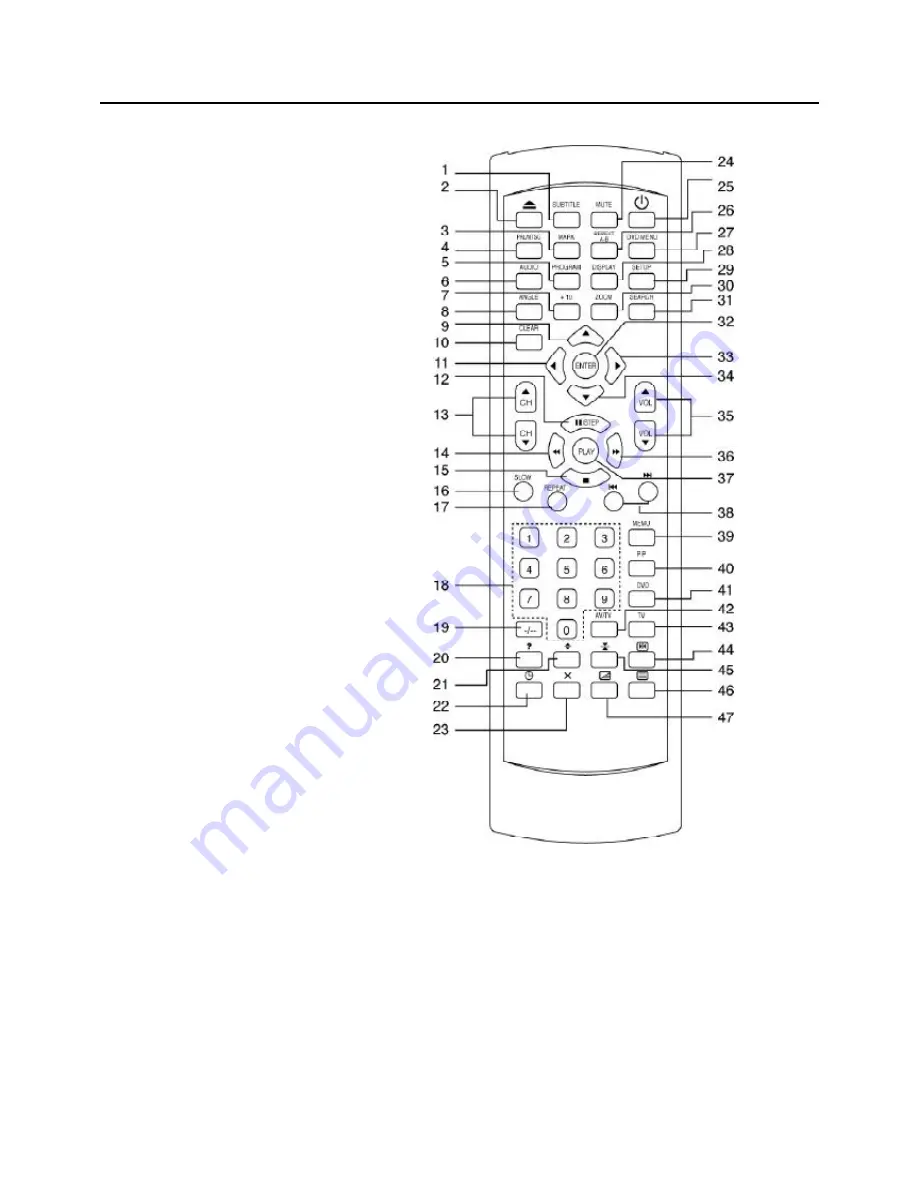
REMOTE CONTROL

DESCRIPTION OF CONTROLS

1.

DVD Subtitle Button

2.

Eject Button

3.

Mark Button

4.

PAL/NTSC Button

5.

Program Button

6.

Audio Button

7.

+10 Button

8.

Angle Button

9.

Direction Up Button

10. Clear Button

11. Direction Left Button

12. Pause/step Button

13. TV Channel Buttons

14. Fast Reverse Button (Back)

15. Stop Button

16. Slow Buttons

17. Repeat Button

18. Numeric Buttons

19. Two Digit program button

20. Teletext Conceal Buttons

21. Teletext Enlarge Button

22. Teletext Time Display Button

23. TV System/Teletext Cancel Button

24. Mute Button

25. Stand-by button

26. Repeat A-B Button

27. DVD Menu Button

28. Display Button

29. Setup Button

30. DVD Zoom Button

31. Search Button

32. DVD Enter Button

33. Direction Right 

Button

34. Direction Down  

Button

35. Volume Buttons

36. Fast Forward Button (Next)

37. Play Button

38. DVD Skip Backward/Forward Button

39. TV Menu Button

40. TV Personal Preference Button

41. DVD Button

42. AV/TV Button

43. TV Button

44. Teletext  Index Button

45. Teletext Stop Button

46. Teletext/TV Mode Button

47. Teletext Mix Mode Button

Содержание CT-S21MTD-E3

Страница 1: ...GB 1 GB 1 16 NL 1 16 F 1 16 21 51CM COLOUR TELEVISION CT S21MTD E3 ...

Страница 2: ...O RAIN OR MOIS TURE TO REDUCE THE RISK OF FIRE ELECTRIC SHOCK OR PICTURE SOUND INTERFERENCE USE THE RECOMMENDED ACCESSORIES ONLY CONTENTS FEATURES 2 IMPORTANT SAFETY INSTRUCTIONS 3 LOCATION OF CONTROLS 5 REMOTE CONTROL 6 ANTENNA CONNECTIONS 7 POWER SOURCE 7 TV OPERATION PRESETTING THE TV CHANNELS 8 CHANNEL SELECT AND VOLUME CONTROL 9 OPERATING WITH REMOTE CONTROL 10 TELETEXT TELETEXT OPERATIONS 11...

Страница 3: ...blocked or covered The openings should never be blocked by placing the product on a bed sofa rug or other similar surface This product should not be placed in a built in installation such as a bookcase or rack unless proper ventilation is provided or the manufacturer s instructions have been adhered to 10 POWER SOURCES This product should be operated only from the type of power source indicated on...

Страница 4: ...e product 19 SERVICING Do not attempt to service this product yourself as opening or removing covers may expose you to dangerous voltage or other hazards Refer all servicing to qualified service personnel 20 DAMAGES REQUIRING SERVICE Unplug this product from the wall outlet and refer servicing to qualified service personnel under the following conditions a When the power supply cord or plug is dam...

Страница 5: ...tton 7 TV AV DVD Button 8 Open Close Button 9 DVD Loader 10 DVDPlay Button 11 DVD Stop Button 12 Earphone 13 Front Video Input 14 Front Audio Input 15 75 ohm Antenna 16 Scart connector 17 S Video out for DVD 18 Video out for DVD 19 Audio out L for DVD 20 Audio out R for DVD 21 Audio digital Out Socket For DVD only ...

Страница 6: ...eal Buttons 21 Teletext Enlarge Button 22 Teletext Time Display Button 23 TV System Teletext Cancel Button 24 Mute Button 25 Stand by button 26 Repeat A B Button 27 DVD Menu Button 28 Display Button 29 Setup Button 30 DVD Zoom Button 31 Search Button 32 DVD Enter Button 33 Direction Right 4 Button 34 Direction Down 6 Button 35 Volume Buttons 36 Fast Forward Button Next 37 Play Button 38 DVD Skip B...

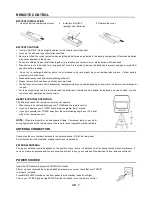
Страница 7: ...ntrol handset be replaced on a yearly basis or when remote control operation becomes erratic REMOTECONTROLOPERATION The following cases the remote control may not operate When there is an obstacle between your TV DVD and the remote control If you try to operate your TV DVD from a distance greater than 7 metres If you try to operate your TV DVD away from the normal viewing angle over 30 either side...

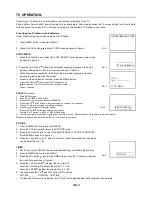
Страница 8: ...art searching up or down the frequency 5 When a TV station is located the station will show 6 Press CH button until Program shows 7 Press the VOL button and select which position To store the TV station i e BBC1 1 BBC2 2 and so on 8 To store the station press the CH button until Store shows Now press the VOL button to store the station Repeat 2 to 7 above and store the remaining TV channels in you...

Страница 9: ...HANNELSELECTANDVOLUMECONTROL 1 Press CH buttons to select TV station TV Mode Only Press CH the program no will appear on the top right corner and change from higher no to lower no Press CH the program no will change from lower no to higher no 2 Press VOL to ADJUST sound level TV AV DVD Mode Button on the main unit If video audio input socket are in use press AV TV Mode button AV will display on th...

Страница 10: ...elect the picture effect PP MILD STANDARD DYNAMIC Stand By Button 25 Press the button to switch ON OFF the picture and sound To switch on the TV from stand by mode just press any desired program number 0 9 Mute Button 24 Press the mute button to switch OFF the sound press once again to switch ON the sound TV Mode Button 43 Press the TV Mode button to select the TV mode TV AV Mode Button 42 Press t...

Страница 11: ...op half of the page at double height text Press again to display bottom half of the page Press again to get full page at normal height text Stop Button More information may follow the page of Teletext you have selected and it is automatically displayed after a short period of time Press button to hold the page Press again to resume automatic page changing Cancel Button x System To switch between T...

Страница 12: ...s the PLAY Button again will resume to Play State DVD Setup Mode Setup Mode provides the menu for the configuration of TV DISPLAY Mode OSD LANGUAGE mode DOLBY Mode AUDIO Mode PARENTAL Mode PASSWORD etc Item selection in the SETUP menu is done by using the Navigation Arrow and the ENTER button To exit the SETUP Mode to press the SETUP button again The initial password for PARENTAL Mode is set at 13...

Страница 13: ...disc Repeat All Subsequent key press of the REPEAT key can change between these two options Repeat AB This function is applicable for DVD and CD audio User can specify the repeating interval by marking the starting point and the end point 1 Press the REPEAT AB Button to mark the starting point Playback will continue 2 Press the REPEAT AB Button to mark the end point The marked part will be repeate...

Страница 14: ...be achieved one by one through subsequent key presses on the ZOOM button NOTE User can select the portion of the picture to be enlarged by using the Navigation buttons 3456 Program Mode This function is applicable for DVD and CD audio User can assign the playback sequence according to his her preference For CD audio user can assign the track sequence while for DVD disc user can assign both the Tit...

Страница 15: ...lect the next song when key in the third digit the third digit number may not appear immediately need to wait for a while Picture CD Digital picture JPEG from a digital camera can be burnt on to a disc and played on this TV Insert a picture CD into the tray and the disc will be loaded automatically If the disc type can be identified the player will start showing the pictures one by one Slide Show ...

Страница 16: ...AL NTSC output Digital audio output Coaxial digital output pin jack S video Y output level 1Vp p 75 Ohm C output level 0 300Vp p 75 Ohm PAL 0 286Vp p 75 Ohm NTSC Headphone Stereo in DVD mode Mono in TV mode GENERALSECTION AC Power Input 230V 50 Hz AC Power Consumption 90W Speaker 3 8ohm x 2 Audio Output 2 5W 2 5W Dimensions 521x 482x 524 5 mm Net Weight 22 7 Kg Specifications subject to change wit...

Страница 17: ...GB 17 ...
Отзывы: