background image

13

SPECIFICATIONS

Model: 

AM-SV0314GR

Battery : 14.4V Ni-MH

Adaptor :

Input: AC 200-240V~ 50/60Hz

Output: DC 25V       200mA

Power: 80W

The Ni-MH batteries in this vacuum cleaner are rechargeable and have a 

service life of many years (depending on use and storage conditions). 

When the batteries eventually expire, they should be removed for 

recycling. Contact your local solid waste

authority for recycling information.

• Always dispose of batteries safely.

• Never dispose of batteries in a fire.

• Never try to dismantle batteries.

• Never short circuit batteries.

1.  Unscrew and disassemble the vacuum cleaner.

2. Pull out the batteries and cut the wires connected.

3. Disconnect the battery terminals with “NON” conductive tape such as 

    packing or insulation tape to prevent accidental short circuit of the 

    battery terminals and place the batteries in a strong plastic bag.

4. Take the batteries to your local recycling station.

REMOVING THE BATTERIES

This appliance should not be put into the domestic garbage at 

the end of its life, but must be offered at a central point for the 

recycling of electric and electronic domestic appliances. This 

symbol on the appliance, instruction manual and packaging 

puts your attention to this important issue. The materials used 

in this appliance can be recycled. By recycling of used 

domestic appliances you contribute an important push to the 

protection of our environment. Ask your local authorities for 

information regarding the point of recycling.

The European directive for batteries (2006/66/EC) states that 

it is not permitted to throw batteries away with the household 

waste. They may contain substances which are harmful to the 

environment. Empty batteries can be handed over to a local, 

public collection point or a local recycling centre. 

EN

Содержание AM-SVO314GR

Страница 1: ...Instruction Manual Size 145 x 210 MM C M Y K PANTONE 185C Cover Color Inner Color K PANTONE 185C 2020 07 30 V2 713017 AM SV0314GR ...

Страница 2: ......

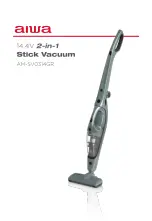
Страница 3: ...ereplő a biztonsági előírásokat A használati útmutatót őrizze meg a későbbikre is Thank you for purchasing your new AIWA AM SV0314GR 14 4V 2 in 1 Stick Vacuum We recommend that you spend some time reading this instruction manual in order that you fully understand all the operational features it offers Read all the safety instructions carefully before use and keep this instruction manual for future...

Страница 4: ...EN HU Instruction Manual English page 4 13 Használati Útmutatót Magyar oldal 14 23 3 ...

Страница 5: ... given supervision or instruction concerning use of the appliance in a safe way and understand the hazards involved Children shall not play with the appliance Cleaning and user maintenance shall not be made by children without supervision 4 Only use the appliance with the supplied power adaptor or charger 5 Check that the voltage marked on the rating label matches your mains voltage 6 Sparks insid...

Страница 6: ...ance in water or other liquids 12 Do not store the appliance in areas with high temperature keep it away from heat sources such as radiators or gas electric fires 13 To disconnect the power cable from the mains socket remove the plug direct do not pull at the power cable 14 If using an extension cord with this product the marked electrical rating of the cord set or extension cord must be at least ...

Страница 7: ...9 Do not use the product to vacuum metal objects such as coins screws nails tacks etc 20 Keep hair loose clothing and body parts away from openings or moving parts especially the part of the product where there is suction 21 Do not point the appliance at the eyes ears or mouth during operation 22 Make sure the dust container is properly installed before use Never use the appliance without the moto...

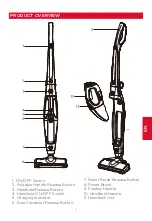
Страница 8: ... 2 Foldable Handle Release Button 3 Handheld Release Button 4 Handheld ON OFF Switch 5 Charging Indicator 6 Dust Container Release Button 7 Power Brush Release Button 8 Power Brush 9 Folding Handle 10 Handheld Handle 11 Handheld Unit EN ...

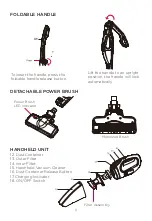
Страница 9: ...er the handle press the foldable handle release button DETACHABLE POWER BRUSH Power Brush LED Indicator Motorized Brush HANDHELD UNIT 12 Dust Container 13 Outer Filter 14 Inner Filter 15 Hand held Vacuum Cleaner 16 Dust Container Release Button 17 Charging Indicator 18 ON OFF Switch Filter Assembly ...

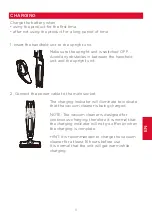
Страница 10: ...t and the upright unit 2 Connect the power cable to the main socket The charging indicator will illuminate to indicate that the vacuum cleaner is being charged NOTE The vacuum cleaner is designed for continuous charging therefore it is normal that the charging indicator will not go off even when the charging is complete HINT It is recommended to charge the vacuum cleaner for at least 16 hours befo...

Страница 11: ... to detach the hand held vacuum cleaner from the upright unit Slide the ON OFF switch to turn the vacuum cleaner on The hand held vacuum cleaner will start to work 2 Vacuum the surface in any direction until the area is clean 3 Slide the ON OFF switch to turn off the hand held vacuum cleaner Slightly lift the vacuum cleaner s head upwards to avoid dust falling out from dust container before switch...

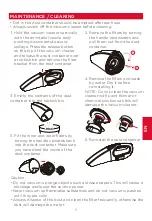
Страница 12: ...ts of the dust container into the rubbish bin 4 Remove the filters and wash by water Dry it before re installing it NOTE Do not clean the vacuum cleaner with paint thinner or chemical solutions as this will damage the vacuum cleaner 5 Fit the inner and outer filters by turning the handle upwards back into the dust container Make sure you have dried the inside of the dust container Caution Do not v...

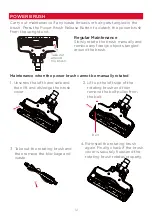
Страница 13: ...y foreign objects tangled around the brush Maintenance when the power brush cannot be manually rotated 1 Unscrew the left hand side and then lift and dislodge the brush cover 2 Lift up the left side of the rotating brush and then remove the belt pulley from the belt B elt 3 Take out the rotating brush and then remove the blockage and waste 4 Re install the rotating brush again Finally check if the...

Страница 14: ...e battery terminals and place the batteries in a strong plastic bag 4 Take the batteries to your local recycling station REMOVING THE BATTERIES This appliance should not be put into the domestic garbage at the end of its life but must be offered at a central point for the recycling of electric and electronic domestic appliances This symbol on the appliance instruction manual and packaging puts you...

Страница 15: ... a készülék biztonságos használatára és megértették a használatból fakadó veszélyeket Gyermekek ne játsszanak a készülékkel A készülék tisztítását és karbantartását csak akkor végezheti gyermek ha Ön ehhez megfelelő felügyeletet biztosít 4 A készülék kizárólag csak a hozzá biztosított tápegységgel és töltővel használható 5 Ellenőrizze hogy a készüléken lévő műszaki adatokat tartalmazó címkén jelze...

Страница 16: ...gett soha ne merítse a hálózati kábelt a hálózati csatlakozót a töltő állomást vagy a készülék egyéb részeit vízbe vagy egyéb folyadékba 12 A készüléket soha ne tárolja magas hőmérsékletű helyen és tartsa távol hőforrásoktól mint pl radiátorok és gáz elektromos melegítő eszközök 13 A hálózati kábelt mindig úgy húzza ki a konnektorból hogy közben mindig a csatlakozót fogja nem a kábelt magát 14 Ha ...

Страница 17: ...ékkel fémtárgyakat mint pl érmék csavarok szögek szegecsek stb 20 Tartsa távol a készüléktől a hajzatot a lenge ruházatot és testrészeit különösen akkor ha működés közben nyitná ki a készüléket mert a mozgó alkatrészek fentiekkel való érintkezése balesetet okozhat mivel ezek a porszívóba beakadhatnak 21 Működés közben ne irányítsa a készüléket a szem a fül vagy a száj irányába 22 Használat előtt g...

Страница 18: ...mb 2 Lehajtható fogantyú kioldó gomb 3 Kézi egység kioldó gomb 4 Kézi porszívó főkapcsoló 5 Töltöttség kijelző 6 Portartály kioldó gomb 7 Power padlókefe kioldó gomb 8 Power padlókefe 9 Lehajtható fogantyú 10 Kézi fogantyú 11 Kézi porszívó ...

Страница 19: ...san a helyére pattan A fogantyú lehajtásához nyomja meg kioldó gombot LEVEHETŐ POWER PADLÓKEFE Power padlókefe LED kijelző Motorizált kefe KÉZI PORSZÍVÓ 12 Portartály 13 Külső szűrő 14 Belső szűrő 15 Kézi porszívó 16 Portartály kioldó gomb 17 Töltöttség kijelző 18 Főkapcsoló gomb Szűrőegység ...

Страница 20: ... és a függőlegesen álló porszívó egység közé ne kerüljön semmilyen akadály 2 Csatlakoztassa a tápkábelt a hálózati csatlakozóhoz A töltést jelző fény világítani kezd ez jelzi a töltés kezdetét FIGYELEM A porszívót folyamatos töltésre tervezték ezért akkor is megfelelően működik ha a töltést jelző fény azután is világít ha a készülék teljesen feltöltődött TANÁCS Használat előtt a készüléket legaláb...

Страница 21: ... ezáltal leválaszthatja a kézi porszívót az álló porszívó egységről Csúsztassa el a főkapcsoló gombot a kézi porszívó elindításához Kezdheti a porszívózást 2 Alaposan porszívózza ki a tisztítani kívánt felületet 3 Csúsztassa el a kézi porszívó főkapcsoló gombját a készülék kikapcsolásához Emelje meg kissé a kézi porszívó szívó részét hogy megakadályozza a por és kosz portartályból való kihullását ...

Страница 22: ...t a szemetesbe 4 Távolítsa el a szűrőket és tisztítsa meg azokat vízzel A szűrőket visszaillesztés előtt mindig teljesen meg kell szárítani FIGYELEM Ne tisztítsa a porszívót hígítóval vagy egyéb vegyszerrel mivel ezek károsítják a készüléket 5 Helyezze vissza a belső és külső szűrőt a kar felfelé való elforgatásával így a szűrők a helyükre kerülnek A portartály mindig legyen száraz mielőtt összesz...

Страница 23: ...ítsa el a beleragadt kosz maradványokat Karbantartás amennyiben a Power kefefej sörtéi elakadtak és kézzel nem forgathatók 1 Csavarja le a baloldalit rögzítőt majd emelje fel hogy eltávolíthassa a kefefej fedelét 2 Emelje fel a forgókefe bal oldalát majd távolítsa el a szíjról a forgókefét Belt 3 Vegye ki a forgókefét és távolítsa el róla a beleakadt koszt 4 Szerelje össze a forgókefefejet A végén...

Страница 24: ...az akkumulátoron Helyezze az akkumulátort egy erős nagy súlyt is elbíró műanyag zacskóba Vigye az akkumulátort az erre kijelölt szelektív hulladékgyűjtő helyre AZ AKKUMULÁTOR ELTÁVOLÍTÁSA Ez a jel a terméken vagy a kísérő dokumentációban arra hívja fel a figyelmét hogy az elektromos vagy elektronikus termék nem dobható a háztartási hulladék közé A megfelelő ártalmatlanításhoz és újra hasznosításáh...

Страница 25: ...Importőr Imported by Varr Ker Kft 2046 Törökbálint DEPO PF 7 Hungary ...

Отзывы: