Air Quality Engineering SMOKEMASTER C-12 Скачать руководство пользователя страница 7

both directions.  This makes it easy to fasten the 
air cleaner directly to the ceiling framework with 8 
inch lag screws.  Leave space for the power cord 
to run between the top of the C-12 and the ceiling, 
The power supply cord must not be concealed 
above ceilings or behind walls. 

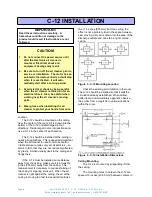
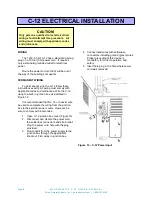
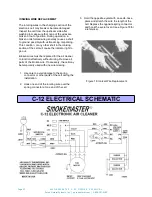
Note in Figures 7 and 8 that the C-12 is not 

suspended from the top but rather from the 
venturi plate, which is heavier metal and 
designed to support the entire device.


Figure 7 

– C-12 Lag Screw Placement


Figure 8 

– C-12 Threaded Rod Placement


Be sure that you select a strong structural part 

of the ceiling.  Do not fasten it to a false ceiling or 
to plaster or plaster-board. In some cases, it may 
be necessary to construct some type of framing 
strong enough to support the weight of the C-12. 

The C-12 may also be mounted using 3/8 

in. [10 mm] diameter threaded steel rods 
available in many hardware stores. Four steel 
rods will be required.


WALL MOUNTING


Two wall mounting brackets are used to 

support the C-12. They are included in an 
accessory package along with a blank plate to 
block off the outlet louvers on the side of the air 
cleaner which will be against the wall. 


The two brackets must be mounted on the wall 

16 inches [406.5 mm] between centers so that the 
long bolts will line up with the air cleaner mounting 
holes.  The brackets should be securely fastened 
to the wall studs with lag screws. On masonry 
walls, use appropriate screw anchors. 


Use the blank metal plate to block off the 

louvered outlet on the side of the air cleaner that 
will face the wall. Use the 2 screws with nuts and 
washers to fasten this plate to the louvers. 


Figure 9 

– Wall Mounting the C-12


Page 7

S M O K E M A S T E R   C - 1 2   O W N E R ' S   M A N U A L 

Pure n Natural Systems, Inc.  |  purennatural.com  |  1-800-237-9199

Содержание SMOKEMASTER C-12

Страница 1: ...ior written consent of Air Quality Engineering Inc All statements technical information and recommendations in this manual or related documents are believed reliable but the accuracy and completeness thereof arenot guaranteed or warranted and they are not intended to be nor should they be understood to be representation or warranties concerning the products described Specifications are subject to ...

Страница 2: ...aden air successively through the prefilter the cell ionizing section and the cell collector section The ionizing section imparts an electrical charge to the individual particles that are then drawn by electrostatic forces to the oppositely charged collector plates Cleaned air is then discharged back into the room The electronic cells must be washed periodically to maintain efficient performance F...

Страница 3: ...f no less than 15 cubic feet of air per minute per person Additional ventilation may be required for toxic contaminants In any event the air cleaner must be used only in areas that are ventilated for human occupancy in order to dissipate any incidental generation of ozone DIMENSIONS 25 x 25 x 11 635 mm x 635 mm x 279 5 mm WEIGHT 79 Lbs 36 Kg shipping 69 Lbs 31 Kg installed including electronic cel...

Страница 4: ...or Allows easy access to components for periodic cell and prefilter cleaning Safety interlock discharges allpower when the door is opened Built in test button assures collector performance Mounting Mounts on wall brackets or with steel suspension rods For mounting directly to a joist ceiling lag screws areavailable Plug Plugs into any regular 120 or 240 volt grounded outlet depending on voltageord...

Страница 5: ... 07071 07089 5 Door Interlock Switch 10106 10106 6 Motor Kit 05299 05014 7 Fan 37009 37009 8 Power Cord 42078 42027 9 Control Switch 10110 10110 10 Indicator Light 10097 10097 11 Intake Grille Light 20025 20025 Intake Grille Black 20026 20026 NP Ionizer Wire 38004 18 38004 18 C 12 Parts List Page 5 S M O K E M A S T E R C 1 2 O W N E R S M A N U A L Pure n Natural Systems Inc purennatural com 1 80...

Страница 6: ...ck the existing air circulation in the room The C 12 should be installed so that it aids the circulation already established When airflow patterns are not immediately apparent observe the smoke from a cigarette in various locations within the room Figure 6 C 12 Installation Dimensions Ceiling Mounting The C 12 is mounted by suspending it from the ceiling The mounting holes in holes in the C 12 are...

Страница 7: ...also be mounted using 3 8 in 10 mm diameter threaded steel rods available in many hardware stores Four steel rods will be required WALL MOUNTING Two wall mounting brackets are used to support the C 12 They are included in an accessory package along with a blank plate to block off the outlet louvers on the side of the air cleaner which will be against the wall The two brackets must be mounted on th...

Страница 8: ... C 12 junction box cover Figure 12 2 Disconnect and discard the power cord the solderless connectors and strain relief Plug the power cord hole with the plug provided 3 Run conduit from the power supply to the junction box through the appropriate knockout Fish wires to junction box 4 Connect lead wires with solderless connectors including ground green wires Proper grounding of this device is manda...

Страница 9: ...to work right refer to the Electrical Troubleshooting section SAFETY INTERLOCK SYSTEM In order for all air cleaner functions to receive operating power the grille must be securely in position This actuates the safety interlock switch The air cleaner will not function without the grille inplace FAN SWITCH Your electronic air cleaner has an Off Low Med Hi switch The electronic collection system and ...

Страница 10: ...llow better release of contaminant when washing 7 Check the electronic cells for broken wiresand bent collector plates The cells may be installed in the air cleaner and energized The indicator light may remain off during the normal two hour drying time However if annoying arcing occurs during this period the cell may be removed to dry 8 CELL CLEANER IS REUSABLE SAVE FOR REPEATED USE Replace cleani...

Страница 11: ...power at the fuse or circuit breaker 2 Open the intake grille Remove the cells to provide access to the motor 3 Remove the fan blade from the motor 4 Disconnect the fan motor leads at the plastic connector near the fan motor C 12 POWER SUPPLY REPLACEMENT PROCEDURE 1 Disconnect power from the unit 2 Disconnect quick connect terminals from power supply Unplug power supply wire harness 3 Remove 4 scr...

Страница 12: ... cleaner to function effectively without arcing Remove all parts of the broken wire If necessary the cell may be temporarily used with one wire missing 1 Use care to avoid damage to the spring connector or other parts of the cell during the installation 2 Hook one end of the ionizing wire over the spring connector at one end of the cell 3 Hold the opposite eyelet with a needle nose pliers and stre...

Страница 13: ...N ON LAMP OFF 1 If the fan is on and the light is out the problem is with the electronic cell or high voltage power supply 2 To determine which component is faulty Remove the electronic cell and operate the air cleaner If the light does not come on then the high voltage power supply will have to be replaced 3 If the indicator light does come one the problem is with the electronic cell Check the ce...

Страница 14: ...r serviced by anyone other than an authorized service technician using genuine AQE parts 4 UNAUTHORIZED PARTS A showing by the original purchaser that the Product has had only genuine Air Quality Engineering Inc parts and filters used in its operation and maintenance 5 SERIAL NUMBER INTACT A showing by the original purchaser that the Serial Number has notbeen altered or removed 6 MISUSE A showing ...

Отзывы: