


5. Remove the screws holding the motor to the
unit to remove the motor.
6. Install the new motor, connect the electrical
lines and replace the fan, cells, prefilter and
grille.
7. Connect the power and check the new motor
operation.
MOTOR MAINTENANCE PROCEDURE
The manufacturer of the motor used in the air
cleaner recommends oiling the motor at least once
a year. The following procedure can be followed:
1. De-energize the unit.
2. Remove the prefilter and cells from the
cabinet.
3. Remove the fan blade from the motor shaft.
4. Unscrew the four screws holding the motor
mounting plate and lower the motor. THE
WIRING NEED NOT BE DISCONNECTED.
5. There are two oil holes on the motor:
a. Near the motor shaft.
b. On the end opposite the motor shaft near
the bearing plate.
Five drops of SAE 20 weight non detergent oil or
electric oil in each hole is adequate. Wipe off the
excess oil that misses or runs out of the oil holes.
Replace the motor fan blade, cells and prefilters in
the unit. Re-energize the unit and check it out to
ensure proper operation.
MOTOR REPLACEMENT PROCEDURE
1. Disconnect the power at the fuse or circuit
breaker.
2. Open the intake grille. Remove the cells to
provide access to the motor.
3. Remove the fan blade from the motor.
4. Disconnect the fan motor leads at the plastic
connector near the fan motor.
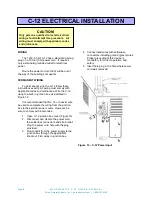
C-12 POWER SUPPLY REPLACEMENT
PROCEDURE
1. Disconnect power from the unit.
2. Disconnect quick connect terminals from
power supply. Unplug power supply wire
harness.
3. Remove 4 screws holding power supply in
place (on earlier units, remove nuts and
washers from inside of cabinets).
4. Install new power supply.
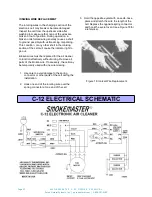
5. Connect line voltage wires to power supply
with plugs.
Wires with similar colors go
together
. Next, connect the pink high voltage
wires to the outside terminals on the contact
board which are marked I. Attach the grey
high voltage wires to the inside terminals
marked C. Be certain that all wires are
connected properly.
6. Reconnect power and test power supply with
test button to be sure unit is operating
properly.
SERVICE
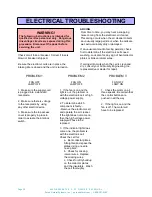
WARNING!
The following instructions are intended for
qualified service personnel only. Dangerous
line voltage circuits are exposed during this
procedure. Disconnect the power at the fuse
before servicing the unit.
Page 11
S M O K E M A S T E R C - 1 2 O W N E R ' S M A N U A L
Pure n Natural Systems, Inc. | purennatural.com | 1-800-237-9199