background image

9


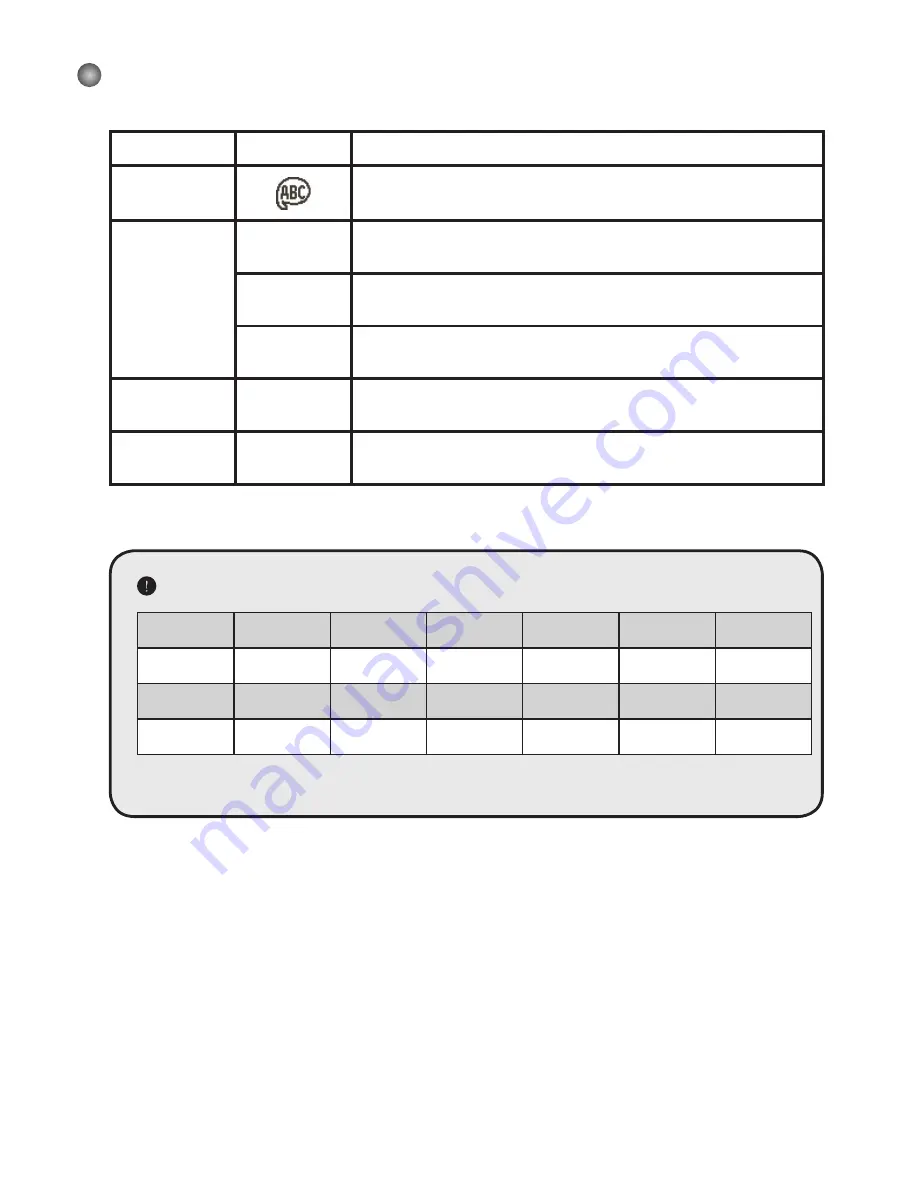
Menu items in Setting mode (2)

Item

Option

Description

Language

Lets you select the language used for OSD.

USB Mode

Menu

When connected to a PC, the camcorder displays a menu for 

you to choose a desired connection mode.

Camera

When connected to a PC, the camcorder automatically enters 

Camera (PC camera) mode.

Disk

When connected to a PC, the camcorder automatically enters 

Disk (removable disk) mode.

Start Movie

On/Off

Enable/disable the movie sequence when the camcorder is 

powered on.

Default

On/Off

Restore factory defaults. Note that your current settings will be 

overridden.


Flicker Settings

Country

England

Germany

France

Italy

Spain

Russia

Setting

50Hz

50Hz

50Hz

50Hz

50Hz

50Hz

Country

Portugal

America

Taiwan

China

Japan

Korea

Setting

50Hz

60Hz

60Hz

50Hz

50/60Hz

60Hz

Note:

 The flicker setting is based on the frequency standard of your local power supply.


Содержание IS-DV2.4

Страница 1: ...English...

Страница 2: ...deo light 13 LCD Panel 14 Speaker 15 Shutter Button 16 Lens 17 Video light 18 Flash strobe 19 Battery cover 20 Tripod Port Loading the battery Please use two AA batteries 1 Slide open the battery comp...

Страница 3: ...or insert a new one If you want to restart the serial number plese use the camcorder Format function to format the card Turning on the camcorder Open the LCD panel OR Press and hold down the Power but...

Страница 4: ...h mode Photo resolution Zoom ratio Number of pictures les SD card inserted Battery life Play mode Recording time Volume Current total recordings Play mode Highlight box NightShot Smart Zoom File type...

Страница 5: ...ons to zoom in or zoom out the screen 3 Press the Shutter button to take a still picture Playing back your recordings 1 Press the button 2 Use the Zoom buttons to select the Playback mode 3 Press the...

Страница 6: ...r more information Taiwan NTSC America NTSC Europe PAL China PAL 2 Connect the audio and video ends of the AV cable to the TV 3 Turn on the camcorder 4 Connect the other end of the AV cable to your ca...

Страница 7: ...tion Print photos 1M 1280x960 3x5 in 3M 2048x1536 4x6 in or 5x7 in 6M 2848x2136 6x8 in Selftimer On Off Enable the selftimer After the selftimer is turned on the camcorder will have ten seconds delay...

Страница 8: ...g or environments with high color temperature Tungsten This setting is suitable for indoor recording with incandescent lamp lighting or environments with low color temperature Effect Normal Make recor...

Страница 9: ...option is suitable for America Taiwan Japan and Korea areas PAL Set TV system compatibility to PAL This option is suitable for Germany England Italy Netherlands China Japan and Hong Kong Icon On Off E...

Страница 10: ...o a PC the camcorder automatically enters Disk removable disk mode Start Movie On Off Enable disable the movie sequence when the camcorder is powered on Default On Off Restore factory defaults Note th...

Страница 11: ...00 620 1540 SD MMC card 512MB 600 1230 3080 SD MMC card 1GB 1200 2500 6160 Note The actual value of capacity may vary up to 30 depending on the color saturation and complexity of your subject and surr...

Страница 12: ...er VGA 640x480 pixels up to 30 fps QVGA 320x240 pixels up to 30 fps Digital voice recorder WAVE WAV format PC Camera VGA 640x480 pixels QVGA 320x240 pixels LCD display 1 5 Color LCD Digital zoom 4X TV...

Страница 13: ...Advanced Instructions English...

Страница 14: ...pear automatically double click on My Computer and then the CD ROM drive Then start the Setup exe program manually 2 Start the installation Click on the icon to launch the installation of the driver N...

Страница 15: ...to complete the installation 5 Install Direct X 9 0c or above After the codecs installation is completed you will be prompted to install Direct X 9 0c or above if the program is not yet installed in...

Страница 16: ...B mode Power on Press the Mode button Enter the Setting mode USB Mode Menu When connected to a PC the camcorder displays a menu for you to choose a desired connection mode Camera When connected to a P...

Страница 17: ...uter a removable disk will appear in your computer The removable disk actually represents the storage medium of your camcorder In the disk you can nd all of your recordings Refer to the gure below to...

Страница 18: ...era item and press the button to con rm If you want to use the Video Conferencing function please install programs such as Netmeeting to serve the purpose Notice for Windows 2000 users When using the...

Страница 19: ...art Stop preview window Setting Open album Select video source Sub menu available To view pictures taken by DV TS PC Camera please click on to open the photo album Or as an alternate option go to the...

Страница 20: ...icon Taking a snapshot Click on the icon to take a snapshot Con guring Format options Color Space Select one of the following functions according to your needs RGB 24 This item is for retaining bette...

Страница 21: ...ty If the network bandwidth is congested when using PC Camera slide the bar toward Faster Video to avoid this problem Con guring Flicker options If you take your camcorder abroad and find the screen o...

Страница 22: ...some space from the SD MMC card or the internal memory The camcorder is recharging the ash strobe Wait until the ash strobe is fully charged Using a protected SD card Set the SD card to be writable Th...

Страница 23: ...n taking pictures Add extra light sources or enable video light when recording video clips Noises occur when viewing images on the LCD screen or on the computer The icker setting does not match the st...

Страница 24: ...been connected to the PC via the USB cable before installing the driver Install the driver before plugging in the USB cable The TV screen does not display after connecting the camcorder to the TV The...

Страница 25: ...lay this message will show up Please Change Battery The battery life of the camcorder is low You should replace the battery with a new one immediately Memory Full The storage memory is full and can no...

Страница 26: ...t the same time It s easy Three simple steps are all it takes Please refer to Converted les section for more information System requirements To install and run the MediaConverter your system must meet...

Страница 27: ...upported le types for conversion AVI Microsoft Video 1 format Cinepak Intel Indeo uncompressed etc MPEG 1 in MPEG MPG MPE DAT VCD MPEG1 MPEG 4 in AVI format MPEG 4 in ASF WMV QuickTime MOV QuickTime 6...

Страница 28: ...15 Appendix B Converted les...

Страница 29: ...e types you d like to display b Preview highlighted les to be sure that they re the ones you want Check the AutoPlay box to start the playback automatically after you click a le 3 Repeat steps 1 and 2...

Страница 30: ...ected and then click Select Destination and choose the device Settings Various program settings can be accessed by clicking the Settings button Each section lets you select one of two settings Optimiz...

Страница 31: ...efault and 29 97 Selecting Optimize for the selected device uses the default values above where applicable After viewing modifying the various settings select either Save or Cancel to return to the ma...

Страница 32: ...ted ASF les 2 Open Windows Explorer to nd a Removable Disk appeared in My Computer 3 Double click on the icon of Removable Disk 4 Double click on the DCIM le folder 5 Double click on the 100MEDIA le f...

Страница 33: ...ts Operating System Windows 2000 XP CPU Pentium III or above System RAM 128MB or above Graphic Card 64MB 24 bit true color CD ROM speed 4x or above Software Direct X 9 0c or above and Windows Media Pl...

Страница 34: ......

Отзывы: