Aigo DC-T1200 Скачать руководство пользователя страница 11

150mm+-2

105

mm+-2

105

mm+-2

20

21

OSD Information (Default:DETAIL)

MOVE :

SET:OK

OSD INFORMATION

OFF

BASIC

DETAIL

Voice Recording Mode(

)

Movie Clip Mode

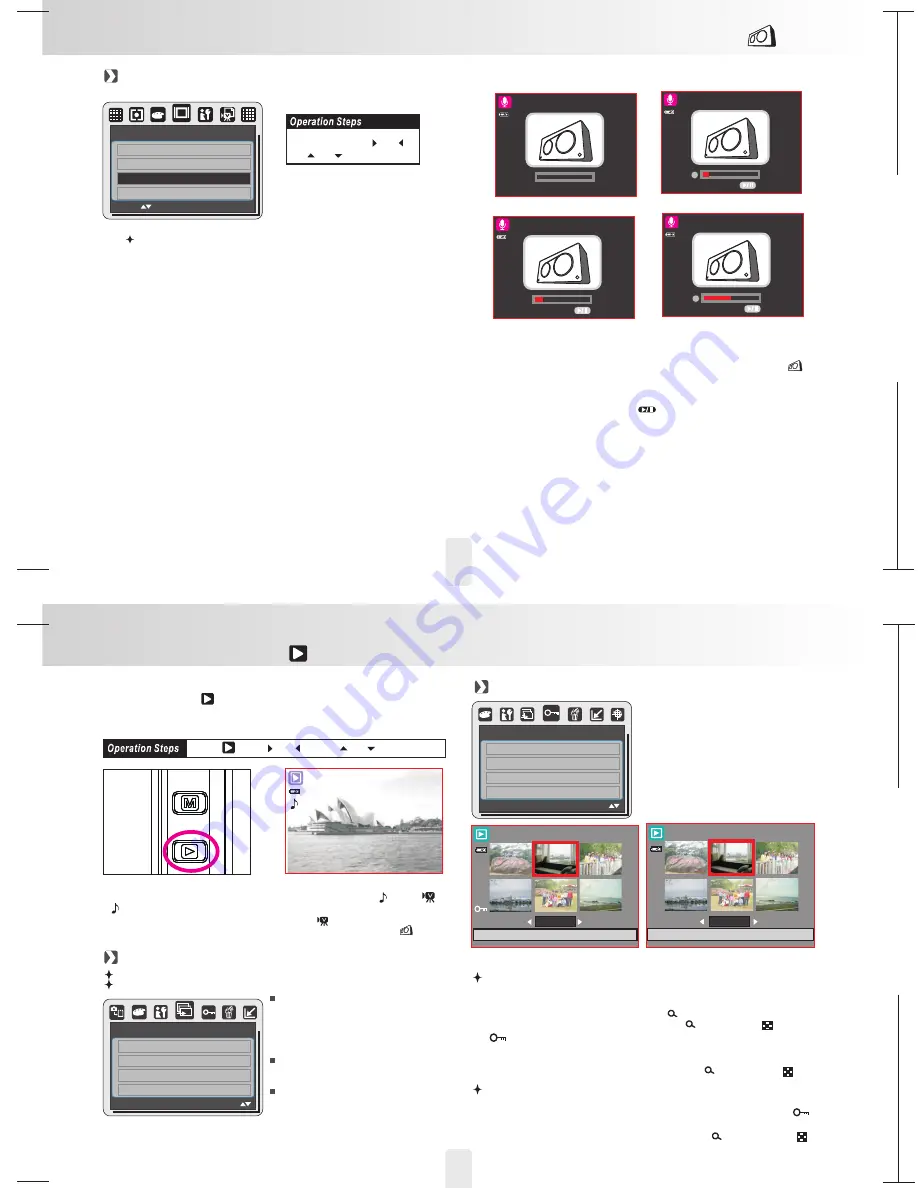
1. Press the Mode Button and choose Voice Recording Mode (

).

2. Press the Shutter Button to start the recording and

press the Shutter Button again if you'd like to stop the recording.

3. Press the Play/Pause Button (

) during the recording can put

the recording on hold and press the same button again and
re-activate the recording.

00:00:00

START: SHUTTER

00:00:20

PAUSE

00:00:20

RECORD

00:00:32

PAUSE

1. MENU

2.

or

4.

OK

3.

or

There are 3 options for the OSD information.
1.OFF:

No OSD information is required.

2.BASIC: Only basic information is required.
3.DETAIL:Detailed information is required.

Playback Mode(

)

To playback Stil Image, Movie clips and Audio Clips,Please press
Playback Button (

) and the camera will show the stored still

images, movie clips and audio clips (voice recording). Use the
Right and Left Button to choose the file you would like to play.

1. Still Image

2. Movie Clip:
3. Audio Clip (voice recording):

Still images are the images with no special signs such like (

) and (

).

(

) represents that the images are with voice memos.

Movie clips are the ones with (

).

Audio clips are the ones with (

).

100-0088

Slide

SLIDE

SHOW

PLAY

INTERVAL

2 SEC

EFFECT

OFF

MOVE :

PROTECT

SELECT

ALL

Protect

100-0066

EXIT : SH

100-0066

EXIT : SH

1.Press the OK/Menu Button and choose "PROTECT".
2.Choose "SELECT" and press OK/Menu Button.
3.Choose one image and press T Button (

).

4.Choose another image and press T Button (

) or W Button(

).

(

) will show on the TFT LCD Monitor when the protection is set.

5.Press OK/Menu Button to confirm the request for the protection of the

selected image(s).

6.To cancel the protection, please press T Button (

) or W Button(

).

Set Selected Image(s) With Protection

Set All Images With Protection

1 Press the OK/Menu Button and choose "PROTECT".
2. Choose "ALL" and press OK/Menu Button to confirm the request. (

)

will show on the TFT LCD Monitor when the protection is set.

3. To cancel the protection, please press T Button (

) and W Button(

).

.

MOVE :

EXIT:MENU

W

LOCK

T

W

UNLOCK

T

1.

2.

or

3.

or

After you complete the setting of INTERVAL and EFFECT, please go to
SHOW and select PLAY/ REPEAT to start the slideshow.

Note

SHOW

INTERVAL

EFFECT

This option is to start the slideshow after
you set up the settings of INTERVAL and
EFFECT. In this option you can also
choose to play the slideshow just once
or repeatedly.

This option is to choose the interval time
between each still image.

This option is to choose the effect of the
slideshow.

Press Menu/OK Button to enter the menu and choose SLIDE.
There are three options in this feature which are:

EXIT:MENU

Содержание DC-T1200

Страница 1: ...t 15 Image Size 16 Quality 16 Voice memo 16 Metering 16 Shooting Continues 17 Sharpness 17 Effect 17 Frame 17 OSD Info 18 Face Detection 18 19 Size 19 Quality 19 Metering 19 Effect 19 OSD Information...

Страница 2: ...maged in an environment of high temperature To avoid electricity leakage please remove the battery if the camera is expected not to be in use for a long period of time It is normal that the temperatur...

Страница 3: ...ps 100 ISO ISO 200 ISO 400 AUTO ISO ISO 800 ISO 1600 White Balance Auto Daylight Cloudy Sunset Fluorescent Tungsten Custom Shooting Mode Single Continuous Metering Spot Multi Image Quality Super Fine...

Страница 4: ...daptor Jack when the charging is completed 1 Power off the camera 2 Open the Battery Memory Card Cover 3 Insert the memory card into the card slot and press it down until a click sound happens Please...

Страница 5: ...he menu is not displayed on the LCD monitor the Right Button operates as Flash function By pressing the Flash Mode Button you can select different flash options as follows Auto Flash Auto Flash with R...

Страница 6: ...press Delete Button to adjust the exposure Press Left Right Button to set the Exposure Value You can adjust the value of the exposure compensation which is ranged from 2 0EV to 2 0EV at 0 5EV incremen...

Страница 7: ...ORTRAIT LANDSCAPE a Metering Spot b Sharpness Normal c Effect Normal d Shooting Continuous Shooting Single e Flash 1 Auto Flash 2 Red eye Reduction 3 Flash Off are available Under this mode the settin...

Страница 8: ...ed up as below MODE SET FIREWORKS CANDLE LIGHT BEACH AUCTION Beach Mode a Metering Multi b Sharpness Normal c Effect Normal d Shooting Continuous Shooting Single e Flash Off Under this mode the settin...

Страница 9: ...le light sources in the image area This is suitable for general use SHOOTING Default SINGLE 1 No continuous shooting SINGLE 2 You can have the continuous shooting function starting by pressing the Shu...

Страница 10: ...Web 320X240 30FPS Please press the Mode Button and choose Movie Clip Mode M Video Size Default 640x480 30FPS Movie Clip Mode The video size options are provided as follows 1280 x 720 30FPS 640 x 480...

Страница 11: ...8 Slide SLIDE SHOW PLAY INTERVAL 2 SEC EFFECT OFF MOVE PROTECT SELECT ALL Protect 100 0066 EXIT SH 100 0066 EXIT SH 1 Press the OK Menu Button and choose PROTECT 2 Choose SELECT and press OK Menu Butt...

Страница 12: ...ld like to rotate 2 Press OK Menu Button and choose ROTATE 3 Choose the rotation you prefer and press OK Menu Button 4 The image after rotation will be stored as a new image o o o DPOF MOVE DPOF STAND...

Страница 13: ...S SOUND 3 Select the sound you prefer and press OK Menu Button to confirm the setting Or you can choose OFF to turn off the a start up sound To set up the shooting sound please follow the steps below...

Страница 14: ...e the Left Right Button to select another picture and select the number of prints for another picture 4 After setting the number of prints press the Menu OK Button to save 5 Press the Shutter Button t...

Страница 15: ...supplied Video USB Cable Turn on the TV and switch the TV Video switch to A V Mode Power on the camera and then switch to the Playback Mode Press down the LEFT or RIGHT direction Button to go to the n...

Страница 16: ...you prefer to convert 2 Click on Make Movie then choose Batch Convert 5 6 3 Select photo you prefer to convert 4 Click Convert to make photo convert Please select JPEG as file format otherwise the fi...

Страница 17: ...authorization Step 2 5 Choose t or G to log in You Tube Accoun oogle Account 4 33 32 1 Choose file that you like to upload 2 Click Upload to YouTube 8 Click to get permission Allow 6 User will see af...

Страница 18: ...12 Mega Pixels 1 1 72 CCD Sensor Approx 12 19 Mega Pixels 4 032 3 024 Approx 12 43 Mega Pixels 4 088 3 040 Optical 3x Zoom 35 102mm EQ for 35mm film F2 8 Wide F5 1 Tele Still Image mode 1 0X 5 0X Play...

Отзывы: