background image

YES

tablet

 7375 User Guide—Operation Notes


Software Update 

 
The software on the 7375 may be subject to occasional updates.   

NOTE:


You will lose all configuration information and user files during Update. 

 
There are two means to facilitate this process. 

(i)  Through network adapter or local storage under OS 

1.


Obtain the new firmware image file from Affirmative Computer Products and place it in an FTP server or in 
local storage. 

2.


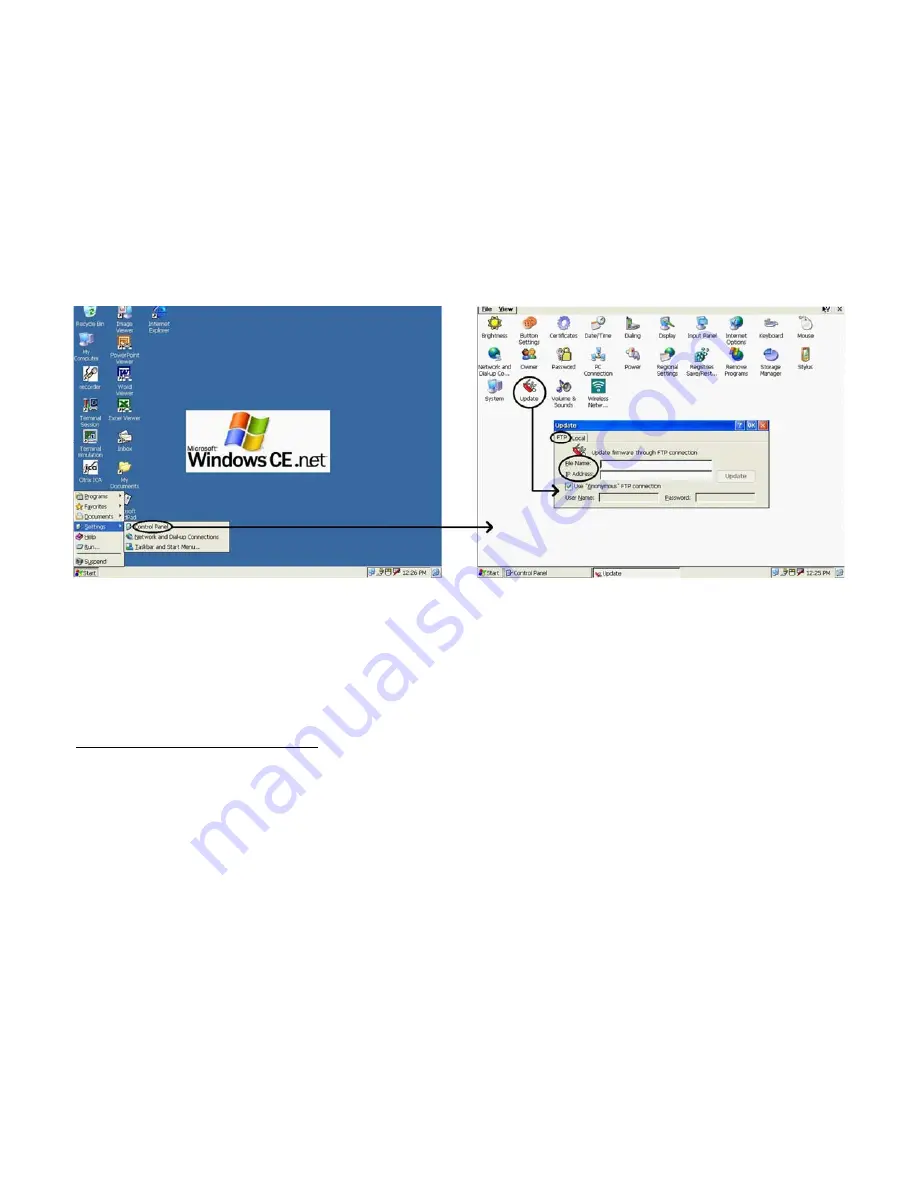
Go to 

My Computer>Control Panel>Update

; the Update window will appear. 


3.


Select from the 

FTP

 or 

Loca

l tabs depending on the location of the updating content.  “Local” storage includes 

CompactFlash (CF), USB storage in the USB port, and shared network storage. 

4.


Provide appropriate information in the blank fields. 

5.


Click on 

Update

, and the tablet will be updated with the specified software from a specified FTP server or local 

locations automatically.  Please follow any displayed instructions carefully. 

6.


After completion of the loading process, click on 

OK

 in the window for confirmation. 


CAUTION for “Update” Function 
To avoid system crashes and irrecoverable states, you MUST: 


Use AC power instead of Battery power when the tablet software is being updated. 


NOT turn the system OFF when the tablet software is being updated.  

The use of an uninterruptible power supply (UPS) is recommended. 


(ii)  Through Cradle USB Port 

This method can also often be used to recover from corrupted flash memory in the tablet.  The following describes 
the procedure for updating firmware through the Cradle-USB port: 


Client (7375) side  

1.


Place the 7375 on the Cradle; making sure that the mounting is physically secure. 

2.


Connect a USB cable from a Windows 2000 or Windows XP system to the cradle.  

3.


Press and hold the 

Suspend

 button for more than 4 seconds to completely turn off the power.  

4.


Press the 

Suspend

 button again to turn on the power and quickly (

BEFORE the display shows the Splash 

Screen; you have about 1-3 seconds.  If you miss this, then repeat Step c

) press and hold the 

soft keyboard


button (Button #5) AND the 

Cradle USB

 button (Button #6) simultaneously.  You should be able to see a 

text-based Menu on the screen.  Use the 

4-way navigation

 button to move up and down through the Menu 

and the 

soft keyboard

 button to Select. 


                                                                                                              21 

Содержание YEStablet 7375

Страница 1: ...YEStablet 7375 Wireless Digital Tablet User Guide Affirmative Computer Products 202 South River Drive Tempe AZ 85281 Phone 480 946 1444 Fax 480 946 9250 Web Site www affirmative net January 2004...

Страница 2: ......

Страница 3: ...GETTING STARTED WITH THE 7375 TABLET 1 Precautions 1 Package Contents 1 Unpacking the 7375 1 TECHNICAL SPECIFICATIONS AND PORTS OF THE 7375 TABLET 3 Hardware Specifications 3 7375 Power Source 3 7375...

Страница 4: ...Code Page 28 Keyboard Language 28 Keyboard Type 28 Edit 28 Default 29 Options 29 Font 29 Print Screen 29 Cursor 29 Miscellaneous 29 Attributes 30 Default View 30 Attribute Settings Standard View Only...

Страница 5: ...neral 62 Transcode Table 63 Escape Sequences 64 Euro 65 Font ID 66 APPENDIX 1 CISCO AIRONET WLAN ADAPTER 67 APPENDIX 2 LIST OF 7375 ACCESSORIES 71 APPENDIX 3 OPTIONAL EXTERNAL BATTERY PACK 73 APPENDIX...

Страница 6: ...device is not designed for operation in an explosive environment If the user is in an explosive environment the unit should be removed from the area immediately Interface Warning This computing device...

Страница 7: ...does cause harmful interference to radio or television reception which can be determined by turning the equipment off and on the user is encouraged to try to correct the interference as follows Reorie...

Страница 8: ...rd party manufacturer s warranties Affirmative Computer Products will pass on to the original purchaser all transferable third party manufacturer s warranties Affirmative Computer Products obtains on...

Страница 9: ...e Uniform Commercial Code and other applicable law Affirmative Computer Products reserves the right to change its warranty policy at any time Such new warranty shall immediately take effect and apply...

Страница 10: ...t or liquid leak and may cause fire or injury Store and Dispose of all batteries in accordance with the instructions contained herein Never dispose of the battery by burning Any such action may result...

Страница 11: ...s for Travel Avoid exposing your 7375 wireless tablet to magnetic detectors and security magnetic wands X ray screening devices should not harm the 7375 Place the 7375 in a protective case and take it...

Страница 12: ...YEStablet 7375 User Guide THIS PAGE INTENTIONALLY LEFT BLANK x...

Страница 13: ...mage the screen and oil from your skin may be difficult to remove Please use the Stylus provided Avoid exposing the tablet screen to direct sunlight or other heat source Where possible the 7375 should...

Страница 14: ...YEStablet 7375 User Guide THIS PAGE INTENTIONALLY LEFT BLANK 2...

Страница 15: ...Power Source The primary sources of the 7375 s power are the internal and optional external battery packs A DC in jack connects the AC DC adapter with the 7375 to recharge the battery pack Both the 73...

Страница 16: ...morex Compact Flash Memory Cards SanDisk Compact Flash Memory Cards Lexar Media Compact Flash Memory Cards Lexar Media High Speed Series Compact Flash Memory Cards USB Keyboard Mice All USB devices th...

Страница 17: ...Launch Close Soft keyboard Fixed 6 Cradle USB ActiveSync interface Enable Push to Enable USB ActiveSync link between PC and Cradle with tablet secure on Cradle Fixed for most software configurations...

Страница 18: ...YEStablet 7375 User Guide THIS PAGE INTENTIONALLY LEFT BLANK 6...

Страница 19: ...er onto the 7375 by referring to the Software Installation Development Synchronization section in this document However software drivers installed in this manner will need to be re installed should yo...

Страница 20: ...YEStablet 7375 User Guide Wireless network adapter Wireless Information tab Advanced button Wireless Networks tab Wireless network adapter IP Information tab Details button 8...

Страница 21: ...ngs e g by Registries Save Restore utility in Control Panel prior to the procedure To power off the tablet push and hold in the Suspend button for over 4 seconds the display will turn off and all LEDs...

Страница 22: ...d and detected into the 7375 In general for an Adapter selected click on Properties i You have two options Obtain an IP address via DHCP or Specify an IP address ii When you select Obtain an IP addres...

Страница 23: ...ou must provide the required information Connection Server User ID and Password If you do not have this information contact your Network Administrator 7 Click Next 8 In this window you will configure...

Страница 24: ...C in port on the 7375 or through the DC in port on the Cradle while the 7375 is docked on the Cradle Desktop Cradle DC in Port and Cradle Connector Tablet and Cradle in Vehicle Mount USB Slave Type B...

Страница 25: ...erminal Clients ICA and RDP You may use the 7375 to connect to Citrix and Microsoft Terminal Servers 1 Start Programs Terminal Client Citrix ICA OR activate Desktop icon Citrix ICA to connect to a Cit...

Страница 26: ...A viewer application suite for Microsoft Office and PDF documents as well as images enhances the user experience by facilitating the display of corresponding content via the browser or in standalone...

Страница 27: ...to program most of the buttons 1 4 6 or 7 8 10 per Front Layout diagram to operate per tabulated functions or user scripts Refer to Start Settings Control Panel Button Settings icon to use this featu...

Страница 28: ...YEStablet 7375 User Guide THIS PAGE INTENTIONALLY LEFT BLANK 16...

Страница 29: ...can be significantly lengthened by putting the tablet into Suspend mode through the Suspend button see Button Function Table whenever the tablet is not in use The 7375 may also be configured to automa...

Страница 30: ...upports a graceful shutdown and also extends the time where information is retained in volatile memory Connect the AC DC adapter or external battery pack of good capacity to the 7375 and briefly engag...

Страница 31: ...in the resulting dialog box 9 OK out of Inbox 10 Save these settings by executing a Registry Save CompactFlash Storage NOTE Always do a complete Power Off before inserting or removing a CompactFlash c...

Страница 32: ...PC System Tray 5 Use the ActiveSync application to select and initiate the files software transfer 6 You may initiate the disconnect process by unplugging the USB cable NOTE Suspend Resume or removing...

Страница 33: ...ION for Update Function To avoid system crashes and irrecoverable states you MUST Use AC power instead of Battery power when the tablet software is being updated NOT turn the system OFF when the table...

Страница 34: ...suming that the 7375 has been properly set up per the preceding instructions 7 The OS update process will be done automatically after the OS image has been successfully transferred Tablet Registry The...

Страница 35: ...s executed on the 7375 You may see a pre configured demo session in the Administrator Please contact the Affirmative Computer Products Tech Support department at 888 353 5250 for information about thi...

Страница 36: ...continuous forms multi drawers envelope manual feeders simplex duplex auto page orientation and COR Computer Output Reduction Supports CPI LPI Override and LQ NLQ Supports Host Print Transform TN5250e...

Страница 37: ...ected to do otherwise by your network administrator Display Setup Screen 2 Connection Name This is the friendly name that will appear in the YESterm IP Administrator screen Device Type Select one from...

Страница 38: ...window and activating Edit Display Session Configuration The screen shots you see in this section are TN5250e editing screens There are very few differences between the 5250 and 3270 screens and any...

Страница 39: ...ption level from the drop down list Your host must also be configured for this encryption level Automatic Startup not shown above Check this square if you wish the session to automatically start when...

Страница 40: ...que scan code to the terminal when a key is pressed If you want to see what key is associated with a specific scan code type that code in the Edit box shown highlighted in the above figure The associa...

Страница 41: ...o LPT1 port Through the Host Make this selection if you wish to print to a remote printer through the host Extended Local Print This selection provides local printing on steroids To use it you must cr...

Страница 42: ...obal for all sessions or restrict their use to this session only Attributes Properties Sheet Default View Advanced Recommended This default selection provides a graphics appearance for your session sc...

Страница 43: ...g terminal screens Hot Spots are invisible unless the mouse cursor is placed over one of them and then only that one Hot Spot is visible Obviously operating within the Standard view can become tedious...

Страница 44: ...he Sample field Be careful with the colors you choose a wrong choice can cause text or fields to be invisible on the screen because of lack of color contrast Edit Column Separator Activate this button...

Страница 45: ...t To enable the use of Hot Spots you must check the Enable Hot Spots box Advanced View Default Hot Spots are displayed as raised buttons if the Advanced View option is selected in the Attributes tab o...

Страница 46: ...st select the command or the Recorded sequence that you want to associate to the Hot Spot key 6 In c 80 specify where in an 80 column screen the text search engine should start looking for the specifi...

Страница 47: ...an assigned function You can make it visible on the screen by clicking on the Key Pad button on the Buttons toolbar or selecting View Key Pad from the Menu bar You can choose a function from the Key...

Страница 48: ...lick on Accept Click on Apply To Remove a Key Pad button 1 Select the Function Key you want to remove 2 Click on Remove To Add a Key Pad button 1 Click on Add 2 In the Name field type the text you wan...

Страница 49: ...e AS 400 to allow a secure connection to the AS 400 without using SSL Sign On Properties Sheet TN5250e Only For this feature to work to your benefit the Remote Signon parameter of the AS 400 configura...

Страница 50: ...aphic Provides the Windows look to the status bar and displays the connection name Security Configuration YESterm IP provides extreme flexibility in allowing or prohibiting the user to view and change...

Страница 51: ...n if it is rejected because of name conflict This doesn t fix the basic problem but at least the session can be opened IBM recommends setting the host Keep Alive Timeout to 40 seconds in order to faci...

Страница 52: ...ave a unique host and or a unique printer if desired If you want to create a session for extended local Print Screens see Display Session Configuration General Print Screen you can create it here but...

Страница 53: ...Setup Screen Host Code Page Choose the applicable country from the drop down list Printer Driver If you are doing extended local Print Screens or if you are not using the AS 400 Host Print Transform c...

Страница 54: ...red in the Setup Wizard although you can change them here if you wish The additional three parameters are Encryption Level If you want to encrypt the network traffic with the host choose an appropriat...

Страница 55: ...a printer session is associated with a specific printer device name However there are some mainframe configurations with no free printer devices but only printer devices associated to specific displa...

Страница 56: ...rom Portrait Landscape and COR Computer Output Reduction Note If you are using an impact dot matrix printer Portrait is recommended Automatic Page Orientation This option is enabled by Default Note If...

Страница 57: ...e drop down list should be the same as that configured on the mainframe for the specific device Ignore the Code Page Edit button since Code Page editing is not supported in the 7375 Default Page Setti...

Страница 58: ...ts generate a standard text data stream This means that everything is sent to the printer in text mode allowing better control of the printer and better performance Select a PassThrough Driver YESterm...

Страница 59: ...Modify the Passthrough Driver Printer Port Ignore the Parallel Port and COM1 2 radio buttons even though they are not grayed out Only LAN or USB printers can be used with the YEStablet 7375 since the...

Страница 60: ...ows portions of a data stream to be sent directly from the host to the printer There is no modification done to these portions by the emulator driver In order for the emulator to recognize these invio...

Страница 61: ...choose a compatible model from the drop down list Your AS 400 may have a more extensive list of compatible printers If your printer is on the AS 400 list but not on our list you can type in the print...

Страница 62: ...and the Menu bar so that the user cannot make configuration changes Check this box if you wish to provide user access to the configuration parameters Debug Trace This is not applicable in the 7370 Fin...

Страница 63: ...t only from the Sign On screen Properties p This command allows you to edit modify the Properties of the Display Session in use For more information on this function please refer to Display Session Co...

Страница 64: ...ou work with a host system it is convenient to record the keystrokes you make and have YESterm IP play them back when you want to do the same job again Record Playback allows you to do this All your k...

Страница 65: ...ulation sessions Playback No you don t see an actual Playback command But at the bottom of the Tools menu below the line you will see a list of the available macros Click on the one to be played and t...

Страница 66: ...th Hot Spots displayed as raised buttons if they have been enabled Emulation Screen with Advanced View and Hot Spots For more information on the Hot Spot feature refer to Display Session Configuration...

Страница 67: ...that command click on Next Sequence About a This command displays detailed information on the YESterm IP program such as version copyrights and other useful information Button Bar The Button bar is d...

Страница 68: ...ommand Play When this button is pressed a list of recorded macros is shown Click on the desired macro to execute the corresponding recorded key sequence Playback Displays a list of available macros Cl...

Страница 69: ...respond to the emulation sessions shown in order in the YESterm IP Administrator window Inactive sessions will have corresponding grayed out buttons while buttons for active sessions will not be graye...

Страница 70: ...is command disconnects the Printer Session from the host Properties p This command allows you to view edit modify the Properties of the Printer Session in use It will be grayed out and inactive unless...

Страница 71: ...initions are Connect Duplicates the function of the menu File Connect command Disconnect Duplicates the function of the menu File Disconnect command Properties Duplicates the function of the menu File...

Страница 72: ...suming that you chose the 101 terminal keyboard for U S English the following screen will appear 101 Terminal Keyboard Map Page Select the key or key plus modifier Ctrl Alt Shift to which you want to...

Страница 73: ...Keystroke sequence is 1 Open a display session 2 Place the cursor in the field where you wish to start the sequence 3 Activate Tools Start Recording or click on the corresponding button 4 Key the dat...

Страница 74: ...iver from the drop down list and activate Driver Configuration in the Output You will see a screen with five tabs General Driver General Properties Sheet This sheet allows you to select Variable Line...

Страница 75: ...your desired code page from the Code drop down list Customize the Escape sequence used to call the Code Page Select the Code Page from the list activate Edit and an Edit Passthrough Sequence dialog b...

Страница 76: ...s Properties Sheet This sheet allows you to customize all the Escape commands used to perform specific functions Select a function activate Edit and an Edit Passthrough Sequence dialog box will appear...

Страница 77: ...e command used to print the Euro symbol This special function allows you to print the Euro symbol even on those printers that are not Euro ready Select the command you wish to customize then activate...

Страница 78: ...ed with a Host System Font ID To edit a Font ID select the item activate Edit and an Edit Font ID and Sequence dialog box will appear where you can enter the new value Edit Font ID and Sequence Dialog...

Страница 79: ...g the ability to have the 7375 operate within EAP LEAP secured networks When the Aironet adapter is detected the network icon identical to that for tethered networking in the System Tray is displayed...

Страница 80: ...YEStablet 7375 User Guide ACU Status Tab Adapter Profile Setup 68...

Страница 81: ...YEStablet 7375 User Guide Cisco Aironet WLAN Adapter Adapter s Network Connection Information Disabling the Network Adapter 69...

Страница 82: ...YEStablet 7375 User Guide THIS PAGE INTENTIONALLY LEFT BLANK 70...

Страница 83: ...an doubles duration of mobile operation 9375 External Battery Charger Kit with AC Adapter Power Cord Recharges external battery pack offline without affecting usage of tablet 9376 AC DC Power Adapter...

Страница 84: ...dust while maintaining comfortable input New SOCKET CF In Hand Bar Code Scanner CompactFlash card based scanner offers convenient operation especially in conjunction with programmable buttons on the...

Страница 85: ...squeeze the two tabs at the sides of the battery pack while pushing it flat against the rear surface of the 7375 Release the two tabs and verify that the battery pack is secure and flush against the 7...

Страница 86: ...7375 Operation Guide THIS PAGE INTENTIONALLY LEFT BLANK 74 375V0503 0123...

Страница 87: ...ry Cradle AC DC Adapter and Power Cord The battery cradle features a DC input jack two connector interfaces with protective covers two LEDs as power and charging indicators Application 1 Connect the A...

Страница 88: ...ack is fully charged the LED will show solid Green 7 If the charging LED does not light up at all the battery is bad The battery warranty is ninety days 8 Do not forget to replace the protective rubbe...

Страница 89: ...top edge of the tablet A hard button on the tablet can be programmed see Button Settings in Control Panel or may already be pre programmed to trigger the scanner function Button 10 is a popular choice...

Страница 90: ...7375 Operation Guide THIS PAGE INTENTIONALLY LEFT BLANK 78 375V0503 0123...

Страница 91: ...ce of i and ii 3 NOTE An optional 12 24V to 12V DC DC adapter that fits into an automobile cigarette lighter plug or power outlet is available 4 Make sure the protective jacket for the 7375 is in plac...

Страница 92: ...embly to the wall through the 4 6 openings available screws not provided 5 To mount the rear bracket first remove and save the lower row of 2 screws from the rear of the cradle body 6 Slip the rear br...

Страница 93: ...elastic bound retainer features cutouts on a hard cover for operation with the tablet in place The fold down cover doubles as a stand fold the cover over in the opposite direction and secure in place...

Страница 94: ...YEStablet 7375 User Guide THIS PAGE INTENTIONALLY LEFT BLANK 82...

Страница 95: ...preserve user experience while offering the user peace of mind in using the touch display Application 1 Peel off backing starting from any of the 4 notched corners and discard 2 Apply the screen prot...

Страница 96: ...YEStablet 7375 User Guide THIS PAGE INTENTIONALLY LEFT BLANK 84...

Страница 97: ...y status How long will the batteries last How can I check the battery status What do I do if the battery runs down and the tablet turns off What are some ways to extend battery life Is there an advise...

Страница 98: ...__________________________________________________________ Starting Up What is the first thing I should do with the 7375 You need to charge the battery Connect the AC DC adapter provided with the tabl...

Страница 99: ...tional external battery pack is attached to the tablet detach it and repeat the step above OR If you have been using the Cradle then connect the power directly to the tablet instead and repeat the opt...

Страница 100: ...color to indicate charging of the battery the LED may also glow steady Green if the battery is fully charged Press the Suspend button on the left side of the tablet When the 7375 turns on the displaye...

Страница 101: ...double tap on the Power icon Choose the Schemes tab Set the time to enter Suspend mode in this window The time menus are effective in a consecutive or sequential manner You can also put the unit in Su...

Страница 102: ...out of battery power when you power the unit on again the 7375 may not remember the programs that were in operation and any data you may have saved when you lost power To avoid this make sure that you...

Страница 103: ...an I charge the external battery pack The external battery pack can be charged as part of the 7375 with the AC DC adapter connected directly or through the cradle Alternatively the external battery pa...

Страница 104: ...ubnet of a data network This is facilitated by the viewing utilities or applications resident on your 7375 Please make sure that the appropriate folders have Sharing enabled on the PCs On the 7375 and...

Страница 105: ...can support storage cards as well as peripherals such as network adapters wireless or otherwise and barcode scanners provided the appropriate drivers exist The tablet comes with a protective jacket an...

Страница 106: ...Pocket PC and Intel Xscale If a third party peripheral or software is determined to be compatible with or independent of said platform that hardware software may work out of the box or have drivers t...

Страница 107: ...el Stylus or by engaging the virtual keyboard button leftmost of front set of four buttons and the Left button on the 4 way navigation button on the right front face of the tablet simultaneously This...

Страница 108: ...N NOTES Wireless Network for details The antenna should function adequately in the snapped on configuration but you can extract the antenna holder to try to obtain better range or signal strength Can...

Страница 109: ...21 72 77 85 92 93 95 Configuration loss 96 Cradle desktop 12 mountable assembly notes 80 wall mount 79 Custom carrying pouch 81 Data loss 95 DC DC adapter 79 Device configuration 10 Control Panel 10...

Страница 110: ...usions vi limited v loss viii ix 1 Software vi Windows XP Pro 92 Wireless network adapter antenna 17 Wireless WAN adapters 96 WLAN adapter antenna 96 WLAN adapters 96 Word Processing WordPad 14 YESter...

Отзывы: