background image

To remove the device, press the mount clips until they disengage from the rail, then rotate the 
device and pull it away from the rail. A flat-blade screwdriver will make it easier to access and 

press the clips.

Locking the AP

You can secure the AP using a Kensington® lock in the lock slot on the side of the device, or you 
can use a security bracket and a crosshead screw or a security screw. Security brackets and 

screws can be ordered separately from Aerohive (not available in Brazil).

Aerohive recommends a variety of Kensington locks. For more information, contact your sales 

representative.

Connecting the AP to the Network

Follow these steps to connect your AP122 to PoE (power over Ethernet) power and to the network.

1. Connect a standard RJ45 Ethernet cable from ETH0 on the AP


to a switch.

2. If the switch provides PoE (power over Ethernet), cabling the AP


to the switch will power-on

the AP


in a few seconds. If the switch does not provide PoE, use a PoE injector. For more

information about Aerohive PoE injectors, contact your Aerohive representative.

3. After you power on the AP, it automatically tries to get network settings and contact

HiveManager NG. This process takes about five minutes. When you see the AP


listed on the

All Devices

 page in the 

Monitor

 section of the HiveManager NG GUI, the initial setup is

complete and you can begin managing the AP with HiveManager NG.

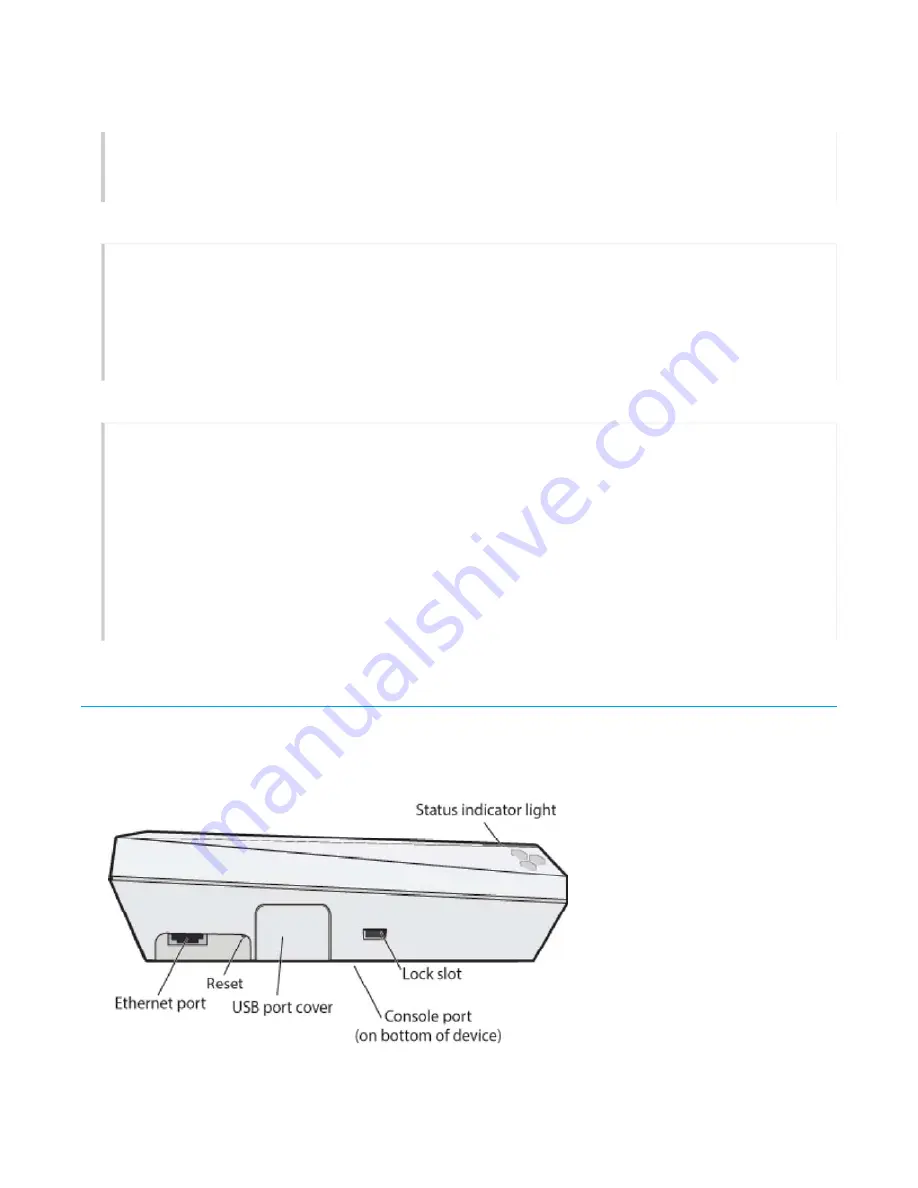
Hardware Components

You can see the hardware components of the AP122 in the illustration below and read about them in 

the sections that follow.

Page 10 of 14

AP122 Hardware User Guide

11/14/2016

Removing the Device

Содержание AP122

Страница 1: ...n it is important to set the country code to the country in which the AP will be deployed to meet regulatory requirements and for optimal wireless operation To do this follow these steps The country c...

Страница 2: ...nce Statement Europe EU Declaration of Conformity This device complies with the essential requirements of the R TTE Directive 1999 5 EC The following test methods have been applied in order to prove p...

Страница 3: ...99 5 EC Espa ol Spanish Por medio de la presente Aerohive declara que el AP130 cumple con los requisitos esenciales y cualesquiera otras disposiciones aplicables o exigibles de la Directiva 1999 5 CE...

Страница 4: ...er Connect the equipment into an outlet on a circuit different from that to which the receiver is connected Consult the dealer or an experienced radio TV technician for help FCC Caution Any changes or...

Страница 5: ...operation as appropriate and iv Users should also be advised that high power radars are allocated as primary users i e priority users of the bands 5250 5350 MHz and 5650 5850 MHz and that these radars...

Страница 6: ...equipment complies with ISED RSS 102 radiation exposure limits set forth for an uncontrolled environment This equipment should be installed and operated with minimum distance 20 cm 7 8 between the ra...

Страница 7: ...nt This icon indicates an electrical caution Failure to comply with an electrical notification can result in serious injury or death and extensive damage to equipment This icon indicates a laser cauti...

Страница 8: ...e supervised to ensure that they do not play with the devices Electrostatic discharge ESD can damage equipment and impair electrical circuitry ESD damage occurs when electronic components are improper...

Страница 9: ...the AP122 on a wall or other flat surface perform the following steps 1 Make two marks where you want to mount the device on the wall or surface exactly 2 5 64 cm apart 1 Drill two holes that are sli...

Страница 10: ...er and to the network 1 Connect a standard RJ45 Ethernet cable from ETH0 on the AP to a switch 2 If the switch provides PoE power over Ethernet cabling the AP to the switch will power on the AP in a f...

Страница 11: ...ightness bright soft dim off You can adjust the brightness level from bright the default to soft to dim or turn it off completely in HiveManager NG Navigate to Configure Network Policy Additional Sett...

Страница 12: ...NJ 20W EU AH ACC INJ 20W US AH ACC INJ 20W AU AH ACC INJ 20W IL Reset Button Use the Reset button to reset the device or restore the factory default settings Insert a paper clip or similar tool into t...

Страница 13: ...ating frequency Orthogonal Frequency Division Multiplexing OFDM modulation Rates Mbps 54 48 36 24 12 9 6 with auto fallback 802 11n 2 4 2 5 and 5 150 5 850 GHz operating frequency 802 11n modulation R...

Страница 14: ...tions PoE nominal input voltages 48 V Typical PoE power consumption is 11 W RJ45 power input pins Wires 4 5 7 8 or 1 2 3 and 6 Environmental Specifications Operating temperature 32 to 104 F 0 to 40 C...

Отзывы: