background image

Editing Recordings

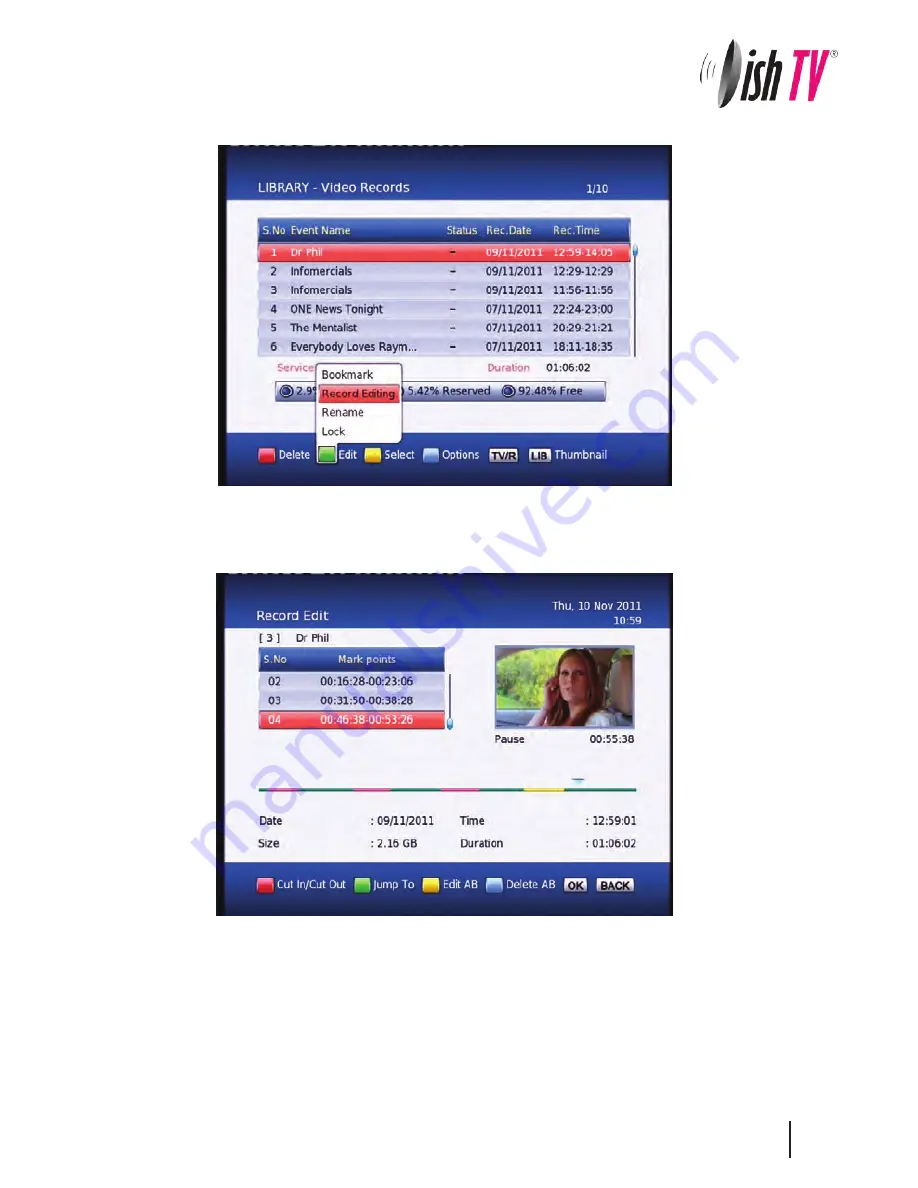
To enter the 

Record Edit

 window select your recording from the 

Library

 or 

Thumbnail Browser

, then push the 

Green

 button on your remote then the 

OK


button. 

Here you can remove sections of your recordings. In the record edit window your recording will play in 

the top right of the screen, you can use all your normal play, fast forward, rewind, pause functions to 

get to where you want to edit. To select an area to delete push the 

Red

 button to start the selection, 

and then the 

Red 

button again to end. If the selection you have made is not quite in the right place 

you can press the 

Yellow

 button to edit/move the start of your selection(A) or the end (B). The 

Blue


button on your remote will remove the selected section but will not delete that part of your recording. 

To move between the selections use the 

Up/Down

 arrows on your remote. Once you are happy with 

the selections you have made and want to delete these parts from your recording, press the 

OK

 button 

and select yes.

27

Содержание T1050PVR

Страница 1: ...User Manual aerialB x ultra T1050PVR...

Страница 2: ...as well as detailed Freeview program information with the Freeview 8 Day Electronic Program Guide For more information about Freeview visit www freeviewnz tv A Freeview Digital Set Top Box gives you...

Страница 3: ...UHF aerial and good signal and quality levels to operate correctly The Full user Manual can be downloaded at www dishtv co nz This guide will provide you with simple instructions for connecting an ope...

Страница 4: ...Version ESG Media Manager Thumbnail Browser Recorded Book List Media Information Connectivity eNet Buttons eWeather eMap eMail Recording Recordings Library Bookmarking Editing Recordings Media Center...

Страница 5: ...LIB Library displays the recorded program list See page 25 for more info Holding the LIB button for 3 sec displays the Record Booking List Interactive Channel MUTE Turns the sound on off CH Changes th...

Страница 6: ...nnect the AV cable that came with your set top box between the yellow red and white sockets on the Connect the cable that comes from your UHF aerial to the RF IN socket in the back of your set top box...

Страница 7: ...ry cover Switch yourTV on and select the correct video input Switch the aerialBox ultra on and wait for it to boot up The Welcome screen should appear on your TV Press OK to start a scan An auto scan...

Страница 8: ...the gateway for all other menus User can invoke the main menu by pressing the MENU key This main menu contains several options User Settings Installation System Configuration ESG MEDIA Manager Connec...

Страница 9: ...be accessed by pressing the channel number button Delete Deletes a channel off the list Favourite View To enter this menu you will be prompted for your password Default is 0000 This menu allows you t...

Страница 10: ...Blue buttons on your remote Recording Start Offset This option will adjust how many minutes before your program the unit will start recording This is very handy when programs are not running on time...

Страница 11: ...with the Signal Strength and Quality for the current frequency If no channels scan in Try a manual scan to see if you can get good signal levels on the channels availible in your area To see a list o...

Страница 12: ...n Mode give you the options All FTA Scrambled Once you have good signal strength and quality you can push the OK button to search the selected UHF frequency What is good signal strength and quality St...

Страница 13: ...evices for example when you turn your receiver on your TV will turn on automatically If you find your TV turning on when you don t want it make sure this setting is set to off HDCP or High bandwidth D...

Страница 14: ...user settings Default password is 0000 S W Upgrade via OTA This option can be used only if an Over The Air software update is broadcasted via the UHF transmitter The software will only be broadcast f...

Страница 15: ...es 3 Set the channel you want to record or set the message you want to appear at the set day and time 4 Set the Date option to a desired date on which the digital receiver will turn on Use the left ri...

Страница 16: ...lecting the ESG option from the Main Menu It will list the available services and when focus is set to the current service then its corresponding current and next events are displayed When your in the...

Страница 17: ...date and also the access date The access date is the date and time the recording was last viewed If the access date is blank this means the recording has not yet been viewed If you push the Yellow bu...

Страница 18: ...You can use the Red button on your remote to delete a booking The Green button on your remote will change the selected booking between a single record or a series booking The Yellow button will take...

Страница 19: ...t eMail Allows you to log in to your email address to send recieve messages and view attached files All of the eNet features require an internet connection via the LAN port on the rear panel of the ae...

Страница 20: ...Use SMS type keyboard to enter letters entry using number keys Press the OK button to load the weather page Press Blue button to change the view between Celsius Fahrenheit and Kelvin Press the i Info...

Страница 21: ...to enter letters entry using number keys Type in the area you wish to search and press OK for the map to start loading Press the Blue button to zoom in on the map Yellow to zoom out Press the Left Rig...

Страница 22: ...Use the Green button to change the keypad mode uppercase special characters numbers Use the i Info button to navigate between the different text boxes like a tab key The Back button will exit the keyp...

Страница 23: ...s the EPG by pressing the GUIDE button on the remote It will bring up the guide from which you can then browse to choose a programme to record Pressing the Red button on a selected show in the EPG men...

Страница 24: ...or discard it Recording Wakeup Timer Recording From here you can manually set timer record ings This is done through Main Menu System Configuration Wakeup Timer By going down to the Wakeup Mode and sc...

Страница 25: ...tiple recordings you need to select the recordings you want to remove using the Yellow button then push the Red button to delete By pressing the Library button LIB a second time while in the library t...

Страница 26: ...he end of each ad break and when you next play your recording you can easly skip the ads by pressing the Right Arrow button next to the OK button Bookmarks are stored with the recordings so that you c...

Страница 27: ...nt to edit To select an area to delete push the Red button to start the selection and then the Red button again to end If the selection you have made is not quite in the right place you can press the...

Страница 28: ...t This can be set to AUTO or MANUAL The manual setting allows you to set your IP address Gateway Subnet Mask Primary DNS and Secondary DNS Displayed also is the MAC address for your unit Once you sele...

Страница 29: ...is just follow the instructions below 1 Download firmware from www dishtv co nz and follow the intructions on the website 2 Unplug your aerialBox Ultra from the power insert the flashdrive 3 Hold down...

Страница 30: ...0 then check set up for above 1 7 faults Q Cannot watch Prime TV when recording TV1 and TV3 A Freeview HD signal is transmitted on 3 x different frequencies with dual tuner receivers you can only tune...

Страница 31: ...ake sure it is set to match the shape of your display Please make sure that Main Menu Installation System Setting HD Resolution is set to one that your TV will be able to display You can view this usi...

Страница 32: ...RCA sockets For internet connection Composite via RCA sockets T1050 Max 10w 100 Designed to receive Freeview HD high definition broadcasts via a UHF antenna Technical Specification 12v DC or via adap...

Страница 33: ...our supplier and have your receipt This warranty is subject to the following provisions This is only valid within New Zealand The product must be correctly connected and operated in accordance with th...

Страница 34: ......

Страница 35: ......

Страница 36: ......

Отзывы: