


TF7038GB_A_NOT
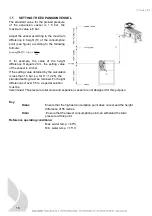
SETTINGS FOR USE WITH STRATIFIED STORAGE
If the Connect WP is integrated into the building heating system according to the above recommendation
(see concept sketch 4.1), the factory settings do not have to be adjusted. Only the following steps need
to be taken:
-
Attach the temperature sensor to the lower part of the buffer tank and connect it to input terminal
6 (see circuit diagram).
-
Ensure the buffer tank discharge pump (“P” in concept sketch 4.1) is regulated as described
above.
SETTINGS FOR USE WITHOUT STRATIFIED STORAGE
Deviating from the recommended system diagram (4.1), the unit can also be used in conjunction with
separate heating and domestic hot water storage tanks. The addition of an outdoor temperature sensor
enables dynamic temperature control of the treated water and thus increases the energy efficiency of the
system in this integration variant. In this case, the following steps must be carried out:
-
Remove the cable bridge on input terminal 16
-
Fit an outdoor temperature sensor to input terminal 12 (see circuit diagram)
-
Attach the temperature sensor to the lower part of the buffer tank and connect it to input terminal 6
(see circuit diagram)
-
Attach sensor 4 to the domestic hot water storage tank (see circuit diagram)
-
Assemble and install the 3-way switch-over valves for switching between heating and domestic hot
water preparation (see circuit diagram)
-
Set the value for the outlet temperature during hot water preparation to the desired setpoint (see
UVR module instructions)
-
Set the desired heating curve for the heating backup (see UVR module instructions)
-
Set the desired hot water temperature (see UVR module instructions). The
corresponding circuit diagrams are included with the respective unit.
17