background image


WS2083 

- 9 - 

Date 


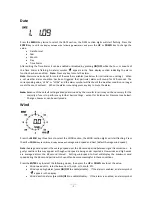
Press  the 

MENU

  key  twice  to  select  the  DATE  section,  the  DATE  section  digits  will  start  flashing.  Press  the 

ENTER

  key 

to  shift  the  display  between  the  following  parameters  and  press

  the 

UP

  or 

DOWN 

key  to  change  the 

value:


Date Format


Year


Month


Day


Time Alarm   

After editing the Time Alarm it can be enabled or disabled by  pressing 

ON/OFF

 while the hour or minute of 

the  Time  Alarm  is  flashing.  An  alarm  symbol 

  appears  in  the  Time  display  section  indicating  the  alarm 

function has been enabled.   

Note:

 Press any key to mute the alarm. 

Note

: Alarms can also be set for most of the weather variables (see below for instructions on setting).    When 

a  set  weather  alarm  condition  has  been  triggered  that  particular  alarm  will  sound  for  120  seconds.  The 
corresponding value, ‘HI AL” or “LO AL” and the alarm symbol will flash until the weather condition no longer 
meets the user’s set level.    When the alarm is sounding press any key to mute the alarm. 
 

Note:

 Because of the default settings already determined by the manufacturer it may not be necessary for the 

majority of users to perform any further basic settings -  except for Relative Air Pressure (see  below). 
Changes, however, can be easily made.   


Wind 


Press the 

MENU

 key three times to select the WIND section, the WIND section digits will start flashing. Press 

the 

UP

 or 

DOWN 

key to shift the display between A

verage wind speed and Gust (default Average wind speed). 


Note:

 Average wind speed is the average speed over the 48 second period between signal transmissions.    In 

gusty conditions this may appear as though wind speed is being under reported as low winds and high winds 
are  averaged  across  the  48  second  interval.    Setting  wind  speed  to  Gust  will  display  the  maximum  wind 
speed during the 48 second period which can often be more meaningful in these conditions.   


Press the 

ENTER

 key to select the following modes, then press the 

UP

 or 

DOWN 

key to set the value:     


Wind speed units - select between km/h, mph, m/s, knots, bft. 


Wind speed high alarm (press 

ON/OFF

 to enable/disable).    If the alarm is enabled, an alarm symbol 

  appears in the display. 


Wind direction alarm (press 

ON/OFF

 to enable/disable).    If the alarm is enabled, an alarm symbol 

Содержание WS2083

Страница 1: ...WS2083 1 WS2083 PROFESSIONAL WIRELESS WEATHER STATION WITH USB UPLOAD ...

Страница 2: ...of incorrect setup please contact our local distributor Greenfrog Scientific www greenfrogscientific co uk and their team will be happy to help Genuine faults can typically be diagnosed without requiring the unit to be returned and replacement parts sent quickly if needed Purchased in AUSTRALIA As many issues can be a result of incorrect setup please contact our local distributor Monax Test Weathe...

Страница 3: ...PC software package 7 1 8 9 2 10 3 11 4 5 12 13 6 14 1 Time 2 Wind Speed and Direction 3 Barometric Pressure 4 Barometric Trend 5 Indoor Temperature 6 Outdoor Temperature 7 Memory 8 Radio Controlled Clock not applicable Aus NZ 9 Date 10 Rainfall 11 Weather Forecast 12 Indoor Humidity 13 Outdoor Reception Signal 14 Outdoor Humidity Note The presence of the Alarm On icon means that the particular al...

Страница 4: ...he signal the RCC icon will not be displayed Positioning Once you have verified that all of the components of the weather station are working they can be positioned in their permanent places Before permanently mounting make sure that all the components work properly together at their chosen mounting or standing locations If there appear to be problems with the 433 MHz radio transmission they can m...

Страница 5: ...ich can cause reduced transmission range As such we recommend avoiding the use of rechargeable batteries Note The performance of Alkaline batteries can be significantly reduced in colder environments resulting in loss of signal In this case we recommend the use of Lithium batteries in the thermo hygro sensor Low Battery Indicator The transmitter low battery indicator may illuminate when temperatur...

Страница 6: ...WS2083 6 ...

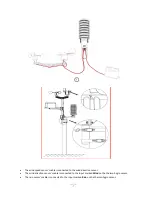
Страница 7: ...cable is connected to the wind direction sensor The wind direction sensor s cable is connected to the input marked Wind on the thermo hygro sensor The rain sensor s cable is connected to the input marked Rain on the thermo hygro sensor ...

Страница 8: ...l 5 press the UP or DOWN key to set the value Level 1 will produce the faintest appearance level 8 the darkest Press the ENTER key to select the following Time zone 12 24h time display default 12h Manual time setting hours minutes Press the UP or DOWN key to set each value Note The radio controlled clock RCC works off the German DCF77 time signal received across large parts of Europe and the UK so...

Страница 9: ...lready determined by the manufacturer it may not be necessary for the majority of users to perform any further basic settings except for Relative Air Pressure see below Changes however can be easily made Wind Press the MENU key three times to select the WIND section the WIND section digits will start flashing Press the UP or DOWN key to shift the display between Average wind speed and Gust default...

Страница 10: ...ween mm and inch Rain high alarm press ON OFF to enable disable If the alarm is enabled an alarm symbol appears in the display Maximum rainfall since this was last reset Resetting the maximum rainfall value when both the rain value and MAX icon are flashing hold the ENTER key for 3s the maximum rain value will be reset to the current reading Clearing Total rainfall when both the Total rain value a...

Страница 11: ...st automatically over a few days as the unit collects data and begins forecasting Press the ENTER key to select the following modes then press the UP or DOWN key to set the value Set the pressure threshold from 2 4hPa default 2hPa Set the storm threshold from 3 9hPa default 4hPa Note The prediction is for the upcoming 12 24 hours and does not necessarily reflect the current weather situation It ca...

Страница 12: ...value and MIN icon are flashing hold the ENTER key for 3s the minimum indoor temperature value will be reset to current reading Indoor Humidity Press the MENU key nine times to select the INDOOR HUMIDITY section the INDOOR HUMIDITY section digits will start flashing Press the UP or DOWN key to change the humidity high alarm press ON OFF to enable disable If the alarm is enabled an alarm symbol app...

Страница 13: ...e reset to the current reading Outdoor Humidity Press the MENU key eleven times to select the OUTDOOR HUMIDITY section Procedures and settings are similar to Indoor Humidity Memory Press the HISTORY key to activate the history data display Press the DOWN key to toggle backwards to see earlier weather history data together with its time stamp press the UP key to see more recent weather history When...

Страница 14: ...ed and displayed by means of a PC Software Download Note No CD is contained with this unit please download the latest software and Basic Installation Guide by entering the link below into your browser s address bar http www boxcn net CumulusDownload This software allows the display storage and printing of historical data In addition the software allows the data to be uploaded and displayed on a we...

Страница 15: ... wind speed appears to be under reporting When set to Average wind speed is measured as the average speed recorded over the 48 second period between transmissions In gusty weather this can appear as though it is under reading Set this to Gust see Wind section above to view the maximum wind speed during each 48 second period My rain gauge is under reporting rainfall or not recording it at all Remov...

Страница 16: ...sumption Base station 2XAA 1 5V batteries Remote sensor 2xAA 1 5V batteries Contact Information Purchased in UK EU Please contact our local distributor Greenfrog Scientific www greenfrogscientific co uk and their team will be happy to help Genuine faults can typically be diagnosed without requiring the unit to be returned and replacement parts sent quickly if needed Purchased in AUSTRALIA Please c...

Страница 17: ...ve 1999 5 EC A copy of the signed and dated Declaration of Conformity is available on request from contact aercusinstruments com COUNTRIES RTTE APPROVAL COMPLIED All EU countries This handbook may contain mistakes and printing errors The information in this handbook is regularly checked and corrections made in the next issue We accept no liability for technical mistakes or printing errors or their...

Отзывы: