background image

The function has no effect

on the operation of the

cooking zones.

4.9 

STOP+GO

This function sets all cooking zones that

operate to the lowest heat setting.
When the function operates, you cannot

change the heat setting.
The function does not stop the timer

functions.

To activate the function:

 touch 

comes on.

To deactivate the function:

 touch 

.

The previous heat setting comes on.

4.10 

Lock

You can lock the control panel while

cooking zones operate. It prevents an

accidental change of the heat setting.

Set the heat setting first.

To activate the function:

 touch  . 

comes on for 4 seconds. The Timer stays

on.

To deactivate the function:

 touch  .

The previous heat setting comes on.

When you deactivate the

hob, you also deactivate this

function.

4.11 

The Child Safety Device

This function prevents an accidental

operation of the hob.

To activate the function:

 activate the

hob with  . Do not set the heat setting.
Touch   for 4 seconds.   comes on.
Deactivate the hob with  .

To deactivate the function:

 activate the

hob with  . Do not set the heat setting.
Touch   for 4 seconds.   comes on.
Deactivate the hob with  .

To override the function for only one
cooking time:

 activate the hob with  .

 comes on. Touch   for 4 seconds. 

Set the heat setting in 10 seconds.

 You

can operate the hob. When you
deactivate the hob with   the function

operates again.

4.12 

OffSound Control

(Deactivating and activating

the sounds)

Deactivate the hob. Touch   for 3

seconds. The display comes on and goes
out. Touch   for 3 seconds.   or 
comes on. Touch   of the timer to

choose one of the following:

 - the sounds are off

 - the sounds are on

To confirm your selection wait until the

hob deactivates automatically.

When the function is set to   you can

hear the sounds only when:
• you touch 

• Minute Minder comes down

• Count Down Timer comes down

• you put something on the control

panel.

4.13 

Power management

function

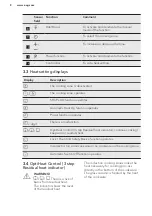
• Cooking zones are grouped

according to the location and number

of the phases in the hob. See the

illustration.

• Each phase has a maximum electricity

loading of 3700 W.

• The function divides the power

between cooking zones connected to

the same phase.

• The function activates when the total

electricity loading of the cooking

zones connected to a single phase

exceeds 3700 W.

• The function decreases the power to

the other cooking zones connected to

the same phase.

• The heat setting display of the

reduced zones changes between two

levels.

ENGLISH

11

Содержание HKL85410FB

Страница 1: ...USER MANUAL EN User Manual Hob HKL85410FB ...

Страница 2: ...r service information www aeg com webselfservice Register your product for better service www registeraeg com Buy Accessories Consumables and Original spare parts for your appliance www aeg com shop CUSTOMER CARE AND SERVICE Always use original spare parts When contacting our Authorised Service Centre ensure that you have the following data available Model PNC Serial Number The information can be ...

Страница 3: ...cessible parts are hot If the appliance has a child safety device this should be activated Children shall not carry out cleaning and user maintenance of the appliance without supervision Children aged 3 years and under must be kept away from this appliance when it is in operation at all times 1 2 General Safety WARNING The appliance and its accessible parts become hot during use Care should be tak...

Страница 4: ... hob guards incorporated in the appliance The use of inappropriate guards can cause accidents 2 SAFETY INSTRUCTIONS 2 1 Installation WARNING Only a qualified person must install this appliance WARNING Risk of injury or damage to the appliance Remove all the packaging Do not install or use a damaged appliance Follow the installation instruction supplied with the appliance Keep the minimum distance ...

Страница 5: ...o change a damaged mains cable The shock protection of live and insulated parts must be fastened in such a way that it cannot be removed without tools Connect the mains plug to the mains socket only at the end of the installation Make sure that there is access to the mains plug after the installation If the mains socket is loose do not connect the mains plug Do not pull the mains cable to disconne...

Страница 6: ...e Do not put aluminium foil on the appliance Cookware made of cast iron aluminium or with a damaged bottom can cause scratches on the glass glass ceramic Always lift these objects up when you have to move them on the cooking surface This appliance is for cooking purposes only It must not be used for other purposes for example room heating 2 4 Care and cleaning Clean regularly the appliance to prev...

Страница 7: ...ds tell which functions operate Sensor field Function Comment 1 ON OFF To activate and deactivate the hob 2 Lock The Child Safety De vice To lock unlock the control panel 3 STOP GO To activate and deactivate the function 4 Bridge To activate and deactivate the function 5 Heat setting display To show the heat setting 6 Timer indicators of cooking zones To show for which zone you set the time 7 Time...

Страница 8: ...ower function operates digit There is a malfunction OptiHeat Control 3 step Residual heat indicator continue cooking keep warm residual heat Lock The Child Safety Device function operates Incorrect or too small cookware or no cookware on the cooking zone Automatic Switch Off function operates 3 4 OptiHeat Control 3 step Residual heat indicator WARNING There is a risk of burns from residual heat Th...

Страница 9: ...e time after which the hob deactivates Heat setting The hob deacti vates after 1 3 6 hours 4 7 5 hours 8 9 4 hours 10 14 1 5 hour 4 3 The heat setting To set or change the heat setting Touch the control bar at the correct heat setting or move your finger along the control bar until you reach the correct heat setting 4 4 Cooking zone indication The horizontal line shows the maximum size of the cook...

Страница 10: ...t the cooking zone with The indicator of the cooking zone starts to flash quickly The display shows the remaining time To change the time set the cooking zone with Touch or To deactivate the function set the cooking zone with and touch The remaining time counts back to 00 The indicator of the cooking zone goes out When the time comes to an end the sound operates and 00 flashes The cooking zone dea...

Страница 11: ...erride the function for only one cooking time activate the hob with comes on Touch for 4 seconds Set the heat setting in 10 seconds You can operate the hob When you deactivate the hob with the function operates again 4 12 OffSound Control Deactivating and activating the sounds Deactivate the hob Touch for 3 seconds The display comes on and goes out Touch for 3 seconds or comes on Touch of the time...

Страница 12: ... speed 1 Fan speed 1 Mode H5 On Fan speed 1 Fan speed 2 Mode H6 On Fan speed 2 Fan speed 3 1 The hob detects the boiling process and acti vates fan speed in accordance with automatic mode 2 The hob detects the frying process and acti vates fan speed in accordance with automatic mode 3 This mode activates the fan and the light and does not rely on the temperature Changing the automatic mode 1 Deact...

Страница 13: ... The bottom of the cookware must be as thick and flat as possible Cookware dimensions Induction cooking zones adapt to the dimension of the bottom of the cookware automatically to some limit The cooking zone efficiency is related to the diameter of the cookware The cookware with a smaller diameter than the minimum receives only a part of the power generated by the cooking zone Refer to Technical i...

Страница 14: ...es 20 60 Use max l water for 750 g of potatoes 7 9 Cook larger quantities of food stews and soups 60 150 Up to 3 l liquid plus ingredi ents 9 12 Gentle fry escalope veal cor don bleu cutlets rissoles sausages liver roux eggs pancakes doughnuts as nec essary Turn halfway through 12 13 Heavy fry hash browns loin steaks steaks 5 15 Turn halfway through 14 Boil water cook pasta sear meat goulash pot r...

Страница 15: ...w the hob operates Use a special cleaner applicable for the surface of the hob Use a special scraper for the glass 6 2 Cleaning the hob Remove immediately melted plastic plastic foil sugar and food with sugar If not the dirt can cause damage to the hob Take care to avoid burns Put the special scraper on the glass surface at an acute angle and move the blade on the surface Remove when the hob is su...

Страница 16: ...n acoustic signal sounds and the hob deactivates An acoustic signal sounds when the hob is deactivated You put something on one or more sensor fields Remove the object from the sensor fields The hob deactivates You put something on the sensor field Remove the object from the sensor field Residual heat indicator does not come on The zone is not hot because it operated only for a short time If the z...

Страница 17: ... the bottom of the cookware is too small for the zone Use cookware with correct dimensions Refer to Technical informa tion chapter and a number come on There is an error in the hob Disconnect the hob from the electrical supply for some time Disconnect the fuse from the electrical system of the house Connect it again If comes on again speak to an Authorised Service Centre comes on There is an error...

Страница 18: ...arantee are in the guarantee booklet 8 INSTALLATION WARNING Refer to Safety chapters 8 1 Before the installation Before you install the hob write down the information bellow from the rating plate The rating plate is on the bottom of the hob Serial number 8 2 Built in hobs Only use the built in hobs after you assemble the hob into correct built in units and work surfaces that align to the standards...

Страница 19: ... 12 mm 28 mm 38 mm B 57 mm 41 mm 31 mm min 30 mm min 500 mm 20 mm 20 mm min 2 mm A B A 12 mm 28 mm 38 mm B 57 mm 41 mm 31 mm min 500 mm R 5mm min 55mm 490 1 mm 750 1mm min 38 mm min 2 mm min 12 mm min 2 mm ENGLISH 19 ...

Страница 20: ...0 GBD CB AU 220 240 V 50 60 Hz Induction 7 4 kW Made in Germany Ser Nr 7 4 kW AEG 9 2 Cooking zones specification Cooking zone Nominal power maximum heat setting W Power function W Power function maximum dura tion min Cookware diam eter mm Left front 2300 3200 10 125 210 Left rear 2300 3200 10 125 210 Middle front 1400 2500 4 125 145 Right rear 2400 3700 10 210 300 The power of the cooking zones c...

Страница 21: ...y the crosses of the respective cooking zones 10 2 Energy saving You can save energy during everyday cooking if you follow below hints When you heat up water use only the amount you need If it is possible always put the lids on the cookware Before you activate the cooking zone put the cookware on it Put the smaller cookware on the smaller cooking zones Put the cookware directly in the centre of th...

Страница 22: ...www aeg com 22 ...

Страница 23: ...ENGLISH 23 ...

Страница 24: ...www aeg com shop 867332806 A 492016 ...

Отзывы: