background image

English

29

 NOTE:


The signals from the remote control are transmitted to 

the device by infrared light. You should therefore ensure 

that the device is not in direct sunlight. This might make 

transmission of the signals from the remote control to the 

device impossible.

Effective range of the remote control 

Point the remote control at the remote control sensor on the 

right next to the display on the front of the device. The dis-

tance between remote control and sensor should not exceed 

5 m. The angle of the remote control to the remote control 

sensor to right, left, top and bottom should not exceed 30°.

Operation 

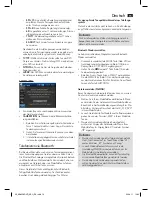
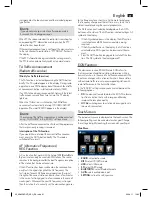
(Illustration 2: Control Panel)

 NOTE:


Some keys are found not only on the device, but also 

on the remote control and touch-screen. Keys with the 

same designation have the same function.

Touch Screen


In addition to operation by means of the keys on the de-

vice and the remote control, it is also possible to use the 

“touch-screen”. Here you can lightly touch the key shown 

with your finger. Read an explanation of the touch-screen 

menus in the “Touch-screen” section on page 31.

 CAUTION: 

Do not obstruct the touch-screen while it is being 

retracted or extended. This could result in damage to 

the monitor mechanism.

MIC (Microphone) 

During a telephone call you should speak in the direction 

of the built-in microphone.


Eject Button


Press this button to eject the CD/DVD.

OPEN Button  

For retracting and extending the touch-screen monitor.

USB Connection


If you would like to play back data contained on a USB 

stick, please insert the stick into the opening provided. 

e word USB PLAY appears in the display. The data is 

played back automatically. 

 NOTE:


•  Due to the large number of different types of USB 

storage media that are available today it is unfortu-

nately not possible to guarantee full compatibility 

with all USB storage media. For this reason there 

may in rare cases be problems with the playback 

of USB storage media . This is 

not

 a malfunction of 

the device.

•  Should the USB storage device not be automatical-

ly selected press the MOD button again. 

 NOTE:


•  To select a specific track navigate using the  

cursor buttons

 in the File menu and select the 

track with 

ENTER

• 

Please note: 

The USB connection is only designed 

for playing back data from storage devices and not 

for charging from other external devices (such as 

smartphones). Only a low power (100 mA) power 

supply can be guaranteed. This USB connection is 

not designed for the use of e.g. external 2.5“ hard 

drives, which may have starting currents of up to 

1100 mA. For playback with your smartphone, iPod 

or iPhone please use the AV IN socket provided. 

Unless music playback via Bluetooth is supported.

AV IN Jack


To connect analogue replay devices. Using this socket it 

is possible to hear the sound of other playback devices 

such as MP3 players, CD players etc. through the loud-

speaker.
1.  Please connect the external device with a 3.5 mm 

stereo jack plug to the AV IN socket.

2.  Press the MOD  button (13) repeatedly until “AV IN” 

appears in the display.

3.  You now hear the sound from the external device 

played back through the loudspeakers.

4.  With the multifunction controller (11) you can change 

the volume.

5.  For the remaining procedure please see the operat-

ing instructions of the external sound source.

 NOTE:


•  Adjust the volume of the external device to a 

comfortable level.

•  With the help of the adapter cable supplied you 

can also play back the picture and sound of other 

playback devices such as cameras, video players 

etc. Connect the playback device in accordance 

with the coloured cinch connectors of the adapter 

cable (red = audio right, white = audio left, yellow = 

video).

LCD Display

 (liquid crystal display)

IR

 (Infrared) 

Sensor for the remote control.



I


Button

a) 

In Radio mode: 

For manually setting the radio station.

b)  In CD/DVD mode


To jump forwards, press the key briefly. To spool 

through the titles, keep the key pressed down.

c) 

In Bluetooth mode:


In order to end a call or reject an incoming call.

10 

II Button


Press the 

II

 button to interrupt playback of the CD/

DVD (pause function). Press this button again to continue 

listening to the CD.

05_AR4026DVD_AEG_SK.indd   29

03.08.11   12:32

Содержание AR 4026 DVD

Страница 1: ...B 17 5 cm 7 LCD Monitor AR 4026 DVD Bedienungsanleitung Garantie 05 Instruction Manual 24 D Autoradio mit USB 17 5 cm 7 LCD Monitor GB Car radio with USB 17 5 cm 7 LCD Monitor 05_AR4026DVD_AEG_SK indd 1 03 08 11 12 32 ...

Страница 2: ... 20 Störungsbehebung Seite 20 Handhabung einer CD DVD Seite 21 Garantie Seite 21 Stichwortverzeichnis Index Seite 23 English Contents Overview of the Components Page 3 Instruction Manual Page 24 Safety Information Page 25 Road Safety Page 25 Safety Information when installing and connecting the radio Page 25 Important Information for installing your carradio Page 26 Installation Page 27 Connection...

Страница 3: ...rsicht der Bedienelemente 3 Overview of the Components Abbildung 1 Fernbedienung Illustration 1 Remote Control Abbildung 2 Bedienfeld Illustration 2 Control Panel 05_AR4026DVD_AEG_SK indd 3 03 08 11 12 32 ...

Страница 4: ...en Betrachtungswinkel verändern 14 OSD CD MP3 DVD Modus Wechsel der Anzeigen Im Radio Modus Frequenz und PTY Programmtyp kurz anzeigen 15 PBC Wiedergabe stoppen Playback Control bei VCD ein ausschalten 16 VOL Lautstärke erhöhen vermindern SEEK I Radiomodus Manueller Sendersuchlauf CD MP3 DVD Modus Sprung zum nächsten Kapitel oder Lied SEEK I Radiomodus Manueller Sendersuchlauf CD MP3 DVD Modus Spr...

Страница 5: ...por etc erreichbar liegen WARNUNG Lassen Sie kleine Kinder nicht mit Folie spielen Es besteht Erstickungsgefahr Verkehrssicherheit WARNUNG Die Verkehrssicherheit ist oberstes Gebot Benutzen Sie daher Ihre Autoradioanlage immer so dass Sie stets der aktuellen Verkehrssituation gewachsen sind Bedenken Sie dass Sie bei einer Geschwindigkeit von 50 km h in der Sekunde 14 m fahren In kritischen Situati...

Страница 6: ... die Zündung ein bzw ausschalten Bei eventuellem Verlust der gespeicherten Sender erhält das Radio keinen für die Senderspeicherung erforderlichen Dauer ACHTUNG Bei einem Anschluss an Dauer ohne Zündung kann es trotz ausgeschaltetem Radio zu einer unnöti gen Belastung der Autobatterie kommen Im schlimm sten Fall zu einer Entladung der Autobatterie 4 Der maximale Neigungswinkel beim Einbau Ihres Au...

Страница 7: ...Anschlüsse gemäß des Schaubildes her ACHTUNG Setzen Sie das abnehmbare Bedienfeld erst nach dem Anschluss der Kabel auf Verwenden Sie Lautsprecher mit einer Impedanz von 4 Ohm Die Lautsprecherverkabelung muss Massefrei sein Beim Anschluss eines Subwoofers ist ein Verstärker erforderlich Das Masseanschlusskabel PARKING muss angeschlos sen werden damit bei der Wiedergabe von DVDs das Bild auf dem Mo...

Страница 8: ... Entnehmen Sie die Batterie aus dem Batteriefach sobald sie verbraucht ist oder die Fernbe dienung voraussichtlich längere Zeit nicht benutzt wird Austretende Batteriesäure sofort mit einem Tuch entfernen Bei Hautkontakt betroffene Stelle sofort waschen Bei Ver schlucken sofort Arzt aufsuchen Bei Augenkontakt Augen auswaschen und Arzt aufsuchen ACHTUNG Beachten Sie beim Entsorgen alter Batterie di...

Страница 9: ...ermedien kommen Dies ist keine Fehlfunktion des Gerätes HINWEIS Sollte das USB Speichermedium nicht automatisch ausgewählt werden drücken Sie wiederholt die MOD Taste Um einen bestimmten Track auszuwählen navigie ren Sie mit den Richtungstasten im Dateimenü und wählen Sie den Track mit ENTER aus Bitte beachten Der USB Anschluss dient aus schließlich zur Wiedergabe von Speichermedien und nicht zum ...

Страница 10: ...r ange wählt werden wenn Sie ein entsprechendes Medium angeschlossen bzw eingelegt haben 14 Stumm Taste Dient zum schnellen Abstellen der Lautstärke Die An zeige VOL MUTE erscheint im Display Zum Beheben dieser Funktion drücken Sie erneut die Taste 15 REL Taste Drücken Sie die REL Taste zum Herausnehmen des vorderen Bedienfeldes 16 BND TILT Taste Radio Betrieb Kurz drücken Drücken Sie kurz die BND...

Страница 11: ...usgeschaltet AF Alternativ Frequenzen REG Funktion AF ist eine Funktion die mit Hilfe des RDS Radio Data System arbeitet und nur bei FM Sendern genutzt werden kann Das Gerät sucht im Hintergrund die am besten zu empfangene Frequenz des eingestellten Senders Wenn die AF Funktion angewählt wird prüft das Radio lau fend die Signalstärke der AF Frequenz Das Prüfintervall für jede AF Frequenz hängt von...

Страница 12: ...MENU Gerätemenü aufrufen DVD Wiedergabe Menü Siehe im Abschnitt DVD Wiedergabe Menü USB SD MP3 CD Menü INT Anspielfunktion 1x drücken Alle Stücke im aktuellen Ordner werden für 10 Sekunden angespielt INTRO DIR erscheint kurz im Display 2x drücken Alle Stücke auf dem Speichermedium werden für 10 Sekunden angespielt INTRO ALL erscheint kurz im Display 3x drücken Anspielfunktion wird deaktiviert INRT...

Страница 13: ...on Ein ON oder Aus schalten OFF SUBWOOFER Subwoofer Ein ON oder Ausschalten OFF DISPLAY SCREEN Wählen Sie hier das Seitenverhältnis vom Bildschirm aus Zur Auswahl stehen 4 3 16 9 und FULL BACKLIGHT Stellen Sie hier die Helligkeit des Touch Screen ein Wählen Sie zwischen LOW gering MID Medium HIGH Hoch RADIO AREA Stellen Sie hier die Region ein in der das Gerät betrieben wird STEREO StereobetriebEi...

Страница 14: ...iltelefon diese Funktion unterstützt DVD OSD SPRACHE Wählen Sie hier die Sprache des DVD OSD Menüs aus UNTER SPRACHE Wählen Sie hier die bevorzugte Spra che der filmbegleitenden Untertitel aus AUDIO SPRACHE Wählen Sie hier die bevorzugte Sprache der Audio Ausgabe aus MENÜ SPRACHE Wählen Sie hier die bevorzugte Sprache der DVD Menüs aus KODE Hier können Sie das Passwort für die Kindersiche rung KLA...

Страница 15: ...ig auf ca 3 Meter Für eine optimale Tonqualität während eines Telefonge sprächs Stellen Sie die Lautstärke nicht zu hoch ein Eine Rückkopp lung Pfeifton aus den Lautsprechern könnte die Folge sein HINWEIS Die Einstellung der Lautstärke ist abhängig von den Ein baupositionen der Lautsprecher zum Mikrofon und kann daher nicht benannt werden Bluetooth Modus auswählen Sie haben verschiedenen Möglichke...

Страница 16: ...enü Die Untermenüs CALLING MUSIC HISTORY und PHONE BOOK werden Ihnen am linken Rand des Touch Screens angezeigt CALLING In diesem Menü HINWEIS Sollten Sie eine oder mehrere Ziffern falsch einge geben haben können Sie die Ziffern mit der Taste BND C RDM Abb 1 23 oder mit CLEAR am Touch Screen löschen Kurz drücken Die Ziffern werden einzeln gelöscht Lang drücken Es werden alle eingegeben Ziffern gel...

Страница 17: ... Sie die Geräte untereinander verbunden haben starten Sie die Musikwiedergabe mit der Taste II Je nach Gerätehersteller Modelle und Softwarever sionen müssen Sie vorher die Musikwiedergabe in Ihrem Mobiltelefon starten 2 Mit den Tasten I I wählen Sie den nächsten bzw vorherigen Musiktitel aus 3 Mit der Taste II unterbrechen Sie die Musikwiedergabe 4 Mit der Taste beenden Sie die Wiedergabe Über de...

Страница 18: ...u stoppen Drücken Sie nun noch einmal auf die Taste II Abb 1 1 so wird die CD DVD von vorn abgespielt Vorheriges Kapitel Track auswählen Drücken Sie die Taste I SEEK Abb 1 16 um zum Beginn des vorherigen Kapitels oder Tracks zu springen Nächstes Kapitel Track auswählen Drücken Sie die Taste I SEEK Abb 1 16 um zum Beginn des nächsten Kapitels oder Tracks zu springen Track direkt auswählen TippenSie...

Страница 19: ...hließen Sie einen externen Monitor an die RCA An schlüsse VIDEO OUT DUAL L OUT und DUAL R OUT an C Dual im Radio AV IN BT Modus 2 Drücken Sie im Radio AV IN oder BT Modus die DUAL Taste Abb 1 12 Die Einblendung im Touch Screen ändert sich auf den Dual Betrieb C DUAL wird im Bild schirm angezeigt 3 Das Signal der eingelegten DVD wird an den externen Monitor geleitet 4 Der Radioton wird weiterhin üb...

Страница 20: ...enSiedieCD richtigherumein Fehlersymptom Grund Lösung CDlässtsichüber dieMODETaste nichtanwählen EsistkeineCD eingelegt LegenSieeine CDein NachEinlegenin dasGerätläuftdie CDnicht DerLautstärke regleristzuleise eingestellt DenLautstärkeregler höhereinstellen DieAnschlüsse sindnichtkorrekt ausgeführt Den 12V sowie denMasseanschluss überprüfen CDsetztaus DieStraßenoberflä cheistrau ZumAbspielender CD...

Страница 21: ...en Dies kann zu Schäden am Gerät führen Anfassen der CD Die CD stets am Rand anfas sen Um die CD sauber zu halten nicht an der Oberfläche anfassen ACHTUNG Keine Aufkleber oder Klebeband auf die CD kleben Die CD nicht direkter Sonneneinstrahlung oder Wärmequellen wie Heizungsrohren aussetzen und sie auch nicht im Auto lassen wenn dieses in praller Sonne geparkt wird da dies zu einem beträchtlichen ...

Страница 22: ...ichen Zugangscode der Ihnen direkt nach Ihrer Anmeldung per E Mail übermittelt wird können Sie den Bearbeitungsablauf Ihrer Reklamation auf unserem Serviceportal online verfolgen Alternativ können Sie uns den Servicefall per E Mail hotline etv de oder per Fax 0 21 52 20 06 15 97 mitteilen Bitte teilen Sie uns Ihren Namen Vornamen Straße Hausnummer PLZ und Wohnort Telefon Nummer soweit vorhanden Fa...

Страница 23: ...2 Montage Sicherheitshinweise Seite 5 MUTE Taste Stummschalten Seite 10 P Play Pause II Seite 10 PTY Seite 11 R RDM Taste Zufallswiedergabe Seite 12 RESET Taste Rücksetzen Seite 10 RPT Taste Wiederholen Seite 12 S Sicherheitshinweise Seite 5 Speicherkarte Seite 10 Stereo Umschaltung Seite 12 Störungsbehebung Seite 20 Stummschalten siehe MUTE Seite 10 T TA Verkehrsfunk Seite 11 Tasten der Fernbedie...

Страница 24: ...s change the viewing angle 14 OSD CD MP3 DVD Modus CD MP3 DVD Mode Switching the display In radio mode briefly display the frequency and PTY program type 15 PBC Stop playback Activate deactivate Playback Control with VCD 16 VOL To increase reduce the volume SEEK I Radio mode Manual channel Search CD MP3 DVD Mode To jump to the next chapter or song SEEK I Radio mode Manual Station Search CD MP3 DVD...

Страница 25: ...gs boxes polystyrene etc out of their reach WARNING Caution Do not allow small children to play with the foil as there is a danger of suffocation Road Safety WARNING Roadsafetyisofparamountimportance Youshould thereforeuseyourcarradioatalltimesinsuchawaythat youareabletocopewiththecurrenttrafficsituation Pleaserememberthatataspeedof30mph 50kph you travel15yards 14metres inonesecond Weadviseyounott...

Страница 26: ...vehicle specific adapters NOTE If the device is correctly connected the radio can be switched on and off via the ignition If the stored stations are lost this indicates that the radio is not receiving any continuous current which is required for storing the ations CAUTION Wherethereisaconnectionto continuous without theignitionbeingswitchedon thecarbatterymightbe drainedofpowereveniftheradioisswit...

Страница 27: ...nnect the device as shown in the diagram CAUTION Do not attach the removable control panel until after connection of the cables Please use loudspeakers with an impedance of 4 ohm The loudspeaker cables must be unearthed If a subwoofer is connected an amplifier is required The earth connection cable PARKING must be connected in order for DVD pictures to be played back to the monitor If the cable ha...

Страница 28: ...h Remove the battery from the battery compartment as soon as it is exhausted or if the remote control is not going to be used for a longer period of time Wipe up leaked out battery acid with a cloth In case of skin contact immediately wash the affected area Seek medical advice if battery acid has been swallowed In case of contact with your eyes wash out the eyes and seek medical advice CAUTION Whe...

Страница 29: ...e Should the USB storage device not be automatical ly selected press the MOD button again NOTE To select a specific track navigate using the cursor buttons in the File menu and select the track with ENTER Please note The USB connection is only designed for playing back data from storage devices and not for charging from other external devices such as smartphones Only a low power 100 mA power suppl...

Страница 30: ...on Radio Operation Short press Briefly press the BND TILT button to switch between FM FM and AM medium wave bands The designation of the corresponding level F 1 F2 F3 M1 M2 appears in the LCD display Long press For adjusting the viewing angle when the touch screen monitor is extended ANGLE 1 4 17 CD DVD Slit Insert the CD DVD with the labelled side facing upwards gently into the CD DVD slot until ...

Страница 31: ...e signal strength of the AF frequency The test interval for each AF frequency depends on the signal strength of the current station and varies from a few minutes in the case of a strong signal to a few seconds in the case of weak signals Whenever the new AF frequency is stronger than the station that is currently set the device changes over to this frequency for a short time As the mute time durin...

Страница 32: ... current folder are played for 10 seconds INTRO DIR appears briefly in the display Press twice all of the pieces of music on the storage medium are played for 10 seconds INTRO ALL ap pears briefly in the display Press three times the intro function is deactivated INTRO OFF appears briefly in the display RPT repeat function Press once repeat the current piece of music RPT 1 appears briefly in the d...

Страница 33: ... off in the display ON In regions where the signal is too strong the reception is improved The letters LOC appear in the display TA VOLUME Here you can set the volume of the traffic announcements RETUNE Select the period of time for the automatic station search function with traffic announcements or program information SHORT after approximately 30 seconds LONG after approximately 90 seconds PI If ...

Страница 34: ...der to change the pass word 1 Touch the lock symbol on the touch screen The PASS WORD window appears on the screen Enter the current password with the number keys In order to prevent unauthorised persons from reading the password only the symbols appear on the screen Confirm your entry with OK 2 Touch the lock symbol again on the touch screen Enter the new password Confirm your entry with OK RATIN...

Страница 35: ...r the car radio on your mobile telephone Please consult the operating manual of your mobile telephone The device SCE_DVD appears for selection on your mobile telephone 2 Depending on the device manufacturer models and software versions you should now enter the password 0000 in your mobile telephone 3 If the registration has been completed successfully the name of your mobile telephone appears in t...

Страница 36: ...ith SEND on the touch screen you can call the selected number NOTE If this function is not supported by your mobile telephone Download Fail is shown briefly on the touch screen Outgoing calls 1 Select Bluetooth mode 2 The telephone number you are calling is entered via the number keys The number entered is shown on the display of the car radio NOTE If you have entered one or more numbers incorrect...

Страница 37: ...rack Track means the sections of an Audio CD This may be for example a song the suite of a symphony etc Titel Kapitel Video DVDs are subdivided into Title and Chapter A Title may be e g a specific film the Chapter however may be subsections of this film MPEG4 Also suitable for playing back files which are MPEG 4 short for Moving Picture Experts Group 4 compressed MPEG 4 is a compression method thr...

Страница 38: ... key in order to change the image section Hold down the key again to select the ap propriate zoom factor or return to the original zoom factor NOTE With the cursor buttons Fig 1 21 you can move through the zoomed image Changing the viewing angle Some DVDs offer the possibility to select the viewing angle Press the ANGLE button Fig 1 6 to change the viewing angle NOTE If changing the viewing angle ...

Страница 39: ...unction control and the MUTE key D Dual in DVD USB SD mode 2 In Radio mode press the DUAL key Fig 1 12 twice The display on the touch screen changes to dual operation D DUAL is shown on the screen 3 The signal of the inserted DVD is transmitted to the external monitor 4 The sound with which dual operation was activated continues to be heard through the front loudspeakers at the volume that was las...

Страница 40: ...ntrol processor of the device may have been blocked by overvoltage or un dervoltage in the vehicle electrical system Press the RESET button Fault Symptoms Cause Solution No radio recep tion The antenna cable is not connected Insert the antenna cable firmly into the antenna socket of the device Poor radio recep tion It is possible that your vehicle has a special antenna phantom po wered antenna Ple...

Страница 41: ...e car Check all CDs for cracks scratches and warping before you play them It is possible that CDs that are dam aged in this way cannot be played back correctly Such CDs should not be used Use only standard commercially available circular CDs with a 12 cm diameter CDs with an 8 cm diameter or CDs with contours e g of a butterfly or heart are not suitable It is possible that such CDs may not only be...

Страница 42: ...29 PTY Page 30 R RDM button Random playback Page 32 RESET button Reset Page 30 Remote control batteries Page 28 Remote control buttons Page 24 Removing the control panel Page 30 Road Safety Page 25 RPT button Repeat Page 32 S Safety Information Page 25 Starting up Page 28 Stereo Switch Page 32 Switching off Page 30 Switching on Page 30 T TA Traffic Announcements Page 31 Technical Data Page 39 Tele...

Страница 43: ...05_AR4026DVD_AEG_SK indd 43 03 08 11 12 32 ...

Страница 44: ...05_AR4026DVD_AEG_SK indd 44 03 08 11 12 32 ...

Страница 45: ...05_AR4026DVD_AEG_SK indd 45 03 08 11 12 32 ...

Страница 46: ...ing to guarantee declaration 24 miesiące gwarancji na podstawie karty gwarancyjnej Záruka 24 měsíců podle prohlášení o záruce A garanciát lásd a használati utasításban 24 місяці гарантії згідно з гарантійним листом Гарантийные обязательства смотри руководство пользователя Kaufdatum Händlerstempel Unterschrift Koopdatum Stempel van de leverancier Handtekening Date d achat cachet du revendeur signat...

Отзывы: