background image


19 

HINT:


To allow for heat loss while placing food into the oven, preheat the oven 10-20°C higher and then 
reduce the temperature to your required cooking temperature. 
Always preheat the oven when cooking multiple dishes at the same time. 

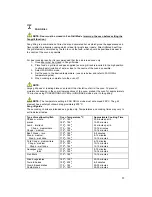
Roasting guide

. These cooking charts are intended as a guide only. Temperature and cooking 

times may vary to suit individual tastes.   


Type of Meat 

Approx. 450 grams = 

1lb 

Cuts of Meat 

Time per lb 

(allow)   

Oven Temperature 

0

Beef 

Prime Rib, rolled 

sirloin bolar blade, 

Top Loin, New York 

Strip Sirloin 

60 minutes per 2lbs 


40 minutes per 2lbs 

180

0

 – 200

0


180

0

 - 200

0


Veal 

Shoulder or leg (with 

bone or rolled) 

40-50 minutes per 

2lbs. 

180

0

 - 200

0


Lamb 

Leg, sho ulder (loin or 

rolled) 

40-50 minutes per 

2lbs 

180

0

 - 200

0


Pork 

Leg loin 

90 minutes per 2lbs. 

220

0

-230

0

 / 180

0

-200

0


Pork leg should be cooked at a higher temperature for the first 15-25 minutes then reduced to 
lower temperature for remaining cooking time. 
 

Type of Poultry 

Size of Meat 

Time per lb 

Oven Temperature 

0

Chicken 

Whole or pieces 

30 minutes per lb. 

180

0

 - 200

0


Duck 

3lbs – 4.1lbs  

30 minutes per lb. 

+ 35 minutes extra 

180

0

 - 200

0


Turkey 

5.4lbs – 21lbs  

20 minutes per lb. 

+ 35 minutes extra 

180

0

 - 200

0


Turkey should be well basted and turned during cooking 
 

Type of Fish 

Cuts of Fish  

Time per lb 

Oven Temperature 

0

Fish 

Whole or fillets 

10 minutes per lb. 

 170-190

0

In Conventional Oven mode, fish should be covered for the first ¾ of the cooking time to help 
retain moisture.  

 
Baking guide

. These cooking charts are intended as a guide only. Temperature and cooking 

times may vary to suit individual tastes. 
 

Oven Temperature 

0

C  General Times 

Foods Suitable 

130

0

 – under 

Very slow 

Small meringues, pavlova, custard, reheating 

130

0

 - 150

0


Slow 

Rich fruit cake, light fruit cake 

150

0

 - 180

0


Moderate 

Casseroles, deep butter cake 

180

0

 - 200

0


Moderately hot 

Shallow butter cakes, sponges, biscuits, meat loaf, 

baked fish 

200

0

 - 230

0


Hot 

Swiss roll, patty cakes, rock cakes, short crust pastry 

230

0

 – and over 

Very Hot 

Scones, Choux pastry 

Содержание 24" 4006G-M

Страница 1: ...User s Manual 4006G M 24 Free Standing Dual Fuel Range User s Manual ...

Страница 2: ...d for future reference Should ownership of the appliance be transferred please ensure that the manual is also passed onto the new owner Contents A Installation check and warnings Page 3 7 B Cooker Measurement Page 7 C Electrical Requirements Page 8 D Using the applianc e for the first time Page 9 10 E Accessories Page 10 11 F Electronic timer Page 11 13 G Gas cooktop control panel Page 14 H Gas co...

Страница 3: ... local regulations All rooms require an open window or equivalent and some rooms will require a permanent vent as well For room areas up to 5 m2 an air vent of 100 cm2 is required For room areas between 5 m 2 and 100 cm 2 an air vent of 50 cm 2 is required If the room is greater than 5 m2 and has a door that opens directly to the outside then no air vent is required If there are other fuel burning...

Страница 4: ... Proceed as follows in order to convert from one type of gas to another remove the grids covers holed flame diffuser and the burner supports fig 7 replace the holed injectors as indicated in 7 C according to the type of gas used see table 1 put the burner supports flame diffusers covers and grids back in position regulate the minimum output following the instructions in paragraph 1 7 REGULATING TH...

Страница 5: ...el in conformity with the regulations in force The supplier refuses all responsibility for damages to person or property resulting from the failure to comply with such provisions The appliance is designed to be used near heat resistant pieces of furniture or kitchen cabinetry only ELECTRICAL CONNECTIONS FIG 7 Before carrying out electrical connection be sure that the characteristics of the electri...

Страница 6: ...l pipe as per current installation standards which can be extended to a maximum of 2000 mm the ends of the pipe must be fitted with an ISO 228 1coupling and gasket or an ISO 7 1 threaded coupling with mechanical gasket b For free standing A non metallic flexible pipe can be used as long as it complies with current standards and the following installation instructions are observed the pipe must be ...

Страница 7: ...onstruction of the wall to which it will be drilled and fitted The installer should provide the fixing hook per customer request B Cooker Measurements 600x640x920 Measurements Please note that all dimensions provided are in millimeters mm The sizes allow for only a small degree of error so all cut outs must be precise and square If the range is placed on a base measures must be taken to prevent th...

Страница 8: ...supply cord is damaged it must be replaced by the manufacturer its service agent or similarly qualified persons in order to avoid hazard When connected to a sub circuit protected by a circuit breaker it is recommended the circuit breaker be the same as the total rating of the appliance To full disconnect the power supply it is necessary to have a proper mean in the fixed wiring in accordance with ...

Страница 9: ...ealed under the base of the oven liner not exposed Foil or dishes with reflective qualities must never be placed on the base of the oven during cooking as the concentration of direct and reflected heat will damage the enamel surface NOTE Damage resulting from such use is not covered under the provisions of the warranty Initial heat up Some smoke and smell may be noticed during the initial heat up ...

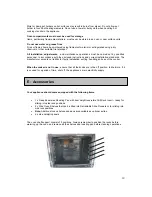
Страница 10: ...ion standards The manufacturer accepts no liability for faulty installation setting handling and use of the cooker When the cooker is not in use ensure that all the knobs are in the off position furthermore if it is unused for a period of time shut off the appliance s main electricity supply E Accessories Your appliance should come equipped with the following items 1 x Deep Enameled Roasting Pan w...

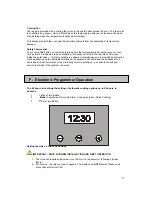
Страница 11: ...e in extreme circumstances and is provided as protection to the appliance and the adjoining furnishings If activated it will shut down the appliance for a short time and will automatically reset allowing normal operations you should consult your service technician if the problem re occurs F Electronic Programmer Operation The 24 hour clock allows the setting of automatic cooking options up to 24 h...

Страница 12: ...sing the button while ton is in the display will change the tone to the desired setting The electronic timer will store in its memory the last tone activated Manual cooking Once the time of day is set the POT symbol will be displayed The oven is now in manual operation mode ready for you to select the desired cooking function and temperature Automatic cooking modes Based on setting the duration DU...

Страница 13: ...sired time and turn off automatically This function is particularly useful in the preparation of the evening meal should you be out during the day it will be ready on your return home For example if your cooking time is 45 minutes and you want the cooking to finish at 6 00 p m Press the MODE button minimum for 4 seconds Press the MODE button again Set the cooking duration time for say 45 minutes u...

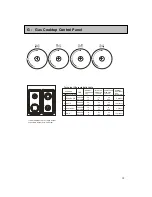
Страница 14: ...OMINAL HEAT INPUT MAX MJ h bTU H PROPANE 28 105 65 13 7 12000 NORMAL PRESSURE mbar INJECTOR DIAMETER 1 100 mm TAP BY PASS DIAMETER 1 100mm PROPANE 28 55 35 3 7 3500 PROPANE 28 90 46 10 5 10000 PROPANE 28 72 35 6 3 6000 NATURAL 10 90 REG NATURAL 10 155 REG NATURAL 10 118 REG 2 1 4 3 1 semirapid burner 2 rapid burner 3 auxiliary burner 4 wok burner ...

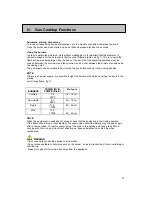
Страница 15: ... up to the closing position NOTE If there is no power supply it is possible to light the burners with matches setting the knob to the startup point large flame fig 1 BURNERS POWER MJ h POWER Btu h Ø of pots Auxiliary 3 2 3000 10 14 cm Semi rapid 6 3 6000 16 18 cm Rapid 11 6 11000 20 22 cm Wok 17 9 17000 24 26 cm NOTE When the equipment is switched off always check that the knobs are in the closing...

Страница 16: ...knob backwards anticlockwise selecting power level from 1 to 12 as before This will activate both Inner and Outer zones concurrently for maximum power c To deactivate turn off Inner Zone or Inner Outer Zone the control knob must be returned to the OFF position IMPORTANT 1 DO NOT TURN CONTROL KNOB ANTICLOCKWISE FROM OFF POSITION AS THIS WILL DAMAGE THE CONTROL MECHANISM OPERATE SINGLE AND DUAL ZONE...

Страница 17: ... containers should not have rough bottoms otherwise scratching will occur Do not switch the electric plate on without the pan over the plate Do not cook any food directly on the hot area Avoid overflows of liquid and should they occur clean away promptly The appliance is not intended to be operated by means of an external timer or separate remote control system Switching on Set the power by rotati...

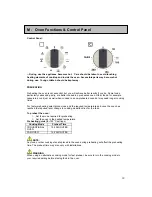
Страница 18: ... need longer cooking times For faster preheating select pizza mode and the required temperature and once the oven has reached the required level change to cooking mode function for the task To preheat the oven 1 Set the mode required for preheating 2 Set the oven to the desired temperature Preheating guide for 180 C settings Cooking Mode Preheat Time CONVENTIONAL OVEN 15 20 MINUTES FAN OVEN 15 20 ...

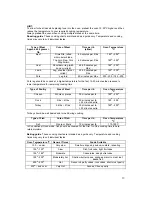
Страница 19: ...temperature for remaining cooking time Type of Poultry Size of Meat Time per lb Oven Temperature 0 C Chicken Whole or pieces 30 minutes per lb 180 0 200 0 Duck 3lbs 4 1lbs 30 minutes per lb 35 minutes extra 180 0 200 0 Turkey 5 4lbs 21lbs 20 minutes per lb 35 minutes extra 180 0 200 0 Turkey should be well basted and turned during cooking Type of Fish Cuts of Fish Time per lb Oven Temperature 0 C ...

Страница 20: ...ect Convention al Oven mode 3 Set the oven to the desired temperature 4 When cooking is complete turn the oven off HINT If water is used in your cooking such as water placed in a baking dish the water will evaporate in the oven in the form of steam The level of condensation will be reduced when cooking in fan oven mode where excess moisture is circulated and evaporates during the cooking cycle NOT...

Страница 21: ...at from behind the fan cover to give a more even temperature throughout the oven The even heat provides similar cooking results for each portion of food Although temperatures for cooking foods in this type of oven are generally the same as required by a conventional oven when cooking foods that require lengthy cooking cycles a fan forced oven normally cooks more quickly saving time and energy Alwa...

Страница 22: ...ndensing in the cooler lower sections of the oven preheat the oven for approximately 10 minutes using CONVENTIONAL OVEN or HIGH BAKE modes prior to fan grilling NOTE The temperature setting in FAN GRILL mode must not exceed 200 C The grill element has a safety shutdown at approximately 200 C Fan grill guide These cooking charts are intended as a guide only Temperatures and cooking times may vary t...

Страница 23: ... from a hot oven whenever possible 2 Place food on grill rack and pan supplied 3 Position the shelf to your preference 4 Select GRILL mode and turn to your desired heat setting 5 When cooking is complete turn the oven off NOTE The grill element is controlled by the oven thermostat Once the temperature in the oven has reached the sel ected temperature the element will switch off and then on again w...

Страница 24: ...f immediately This should be done even if still hot and necessary precaution must be taken to avoid injury Once cool the affected area should be thor oughly cleaned and rinsed using non abrasive mild cleaning detergents and water 2 Care for stainless steel No metal is indestructible and certain procedures should be followed to maintain the finish and durability of stainless steel Never leave stain...

Страница 25: ...finish of the stainless steel and any residual metal fibers may corrode causing a rusty dull appearance Metal polishes with abrasive qualities are also not recommended WARNING Do not use any acid or caustic cleansers or harsh abrasive cleaners or sharp metal scrapers to clean the oven door glass since they can scratch the surface which may result in shattering of the glass Routine cleaning Ensure ...

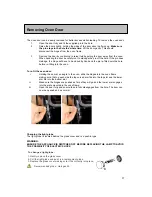
Страница 26: ... side which should face outwards in the oven Because of the structure of the surface it is extremely porous and attracts oxygen When the splashes of grease hit this surface it immediately spreads In this way immediate oxidization of the grease occurs and it ultimately disappears while the oven is in general use at standard cooking temperatures The self cleaning panels are located on the sides and ...

Страница 27: ... fit the oven door i Holding the door at an angle to the oven slide the hinges into the oven frame making sure that on each side the top curved arm fits into the top slot and the lower arm fits into the bottom slot ii Make sure the hinges are pushed as far as they will go and the lower arm engages into the plate mounted in the oven frame iii Open the door fully and ensure the pin fully disengages ...

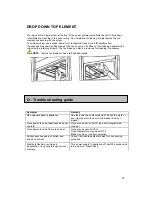
Страница 28: ...TE that the fan blade nut has a left handed thread O Trouble shooting guide Symptom Remedy No power supplied to appliance Has the power been disconnected Check the meter box Has the main fuse or circuit breaker blown or tripped Oven power is on but appliance does not operate Oven may be set on AUTO see auto programmed cooking Oven power is on but there is no heat Oven may be set on AUTO Oven tempe...

Страница 29: ...29 ...
Страница 30: ...region AEG products are supported by a national service support system Call our customer service department for attention Please retain your invoice AEG to quote should you require service assistance This will identify your product for our priority service back up Please attach your invoice to this manual for easy future reference AEG Canada 871 Cranberry Court Oakville Ontario L6L 6J7 Canada Tel ...

Страница 31: ...nformation visit www euro line appliances com www elawest com 871 Cranberry Court Oakville ON L6L 6J7 Canada Toll Free 1 800 421 6332 Showroom 905 829 3980 marketing euro line appliances com 2912 West 4th Ave Vancouver BC V6K 1R2 Canada Toll Free 1 855 352 9378 Showroom 604 235 3980 info elawest com ...

Отзывы: