background image


- 26 - 

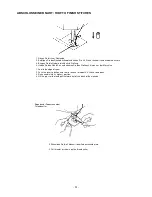
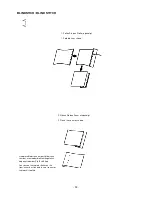
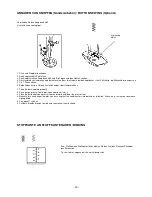
ANNÄHEN VON KNÖPFEN (Sonderzubehör) / BUTTON SEWING (Optional) 


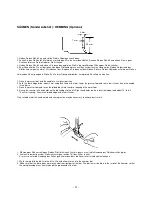
Verwenden Sie den Knopfannähfuß. 
Use the button sewing foot. 


1. Stick- und Stopfplatte auflegen. 
2. Den Knopfannähfuß einsetzen. 
3. Den Knopf zwischen Knopfannähfuß und Stoff legen und den Nähfuß senken. 
4. Das Handrad zu sich drehen und darauf achten, dass die Nadel in beide Knopflöcher sticht. Falls nötig, die Zickzackbreite anpassen. 
5. Ca. 7 Stiche nähen. 
6. Beide Fäden auf die Unterseite ziehen und mit der Hand vernähen. 
 
1. Place the darning plate properly. 
2. Place button presser foot in position and attach it firmly. 
3. Place the button between presser foot and fabric and lower the presser foot. 
4. Manually turn hand wheel towards you, ensuring that the needle enters into both holes of button. If necessary, increase or decrease 

zigzag width. 

5. Sew about 7 stitches. 
6. Pull both threads through to cloth and secure/sew them by hand.  


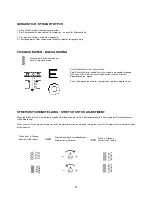
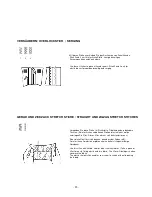
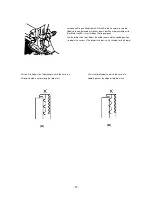
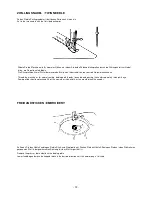
STOFFKANTE AN STOFFKANTE NÄHEN / BINDING  


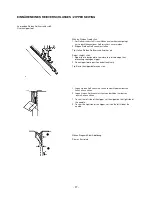
Zum Stoffkante an Stoffkante Nähen wählen Sie den Dreifach Zickzack Stich oder 
den Smokstich. 
 
To sew fabrics edge select the multi-zigzag stitch.


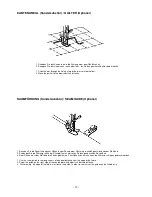
Streichholz  
Match 


Содержание 112704

Страница 1: ... 0 112704 GEBRAUCHSANLEITUNG INSTRUCTION BOOK ...

Страница 2: ... bei Ihrem Händler Die Maschine darf nicht mit verstopften Belüftungsöffnungen betrieben werden Halten Sie die Belüftungsöffnungen der Maschine und des Fußanlassers frei von Flusen Staub und losem Gewebe Keine Gegenstände in die Öffnungen der Maschine stecken bzw fallen lassen Die Maschine nicht im Freien verwenden Die Maschine darf nicht an Orten betrieben werden an denen Sprays oder reiner Sauer...

Страница 3: ...ked Keep ventilation openings of the sewing machine and foot controller free from the accumulation of lint dust and cloth Never drop or insert any object into the opening Do not use outdoors Do not operate where aerosol spray products are being used or where oxygen is being administered Do not put anything on the foot controller because the machine may accidentally start and the motor or the foot ...

Страница 4: ...ine 14 Einstellen der Fadenspannung 15 Auswechseln der Nadel 16 Einsatz Stick und Stopfplatte 16 Stoff Faden Nadel Tabelle 17 Nähen Stichmusterwähler Nähtischausstattung 18 Nähbeginn 20 Stichbreite 20 Abschluss einer Naht 21 Geradstich 22 Zickzack Nähen 22 Stretchsticheinstellung 22 Versäubern Overlockstich 23 Blindstich 24 25 Annähen von Knöpfen 26 Stoffkante an Stoffkante nähen 26 Einnähen eines...

Страница 5: ...usting thread tension 15 Changing needle 16 Inserting darning plate 16 Fabric Thread Needle Chart 17 Sewing pattern selector and operating chart 18 Start sewing 20 Stitch width 20 How to finish stitches 21 Straight stitch 22 Zigzag sewing 22 Stretch stitch adjustement 22 Serging 22 Straight and Zigzag stretch stitches 23 Blind stitch 24 Button sewing 26 Binding 26 Zipper sewing 27 Buttonhole sewin...

Страница 6: ...bere Fadenführung 19 Stretch Stich Justage Schraube 20 Nähfußlifter 21 Nähfußschaftschraube 22 Stichplatte 1 Spool pin 2 Bobbin winder stopper 3 Hand wheel 4 Pattern selector dial 5 Stitch length dial 6 Thread guide and needle clamp 7 Extension table 8 Shuttle cover 9 Presser foot 10 One step button hole lever 11 Reverse button 12 Face cover 13 Take up lever 14 Thread tension dial 15 Stitch width ...

Страница 7: ... an der Maschine Zigzag foot on machine Knopflochschiene Buttonhole foot Reißverschlussfuß Zipper foot Stick und Stopfplatte Darning plate Trennmesser Buttonhole cutter Nadeln Needle Schraubendreher Screw driver Schraubendreher für Nadelplatte Needle plate screw driver Öltube Machine oil tube ...

Страница 8: ...e Unfälle durch Stromschlag CAUTION When cleaning the machine or changing its lamp disconnect it from the mains You avoid accidents through electric shock Austauschen der Glühlampe hinter dem Frontdeckel 1 Um die Lampenklappe zu öffnen müssen Sie die Schraube wie angezeigt lösen 2 Drehen Sie die Glühlampe gegen den Uhrzeigersinn heraus 3 Schrauben Sie die Glühlampe im Uhrzeigersinn ein 4 Verwenden...

Страница 9: ...iner Flachbett Nähmaschine zur Freiarmnähmaschine zum Nähen von Ärmeln Hosenbeinen röhrenförmigen Stoffen usw Zum Nähen solcher Teile ziehen Sie diese einfach wie auf der Zeichnung dargestellt über den Freiarm This sewing machine can be used as a flat bed machine but easily converts to a free arm machine by removing the extension table Especially useful for sewing sleeves trousers legs tubular fab...

Страница 10: ...setzen Sie die Spule auf den Spuler dann drücken Sie den Spuler nach rechts 3 Halten Sie das Fadenende fest und drücken Sie leicht auf den Fußanlasser Stoppen Sie den Spulvorgang nachdem der Faden sich einige Male um die Spule gewickelt hat Schneiden Sie das überstehende Fadenende dicht an der Spule ab und spulen Sie fertig 4 Nach dem Aufspulen drücken Sie den Kupplungsknopf wieder Richtung Nadels...

Страница 11: ...rstehen wenn Sie die Spule in die Spulenkapsel setzen Siehe Abbildung 1 Pull 5 cm of thread from bobbin and insert it into bobbin case as shown 3 Ziehen Sie den Faden durch den Schlitz und unter die Spannfeder und ziehen Sie ca 10 cm Faden heraus 3 Pull the thread through the slot and under the tension spring and pull out about 10 cm of thread 2 Öffnen Sie den Kipphebel der Spulenkapsel und ziehen...

Страница 12: ...Kipphebel und halten Sie die Kapsel daran fest 1 Raise the needle to its highest position Pull the thread to the front open the latch of the bobbin case and hold it 1 Setzen Sie die Spulenkapsel wie angezeigt auf den mittleren Stift so dass der Finger beim Einsetzen in die Aussparung greift 2 Insert the bobbin case according drawing onto the centre pin in the shuttle and release latch Finger Finge...

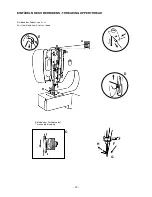
Страница 13: ... 12 EINFÄDELN DES OBERFADENS THREADING UPPER THREAD Einfädeln des Fadens von A H Pass the thread from A to H as shown Einfädeln der Zwillingsnadel Twin needle threading F C D E A E B C D G H G F H ...

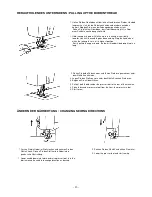
Страница 14: ... thread will be brought up in a loop 2 Ziehen Sie beide Fäden heraus und führen Sie diese gemeinsam unter dem Nähfuß nach hinten 3 Legen Sie den Stoff von vorn unter den Nähfuß senken Sie diesen 4 Beginnen Sie mit dem Nähen 2 Pull out both threads under the presser foot to the rear of the machine 3 Place fabric under pressure foot from the front lower pressure foot 4 Start to sew ÄNDERN DER NÄHRIC...

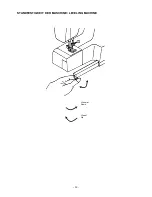
Страница 15: ... 14 STANDFESTIGKEIT DER MASCHINE LEVELING MACHINE Hinunter Down Hinauf Up ...

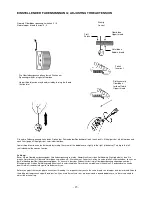
Страница 16: ...Wichtig dabei ist dass Sie gleiche Garnstärken für Ober und Unterfaden verwenden z B Allesnäher aus Polyester Sollten Sie unten große Schlaufen haben kann es an der Einfädelung der Oberfadenspannung liegen Es kann sein dass der Faden nicht fest in die Oberfadenspannung eingezogen wurde Bitte überprüfen Sie den Einfädlungsweg Benutzen Sie unterschiedliche Garnstärken empfehlen wir Ihnen eine 2 Spul...

Страница 17: ...chen Näharbeiten z B Freihandsticken oder Stopfen möchte man den Transport des Stoffes selbst steuern können Drehen Sie die Nadel in die höchste Position und legen Sie die Stick und Stopfplatte über den Transporteur Die Stifte der Platte passen in die Löcher der Stichplatte Jetzt können Sie den Lauf des Stoffes selbst bestimmen Siehe Seite 27 zur Anwendung beim Annähen von Knöpfen When you want to...

Страница 18: ...hlängenwahl Empfehlung Stitch Length Dial Recommendation Nylon Nylon Baumw 80 80 Cotton Trikot Tricot Kunstf 60 60 S Fibre silk Seide Silk Seide 50 50 Silk 70 10 Leicht Light Wolle Seide Wool silk Kunstf 50 Seide 50 S Fibber silk 80 12 2 5 3 2 4 Popeline Gingham 60 80 Baumw 60 80 Cotton 80 90 12 14 Feinjersey Thin Jersey Kunstf 60 60 S Fibber Mittel Medium Gabardine Gabardine Seide 50 50 Silk 80 1...

Страница 19: ...och Buttonhole T 3 5 0 25 1 Geradstich Zickzack Ric rac Zig zag stitch A 0 5 1 4 B C D Automatische Zierstiche Automatic embroidery E 0 5 1 Blindsaum Blind stitch F 4 Umgekehrter Blindsaum Blind hem G 3 5 1 4 Kastenstich Box stitch H 5 4 Zickzack mit 3 Stichen Three step zigzag stitch I 5 2 4 Automatische Zierstiche Automatic embroidery J 5 0 5 2 Grätenstich Federstich Feather stitch K Smok Stich ...

Страница 20: ...stitch O Automatische Zierstiche Automatic embroidery P Automatische Zierstiche Elastic blind hem Q Automatische Zierstiche Elastic embroidery stitch R 3 5 Elastischer Geradstich Elastischer Zickzack Stich Straight stretch stitch Zigzag stitch S 0 5 4 Zig zag 0 5 Freihandsticken Freehand embroidery 0 5 0 Ohne Without Sans ...

Страница 21: ... sewing 2 Hold both threads about 10 cm to the rear of the machine for the first two or three stitches 3 Sufficient fabric should be placed under needle before lowering the presser foot 4 Press foot speed control and start to sew 5 Test the machine stitches on a piece of fabric you plan to use to have a suitable tension and length of the stitch for your fabric 6 Separate the machine from the power...

Страница 22: ...ie den Nähfuß an und nehmen Sie den Stoff nach hinten aus der Maschine 1 Sew to the edge of seam 2 Push the reverse button and sew in reverse for about 3 4 stitches and back 3 Raise needle into its highest position 4 Lift the presser foot and pull the fabric out of the back of the machine 5 Schneiden Sie die Fäden mit dem Fadenschneider ab 5 Cut threads as shown on the thread cutter Eingebauter Fa...

Страница 23: ...inander folgende sehr kurze Stiche die sich zum Aufnähen von Initialen Figuren Applikationen o ä eignen Satin stitching can be used for sewing initials patterns appliqué etc STRETCHSTICHEINSTELLUNG STRETCH STITCH ADJUSTMENT Wenn die Stiche unter S nicht korrekt ausgeführt werden kann man mittels Schraubendreher die Einstellung der Stiche vornehmen siehe Abbildung When stretch stitches are not sewi...

Страница 24: ...ese Stiche für Strickstoffe Trikot und andere dehnbare Textilien Bei elastischen und dünnen Stoffen die sich leicht wellen unterlegen Sie Vlies Dieses Vlies wäscht sich rückstandslos aus Eine solche Naht lässt sich dehnen ohne dass der Faden reißt Der elastische Geradstich ergibt auch eine äußerst strapazierfähige Geradnaht Use this stitch with knitted tricot or other stretchy fabrics Take a piece...

Страница 25: ...ähen Sie den Saum wie gezeigt 2 Finish the seam as shown Sind diese Blindstiche auf der Vorderseite sichtbar ist entweder die Stichlänge falsch eingestellt oder der Stoff zu dünn Can you see these blind stitches on the front either the stitch length is not correct or the fabric is too thin ...

Страница 26: ... dicke Stoffe geeignet Use the blind stitch foot Adjust the width seam and the needle position to obtain the correct The blind stitch foot is only suitable for thick fabric Falsch Die Nadel sticht überhaupt nicht in die Falte ein Wrong Needle is not piercing the fold at all Hier sticht die Nadel zu weit in die Falte ein Needle pierces the edge of fold too much A B ...

Страница 27: ... ziehen und mit der Hand vernähen 1 Place the darning plate properly 2 Place button presser foot in position and attach it firmly 3 Place the button between presser foot and fabric and lower the presser foot 4 Manually turn hand wheel towards you ensuring that the needle enters into both holes of button If necessary increase or decrease zigzag width 5 Sew about 7 stitches 6 Pull both threads throu...

Страница 28: ...h 1 Zipper foot is designed to sew close to a raised edge thus preventing sewing on zipper 2 Place zipper foot in position and attach firmly Tip Baste the zipper before you start 1 Legen Sie den Reißverschluss rechts von der Nadel um dessen linke Seite zu nähen 2 Legen Sie den Reißverschluss links von der Nadel um dessen rechte Seite zu nähen 1 To sew the left side of the zipper set the zipper on ...

Страница 29: ...ie Ihre Näharbeit unter den Fuß Stellen Sie den Stichmusterwähler auf 1 Stellen Sie die Stichlänge auf den mit dem Knopflochsymbol markierten Bereich Wählen Sie eine Stichbreite zwischen 3 und 6 Ziehen Sie den Hebel mit dem Knopflochsymbol links neben dem Nähfuß ganz nach unten und nach vorn Dieser Hebel steuert das Nähen vollautomatisch Nähen Sie nun Ihr Knopfloch Die Maschine wird am Anfang und ...

Страница 30: ...foot Put the stitch dial on 1 Put the stitch length on the marker of button hole symbol Choose stitch width between 3 and 6 Push button hole lever down and to front Pull the lever with the button hole symbol left of button hole foot down and then towards you This lever enables automatic sewing Start sewing your button hole The machine will sew a latch and the size of button hole is according the b...

Страница 31: ...at the up front position Just use slight touching 2 Turn handwheel counter clockwise Toward you 3 rounds 3 Turn the Stitch selector to B H symbol 4 Fix the button hole foot Recommendation of stitch length 0 25 1 0 5 Continue according to page 28 Stichbreiten Wahlrad zwischen 4 und 5 Stitch width adjusting dial set between 4 and 5 Musterwahlrad T Pattern selection dial select T Knopflochhebel s Anm...

Страница 32: ...foot Lower the presser foot and sew a few stitches Keep the needle in the fabric 3 Raise the presser foot and insert the folded fabric into the spiral opening of hemmer foot 4 During the sewing left hand holds on the fabric edge to the left Right hand holds on the fabric front edge lead about 10 to left Then start sewing Secure the folded edge with a few stitches Only suitable materials can be use...

Страница 33: ...chen kann Thread the machine as for normal sewing leading both threads to needle and passing their ends separately through its eye Sewing width should not exceed 2 3 of the maximum stitch width as this would break the needles FREIHANDSTICKEN EMBROIDERY Entfernen Sie den Nähfuß und legen Sie die Stick und Stopfplatte auf Senken Sie den Nähfuß Bewegen Sie den in den Stickrahmen gespannten Stoff in d...

Страница 34: ...e Saumführung zum Nähen langer Säume oder Nähte in gleichmäßigem Abstand vom Stoffrand 2 Schrauben Sie die Führung rechts der Stichplatte ein und stellen Sie den gewünschten Abstand ein 3 Beim Nähen muss der Stoffrand die Führung berühren Zum Nähen von Kurven kann die Führung schräg angebracht werden 1 Use the seam guide to sew long seams of an equal distance from the edge of the fabric 2 Screw th...

Страница 35: ...iferbahn Open face cover and oil the parts indicated 1 Bringen Sie die Nadel in die höchste Stellung 2 Nehmen Sie die Spulkapsel heraus 3 Drehen Sie die Kipphalter A in Pfeilrichtung 4 Entfernen Sie die Greiferabdeckung 5 Nehmen Sie den Greifer ab 6 Reinigen Sie und ölen Sie die Greiferbahn und den Greifer und setzen Sie alles in umgekehrter Reihenfolge wieder ein 1 Raise needle to its highest pos...

Страница 36: ...Oberfadenspannung Verbogene Nadel Ritzen und Kratzer am Greifer Wrong adjustment of zigzag width Improper threading Upper thread tension too tight Bent needle Scratches or nicks on shuttle Einstellung korrigieren Neu einfädeln Oberfadenspannung vermindern Die Nadel ersetzen Den Greifer ersetzen oder die Beschädigungen wegpolieren Re adjust zigzag width Re thread machine Reduce upper thread tension...

Страница 37: ...orte der Sammelstellen erfahren Sie von Ihrer Gemeindeverwaltung Technische Daten Abmessungen der Maschine L 390 x H 320 x B 170 mm Gewicht 7 5 kg 75W Motor 60W Lampe 15W 230V TÜV GS und CE geprüft Guarantee 24 Months The receipt of purchase with date of purchase is the certificate for the guarantee Please always keep carefully In case of guarantee please contact our service hotline number The gua...

Отзывы: