background image

45

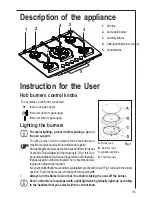
Description of the appliance

Instruction for the User

Hob burners control knobs

 The symbols on the knobs mean that :


there is no gas supply
there is maximum gas supply
there is minimum gas supply

Lighting the burners

For easier lighting,  proceed before putting a pan on
the pan support.

To light a burner, turn the relevant knob anticlockwise to
maximum position and push down the knob to ignite.
After lighting the flame, keep the knob pushed down for about
5 seconds. This will allow the "thermocouple" (Fig. 1 lett. D) to
be heated and the safety device to be switched off, otherwise
the gas supply would be interrupted. Then, check the flame is
regular and adjust it as required.
If you cannot light the flame even after several attempts, check the "cap"  (Fig. 1 lett. A) is in the correct
position. To put the flame out, turn the knob to the symbol  .

Always turn the flame down or put it out before taking the pans off the burner.
Each control knob is equipped with a pilot light which gradually lights up according
to the heatlevel that you select with the control knob.

1

2

5

2

3

4

2

Fig. 1

A

 - Burner cap

B

 - Burner crown

C

 - Ignition electrode

D

 - Thermocouple

1.

Hob top

2.

Semi-rapid burner

3.

Auxiliary burner

4.

Ultra-rapid triple crown burner

5.

Control knobs

Содержание 79850 G

Страница 1: ...79850 G Piano di cottura Plano de cozedura Gas hob Istruzioni per l uso Instru es de utiliza o Operating Instructions IT PT HU...

Страница 2: ...pthemfarenoughfromtheheatedpartsofthisappliance Iftheapplianceisoutoforder disconnectitfromtheelectricsupply Child Safety This appliance has been designed to be operated by adults and children under s...

Страница 3: ...s any responsability should all the safety measures not be carried out Service Undernocircumstancesshouldyouattempttorepairtheapplianceyourself Repairscarriedout by unexperienced persons may cause inj...

Страница 4: ...ation to different types of gas 52 Building In 53 Possibilities for insertion 54 Thefollowingsymbolswillbefoundinthetexttoguideyou throughouttheInstructions SafetyInstructions Stepbystepinstructionsfo...

Страница 5: ...D to beheatedandthesafetydevicetobeswitchedoff otherwise thegassupplywouldbeinterrupted Then checktheflameis regularandadjustitasrequired Ifyoucannotlighttheflameevenafterseveralattempts checkthe cap...

Страница 6: ...ork Washtheenamelledcomponentswithwarmsoapywater Never use abrasive cleaners Frequently wash the caps and the crowns with hot soapy water carefully taking away any built up of food The pan supports ar...

Страница 7: ...as supply pipe and the pressure adjuster if fitted To ensure the good operation of the hob and its safety features it is necessary that the taps are periodically lubricated The periodic lubrication of...

Страница 8: ...finflammablematerials e g curtains tea towels etc This appliance before leaving the factory has been tested and studied by many experts and specialists in order to give you the best results Any repair...

Страница 9: ...respond to the recommendedvalues Theadjustableconnectionisfixedtothecomprehensive ramp by means of a threaded nut G 1 2 Interposethesealingbetweenthecomponentsasshown in Fig 4 Screwthepartswithoutforc...

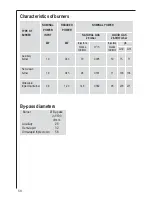
Страница 10: ...jectors g h marks m3 h marks G30 G31 100 mm 100 mm Auxiliary burner 1 0 0 33 70 0 095 50 73 71 Semi rapid burner 1 9 0 45 96 0 181 71 138 136 Ultra rapid triplecrownburner 3 8 1 20 146 0 362 98 276 27...

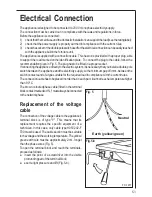
Страница 11: ...heapplianceandtheelectricitysupply withaminimumgapof3mm betweenthe switchcontactsandofatypesuitablefortherequiredloadincompliancewiththecurrentrules Theconnectioncablehastobeplacedinorderthat ineachpa...

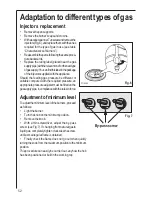
Страница 12: ...le compared with the required pressure an appropriatepressureadjustermustbefittedonthe gassupplypipe incompliancewiththerulesinforce Adjustmentofminimumlevel Toadjusttheminimumleveloftheburners procee...

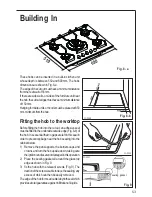
Страница 13: ...anadhesiveseal mustbefittedtotheundersideoutsideedge Fig 8 b of thehob Itisessentialthatnogapsareleftinthissealin ordertopreventspillagenearthehobseepingintothe cabinetbelow 1 Remove the pan supports...

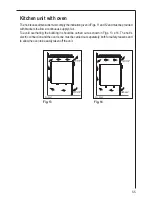
Страница 14: ...en in designing the forniture unit in order to avoid any contact with the bottom of the hob which can be heated when it is operated The recommended solution is shown in Fig 10 The panel fitted under t...

Страница 15: ...rackets to allow a continuous supply of air To avoid overhating the building in should be carried out as shown in Figs 13 e 14 The hob s electric connection and the oven s one must be carried out sepa...

Страница 16: ...s No 1 choice The Electrolux Group is the world s largest producer of powered appliances for kitchen cleaning and outdoor use More than 55 million Electrolux Group products such as refrigerators cook...

Отзывы: