background image

53

FO 2359

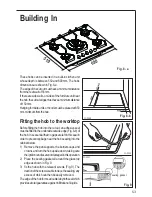
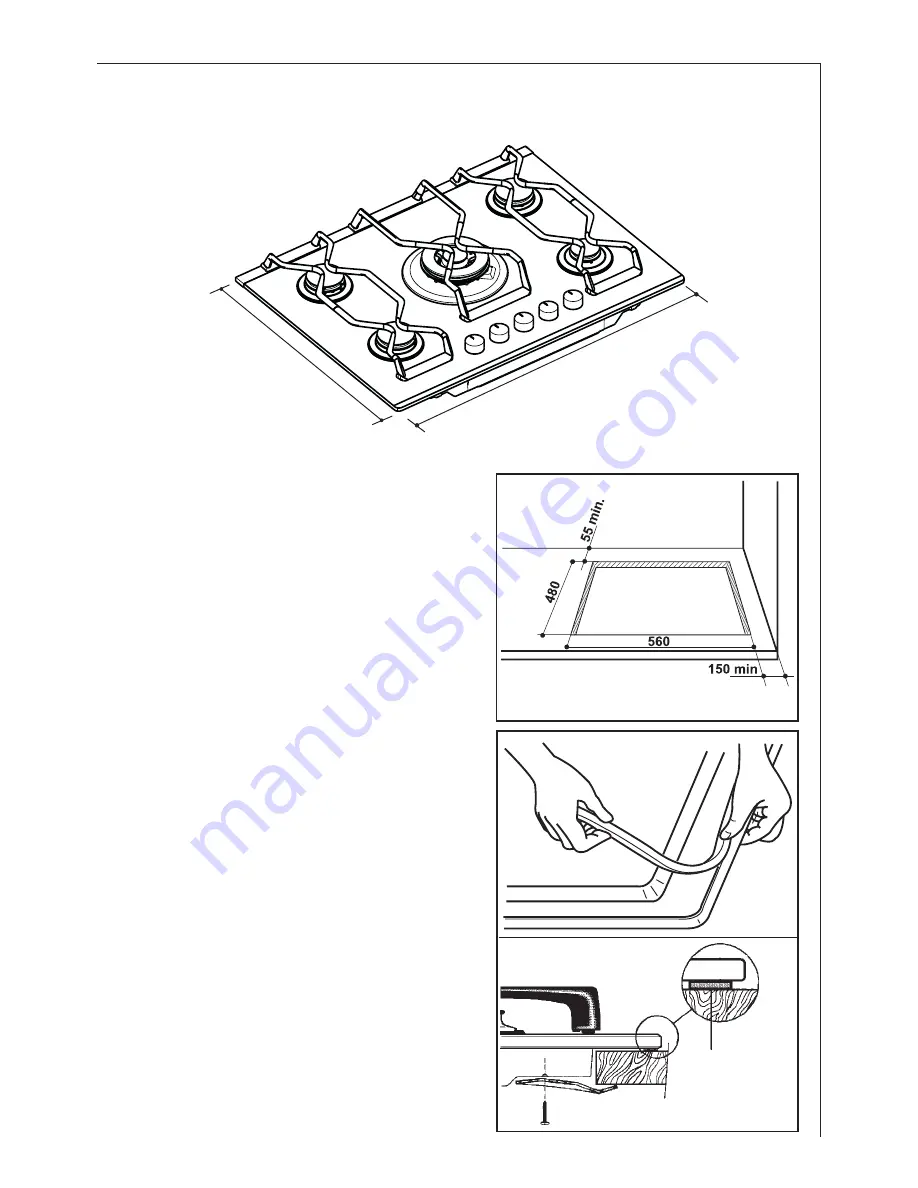
Fig. 8-b

Fig. 8 - a

FO 2320

These hobs can be inserted in a built-in kitchen unit
whose depth is between 550 and 600 mm. The hobs
dimensions are shown in Fig. 8-a.
The edge of the cut out must have a minimum distance
from the rear wall of 55 mm.
If there are side walls, or sides of the furniture unit near
the hob, the cut out edges must have a minimum distance
of 150 mm.
Hanging forniture units or hoods must be placed at 650
mm. minimum from the hob.

Fitting the hob to the worktop

Before fitting the hob into the cut out, an adhesive seal
must be fitted to the underside outside edge (Fig. 8-b) of
the hob. It is essential that no gaps are left in this seal in
order to prevent spillage near the hob seeping into the
cabinet below.
1) Remove the pan supports, the burners caps and

crowns and turn the hob upside down, taking care
the ignition candles are not damaged in this operation.

2) Place the sealing gasket all around the glass top

edge as shown in Fig. 9.

3) fix the hob with the relevant screws (Fig. 9). The

traction of the screws is able to trace the sealing, any
excess of which can then be easily removed.

The edge of the hob forms a double labyrinth seal which
provides a total guarantee against infiltration of liquids.

Building In

FO 2321

sealing gasket

Fig. 9

510

680

Содержание 79850 G

Страница 1: ...79850 G Piano di cottura Plano de cozedura Gas hob Istruzioni per l uso Instru es de utiliza o Operating Instructions IT PT HU...

Страница 2: ...pthemfarenoughfromtheheatedpartsofthisappliance Iftheapplianceisoutoforder disconnectitfromtheelectricsupply Child Safety This appliance has been designed to be operated by adults and children under s...

Страница 3: ...s any responsability should all the safety measures not be carried out Service Undernocircumstancesshouldyouattempttorepairtheapplianceyourself Repairscarriedout by unexperienced persons may cause inj...

Страница 4: ...ation to different types of gas 52 Building In 53 Possibilities for insertion 54 Thefollowingsymbolswillbefoundinthetexttoguideyou throughouttheInstructions SafetyInstructions Stepbystepinstructionsfo...

Страница 5: ...D to beheatedandthesafetydevicetobeswitchedoff otherwise thegassupplywouldbeinterrupted Then checktheflameis regularandadjustitasrequired Ifyoucannotlighttheflameevenafterseveralattempts checkthe cap...

Страница 6: ...ork Washtheenamelledcomponentswithwarmsoapywater Never use abrasive cleaners Frequently wash the caps and the crowns with hot soapy water carefully taking away any built up of food The pan supports ar...

Страница 7: ...as supply pipe and the pressure adjuster if fitted To ensure the good operation of the hob and its safety features it is necessary that the taps are periodically lubricated The periodic lubrication of...

Страница 8: ...finflammablematerials e g curtains tea towels etc This appliance before leaving the factory has been tested and studied by many experts and specialists in order to give you the best results Any repair...

Страница 9: ...respond to the recommendedvalues Theadjustableconnectionisfixedtothecomprehensive ramp by means of a threaded nut G 1 2 Interposethesealingbetweenthecomponentsasshown in Fig 4 Screwthepartswithoutforc...

Страница 10: ...jectors g h marks m3 h marks G30 G31 100 mm 100 mm Auxiliary burner 1 0 0 33 70 0 095 50 73 71 Semi rapid burner 1 9 0 45 96 0 181 71 138 136 Ultra rapid triplecrownburner 3 8 1 20 146 0 362 98 276 27...

Страница 11: ...heapplianceandtheelectricitysupply withaminimumgapof3mm betweenthe switchcontactsandofatypesuitablefortherequiredloadincompliancewiththecurrentrules Theconnectioncablehastobeplacedinorderthat ineachpa...

Страница 12: ...le compared with the required pressure an appropriatepressureadjustermustbefittedonthe gassupplypipe incompliancewiththerulesinforce Adjustmentofminimumlevel Toadjusttheminimumleveloftheburners procee...

Страница 13: ...anadhesiveseal mustbefittedtotheundersideoutsideedge Fig 8 b of thehob Itisessentialthatnogapsareleftinthissealin ordertopreventspillagenearthehobseepingintothe cabinetbelow 1 Remove the pan supports...

Страница 14: ...en in designing the forniture unit in order to avoid any contact with the bottom of the hob which can be heated when it is operated The recommended solution is shown in Fig 10 The panel fitted under t...

Страница 15: ...rackets to allow a continuous supply of air To avoid overhating the building in should be carried out as shown in Figs 13 e 14 The hob s electric connection and the oven s one must be carried out sepa...

Страница 16: ...s No 1 choice The Electrolux Group is the world s largest producer of powered appliances for kitchen cleaning and outdoor use More than 55 million Electrolux Group products such as refrigerators cook...

Отзывы: