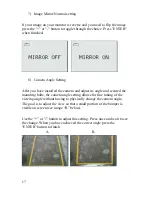
Advent CAM430MV Скачать руководство пользователя страница 12

12 

Camera Wiring 


If not using a ADVENT direct connect monitor please connect the red 
power lead to the positive of your White color back up light and the Black 
wire to vehicle ground. 

NOTE

: If your vehicle has LED type backup 

lights you may be required to use a relay to power the camera as the 
vehicle circuit may not support the camera power. Connection to a low 
current circuit can cause a bad picture, no picture, or even a vehicle 
service lamp coming on. If you connect the camera to a ACC source 
directly you will need to Cycle the ACC on and off in the programming 
instructions in order to enter the configuration mode. 


Use caution when connecting the power cable. Both ends look similar but 
have different pin configurations. DO NOT FORCE TOGETHER. 


Содержание CAM430MV

Страница 1: ...tures Fully Adjustable Multiple Viewing Angle Smart Camera High Resolution 1 2 CMOS Color Camera Weatherproof Housing 190 Degree Wide View Angle Built in Microphone Selectable Image Normal Top Down Pa...

Страница 2: ...s Warnings 3 Product Description 4 Packing List 4 Operating Instructions 5 Camera Installation Instructions 8 Camera Wiring Diagram 12 Software Configuration Settings 14 Specifications 19 Troubleshoot...

Страница 3: ...ny unauthorized modifications or damage to the product may result in electrical shock Handle all components with care Inspect regularly for damage to components and cabling You are responsible for ens...

Страница 4: ...van with the bracket being hidden by your license plate We have also included a surface mount bracket to help with other installation methods This wired Camera is compatible with most monitors TFT scr...

Страница 5: ...m neutral to reverse position 2 Change the camera view Press the MODE button The view changes each time when MODE button is pressed The image will return to the default image next time the vehicle is...

Страница 6: ...iew behind the car Rear view An undistorted view for reversing to parking area Top view Provide a undistorted top down perspective Side view Provide a divided image left and right perspectives in one...

Страница 7: ...comes on screen to confirm the change EXAMPLE So if you wanted to use Rear View as your default view and Side View as your 2nd choice then you would 1 Place the vehicle in reverse 2 Press MODE button...

Страница 8: ...al laws and requirements Most states require that the state name registration stickers and license number are not obstructed in any way Place the camera bracket behind the license plate and line up th...

Страница 9: ...which can be purchased at a hardware store b Check behind the intended drilling location before drilling to verify that no wires or mechanisms can interfere with or be damaged during drilling c Check...

Страница 10: ...ommet behind a tail lamp under the trunk molding or if necessary through a 5 8 inch hole drilled near the vehicle s rear license plate When choosing a wiring path make sure the cable will not be damag...

Страница 11: ...ining Reverse Power 1 Locate the reverse lamp in the tail light assembly Using the tap connector supplied perform the following steps Place the un stripped positive lead from the tail lamp in the run...

Страница 12: ...r the camera as the vehicle circuit may not support the camera power Connection to a low current circuit can cause a bad picture no picture or even a vehicle service lamp coming on If you connect the...

Страница 13: ...location Be sure to not block any Air Bag or safety device while routing the wire Locate a suitable location for easy access for the driver 2 Clean the area thoroughly and allow to dry before attachi...

Страница 14: ...stalled on the camera must be set up correctly when first installed You will be required to measure the vehicle width and the camera mounting height from the center of the lens to the ground If the ca...

Страница 15: ...r 2 This will bring up the configuration menu on screen 3 Press the MODE button to cycle between measurement units of centimeters or inches 4 The first setting is the Camera Height Setting Use the or...

Страница 16: ...ter offset setting 6 Camera Offset Calibration The Offset setting is to adjust for Cameras that may be mounted off center on a vehicle This will insure the parking lines are correctly matched to the v...

Страница 17: ...and adjust its angle and secured the mounting bolts the camera angle setting allows for fine tuning of the viewing angle without having to physically change the camera angle The goal is to adjust the...

Страница 18: ...nto reverse gear You should see an hour glass as all the changes are loaded 10 Use the mode button to cycle through the different views and confirm that all is set up to your satisfaction If necessary...

Страница 19: ...a Pixel Low lux 0 5 lux S N 38dB or more Water proof IP69 Operating Temperature 40 85 Storage Temperature 40 105 Troubleshooting Symptom Solution No video signal appears while reversing the vehicle Ch...

Страница 20: ...20 Add warranty in PDF...

Отзывы: