


2.
Jet Disassembly
2.1
Overview
Note: It is important to flush and clean the jet prior to making repairs. Follow the steps
for cleaning the jet in the HV-2100 Jet Setup and Operation manual 3A6244.
To avoid personal injury:
Move the nozzle close to the collection device so there is minimal misting of the solvent
during flushing.
Be sure there is proper ventilation and wear appropriate eye and skin protection as
instructed by the solvent manufacturer.
Material inside the applicator can be near setpoint temperature. Wear protective clothing to
avoid severe burns.
Turn off the power switch and the air switch on the HV-2100C Jet Controller before
beginning disassembly of the jet. Refer to the HV-2100C Jet Controller Setup and
Operation manual 3A6226.
The extent of jet disassembly depends on which kits are being installed.
For all repair kits, remove and keep:
Nozzle plate and two screws with two washers each
Top cover and two screws
Mounting plate and two screws
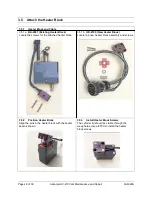
For the Bushing and Heater Kits (BK-2001 and HK-2100):
Detach the Heater Block; keep for BK-2001, discard for HK-2100
Remove and discard the heater seal, washer, and jet hammer spring
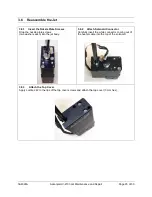
For the Jet Maintenance Kit (JK-2001), remove and discard jet parts in this order:
Heater block and cable
Heater seal, washer, and jet hammer spring
Hammer air cylinder
Pivot bolt
Lever
Bullet solenoid valve
Muffler
When noted, use the tool specified.
Section 2.7 provides a checklist of parts and screws that should be set aside. Take care
to set aside screws as they are removed so they can be easily located for installing the
new parts.
Page 10 of 30
Advanjet HV-2100 Jet Maintenance and Repair
3A6326A


