background image

7

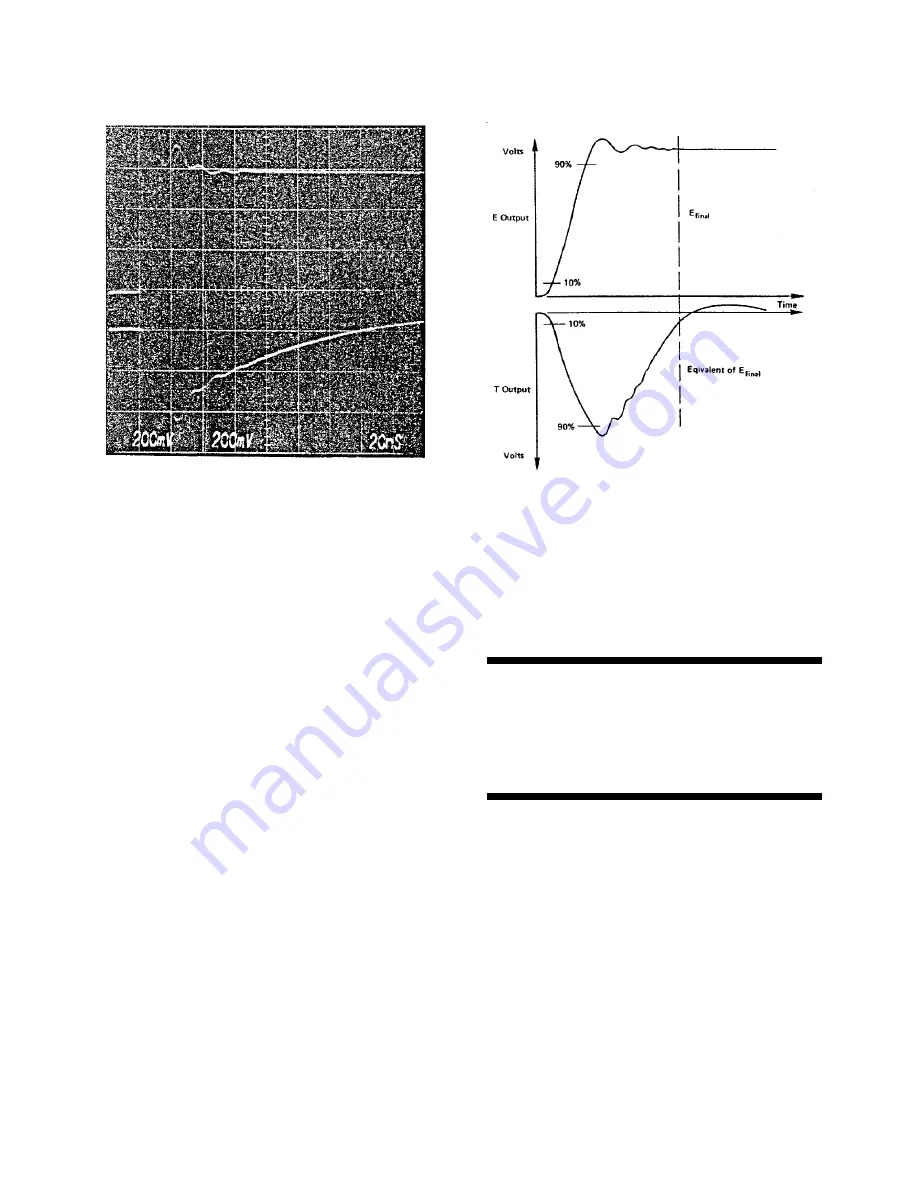
Fig. 4.2.  Typical Simultaneous E and T Output
Signals.

Fig. 4.3.  Output Rise Time Measurement.

CAUTION 

Do not use a metal screwdriver for this
adjustment; there is a possibility of high-bias
voltage leakage on the printed circuit that could
cause a shock.

due to slewing effects and large signal bandwidth

timing resolution when the rise time is optimized

considerations within the charge loop, the large-

with this control.  Because of the high voltages

signal rise time is slightly longer than that

that are present inside the case when the

specified at the E output for an amplitude of 1.0V

preamplifier is operating, a small plastic

unterminated (0.5 V terminated). Again, however,

screwdriver or a TV tuning tool should be used for

this has no impact on a typical timing experiment

this adjustment. 

since the slope of the leading edge is maintained
over the whole dynamic range of the preamplifier,
and since discriminator thresholds are typically
set well below 1.0 V. 

In Fig. 4.2, the rise time of the T output appears
to be longer than that for the E output but this is
not necessarily true. The 10% and 90% check
points on the E rise time are based on the E

final

level, which is less than the initial overshoot. On
the other hand, the 10% and 90% check points on
the T rise time are based on the peak level of the
initial overshoot, which is relatively more than the
final value for the E output. 

4.5.  COMPENSATION ADJUSTMENT

 
A bandwidth compensation adjustment is
accessible to the user of the 142AH.  This control
can be adjusted through the bottom of the case
without opening the unit.   It is used to tune the
preamplifier to the particular detector that is
connected in order to provide the fastest optimal
rise time of the T and E output signals for the best

When the 142 AH Preamplifier is shipped from
the factory, the compensation adjustment has
been set for the specified rise time resolution for
a 0-pF input capacity. For optimum results for
other input capacities, the control should be
adjusted under actual operating conditions. 

If the control has been adjusted for optimum
bandwidth for a specific input capacity and the
input circuit is then changed to provide less
capacity, control readjustment is necessary so
that the preamplifier will not oscillate. If the input
capacity is increased from the value for which the
adjustment has been made, the preamplifier
should be stable and should not oscillate. 

Содержание 142AH

Страница 1: ...Model 142AH Preamplifier Operating and Service Manual Printed in U S A ORTEC Part No 733990 0202 Manual Revision B ...

Страница 2: ... that a Return Authorization Number can be assigned to the unit Also ORTEC must be informed either in writing by telephone 865 482 4411 or by facsimile transmission 865 483 2133 of the nature of the fault of the instrument being returned and of the model serial and revision Rev on rear panel numbers Failure to do so may cause unnecessary delays in getting the unit repaired The ORTEC standard proce...

Страница 3: ...NNECTION TO DETECTOR 3 3 2 ENERGY OUTPUT CONNECTION TO MAIN SHAPING AMPLIFIER 3 3 3 TIMING OUTPUT CONNECTION TO TIMING MODULES 3 3 4 INPUT OPERATING POWER 3 3 5 TEST PULSE 4 3 6 DETECTOR BIAS INPUT 4 3 7 CORONA ELIMINATION 4 4 OPERATION 5 4 1 GENERAL 5 4 2 DETECTOR BIAS 5 4 3 ENERGY OUTPUT 6 4 4 TIMING OUTPUT 6 4 5 COMPENSATION ADJUSTMENT 7 4 6 INPUT PROTECTION 8 5 MAINTENANCE INSTRUCTIONS 9 5 1 T...

Страница 4: ...s a hazard that could result in bodily harm if the safety instruction is not observed CAUTION Indicates a hazard that could result in property damage if the safety instruction is not observed Please read all safety instructions carefully and make sure you understand them fully before attempting to use this product In addition the following symbol may appear on the product ATTENTION Refer to Manual...

Страница 5: ...the instrument during external cleaning use only enough liquid to dampen the cloth or applicator SAFETY WARNINGS AND CLEANING INSTRUCTIONS Cleaning Instructions To clean the instrument exterior Unplug the instrument from the ac power supply Remove loose dust on the outside of the instrument with a lint free cloth Remove remaining dirt with a lint free cloth dampened in a general purpose detergent ...

Страница 6: ...on the 142AH is void if the protection circuit is taken out unless all of the following precautions are taken 1 COMPLETELY DISCHARGE the detector bias circuit before connecting a low impedance a cable or any other capacitive device to the Detector Input connector on the preamplifier making ANY connections to the Detector Input connector and before disconnecting the preamplifier from the detector 3...

Страница 7: ...uctions carefully Timing Filter Amplifier 473A Constant Franction to prevent serious injury to yourself and or damage Discriminator and 574 Timing Amplifier to the instrument The energy range expected in typical applications Observe the steps that are included in the is from 0 to 200 MeV Two simultaneous outputs Notice on page vi to discharge the high are provided the output marked E is for energy...

Страница 8: ...ed TEMPERATURE INSTABILITY 50 ppm C 0 to 50 C DETECTOR BIAS ISOLATION 5000V OPEN LOOP GAIN 40 000 2 2 INPUTS INPUT Accepts input signals from semiconductor charged particle detector and extends operating bias to the detector BIAS Accepts the detector bias voltage from a power supply TEST Accepts input voltage pulses from a pulse generator for instrument and system calibration R 93 in 2 3 OUTPUTS E...

Страница 9: ...able between the detector and the preamplifier Normally corona problems in the bias cable between the bias power supply and the preamplifier are significant due to the filtering circuit within the preamplifier After the input cable has been installed the electronic noise performance of the preamplifier can be predicted by adding the capacity furnished by the detector to the capacity of the cable T...

Страница 10: ...ortions of the preamplifier 1 With no cable connected to the preamplifier circuitry the transient performance of the Input operate the preamplifier at the desired bias preamplifier is best determined by connecting the voltage while observing the E output through a actual detector signal through the Input connector shaping amplifier with an oscilloscope instead of using the pulse generator signals ...

Страница 11: ...n and good manufacturing control as well as extensive testing under full bias assure that each preamplifier is free from spiking problems and that no degradation of noise performance will result when the required bias voltage is applied But dust dirt and other surface contamination can collect within the Input connector and cause spiking problems due to corona discharge in the Input connector and ...

Страница 12: ...ust be detector the detector output pulses are negative cautious to prevent touching the interior of the and the E output of the preamplifier is positive as connector with anything other than a good shown in Fig 4 2 insulator such as the glass tube of the blower lethal high voltages are present on the center pin of the Input connector under these conditions 4 3 ENERGY OUTPUT The charge sensitive l...

Страница 13: ...check points on the E rise time are based on the Efinal level which is less than the initial overshoot On the other hand the 10 and 90 check points on the T rise time are based on the peak level of the initial overshoot which is relatively more than the final value for the E output 4 5 COMPENSATION ADJUSTMENT A bandwidth compensation adjustment is accessible to the user of the 142AH This control c...

Страница 14: ...all a wire jumper across R39 and R5 Inherent to all high speed charge sensitive preamplifiers is the problem of keeping the total system stable while interconnecting the detector and preamplifier with long cables To help ease this problem and permit more flexibility for installations the protection circuit is designed to serve not only as a protection for the FET input but also to terminate the in...

Страница 15: ...amplifier system The noise performance referenced in Section 2 is stated in these terms and verification methods will be described If desired the preamplifier can be tested with no external capacity on the Input connector in which case the noise width should be approximately that shown for zero external capacity In any case the input connector and capacitors when used should be completely shielded...

Страница 16: ...the preamplifier has been verified as outlined in the preceding section or is otherwise not suspected a detector may be tested to some extent by duplicating the noise performance tests with the detector connected in place and with normal operating bias applied The resulting combined noise measurement made either with an analyzer or by the voltmeter method indicates the sum in quadrature of the sep...

Отзывы: