background image

INSTRUCTIONS FOR USE

ENGLISH

Terra™ 26M

1464359000(1)2009-11

5

SWEEPER OPERATION

If necessary, adjust the handlebar (1) to one of the 3 positions, by using the knobs (2).

1. 

Grab the handlebar and push the machine forward no faster than a normal walking pace. The machine does not work if 

2. 

dragged backwards.

CAUTION!

If the machine is to be used on wet floors, use it only for short intervals.

The hopper (3) should be emptied after each working cycle and whenever it is full.

3. 

NOTE

When the hopper is full, the machine cannot collect dust and debris anymore.

HOPPER EMPTYING

Lift the hopper with the handle (4) in the front side and empty it into a proper container.

1. 

Install the hopper on the machine by inserting the lower end into the machine frame (12).

2. 

Slightly press downwards until the hopper is in the proper position.

It is advisable to empty the hopper after each use and whenever it is necessary.

3. 

AFTER USING THE MACHINE

After working, before leaving the machine: empty the hopper (4) and check the main brooms (8 and 9) to remove foreign materials 

(lace, wire, strings or similar) which can compromise the proper operation.

To store the machine in a narrow place, fold the handlebar (1).

Loosen the knobs (2) and pull the handlebar upwards.


Fold down the handlebar and lock it.


Then place the machine in a vertical position to preserve the broom bristles.

MAINTENANCE

CAUTION!

Only perform the maintenance procedures described in this Manual.

For other procedures, contact the Service Center.

Use only Advance original spare parts and accessories.

The lifespan of the machine and its maximum operating safety are ensured by correct and regular maintenance.

SCHEDULED MAINTENANCE CHART

Procedure

After working

Monthly

When necessary

Place the machine in a vertical position
Empty the hopper (3)
Clean the main (8 and 9) and side brooms (6)
Clean the machine 
Replace the main broom (9) when worn
Replace the side brooms (6) when worn
Replace the driving belt

(*)

Contact an authorised Service Center or Retailer.

(*) 

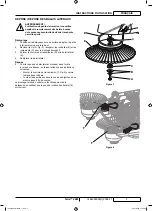
SWEEPER MAINTENANCE

After each use, perform the following procedures:

Empty the hopper (3).


Check if there are foreign objects caught in the brooms or wheels and remove them immediately.


Clean the brooms and remove any lace, wire, strings or similar, which can compromise the machine efficiency and cause 


damages due to the drive system sticking.

Periodically check the main and side brooms for wear ; adjust their height or replace them when the sweeping capacity is 


reduced.

Содержание Terra 26M

Страница 1: ...an 48906 Fax 517 484 9836 Email CustServe Michco com Web site www Michco Com Parts Web site www FloorMachineParts Com Order Parts on Line at www FloorMachineParts Com Directly to Parts Service By Emai...

Страница 2: ...D UTILISATION Mod le Advance 9084802010 FRAN AIS INSTRUCCIONES DE USO Modelo Advance 9084802010 ESPA OL INSTRU ES DE USO Modelo Advance 9084802010 PORTUGU S 1464359000 1 2009 11 1464359000 1 2009 11...

Страница 3: ......

Страница 4: ...UNPACKING DELIVERY 2 IMPORTANT SAFETY INSTRUCTIONS 2 SYMBOLS 3 GENERAL INSTRUCTIONS 3 MACHINE DESCRIPTION 3 TECHNICAL DATA 3 MACHINE STRUCTURE AND CONTROLS 4 USE 4 SWEEPER OPERATION 5 HOPPER EMPTYING...

Страница 5: ...pplied with the machine SPARE PARTS AND MAINTENANCE Any repair must be performed at authorized Advance Service Centers by qualified personnel which will use original spare parts and accessories Contac...

Страница 6: ...ble to collect liquids This sweeper must be used in dry conditions it must not be used or kept outdoors in wet conditions Do not use the sweeper on uneven surfaces Do not allow to be used as a toy Pay...

Страница 7: ...ting wheel 11 Sweeper frame 12 Main broom rotation direction 13 Side broom rotation direction 14 1 2 2 12 9 8 11 14 13 10 3 4 5 6 6 5 7 7 11 10 14 USE This sweeper has been designed to clean flat and...

Страница 8: ...e the machine in a narrow place fold the handlebar 1 Loosen the knobs 2 and pull the handlebar upwards Fold down the handlebar and lock it Then place the machine in a vertical position to preserve the...

Страница 9: ...ustment procedure If the brooms are too worn replace them MAIN BROOM DISASSEMBLY ASSEMBLY CAUTION It is advisable to wear protective gloves when replacing the brooms because there can be sharp debris...

Страница 10: ...h the bottom side 1 up Remove the screw A Fig 3 and keep the washer B 2 and the bearings C for reassembly Remove the driving belt D and the side broom E 3 Replace the side broom 4 Assembly Assemble th...

Страница 11: ...ide or main brooms are too low Adjust the brooms There is a big foreign object caught into the brooms Remove the object The debris collection is not efficient There is a rope or other foreign object c...

Страница 12: ...NS GENERALES 3 DESCRIPTION DE LA MACHINE 3 CARACTERISTIQUES TECHNIQUES 3 STRUCTURE ET COMMANDES DE LA MACHINE 4 UTILISATION 4 FONCTIONNEMENT DE LA BALAYEUSE 5 VIDANGE DU RESERVOIR 5 APRES L UTILISATIO...

Страница 13: ...parations doivent tre effectu es aupr s des Services apr s vente agr s Advance qui disposent du personnel qualifi des accessoires et des pi ces de rechange d origine Pour les ventuelles r parations ou...

Страница 14: ...dehors dans des conditions d humidit Ne pas utiliser la balayeuse sur des plans inclin s Ne pas laisser qu elle soit utilis e comme jouet Faire attention lorsque la machine est utilis e proximit des...

Страница 15: ...aux 13 Sens de rotation balais lat raux 14 1 2 2 12 9 8 11 14 13 10 3 4 5 6 6 5 7 7 11 10 14 UTILISATION La balayeuse a t con ue exclusivement pour le nettoyage des surfaces horizontales et pav es Le...

Страница 16: ...idon 1 Desserrer les poign es 2 et tirer le guidon vers le haut Pousser le guidon en avant et le bloquer Maintenant pour pr server les poils des balais positionner la balayeuse verticalement ENTRETIEN...

Страница 17: ...OSE REPOSE DU BALAI CENTRAL AVERTISSEMENT L utilisation de gants de travail est conseill e pendant le remplacement des balais cause de la pr sence ventuelle de d bris tranchants parmi les poils REMARQ...

Страница 18: ...e montage successif Enlever la courroie de transmission D et le balai lat ral 3 E Remplacer le balai lat ral 4 Repose Pour la repose du balai lat ral proc der dans l ordre 5 inverse de la d pose en fa...

Страница 19: ...r l objet Le ramassage est peu efficace Une ficelle ou un autre corps tranger a t entra n ou captur par les balais principaux Enlever la ficelle ou l objet Le r servoir est plein Vider le r servoir Le...

Страница 20: ...DE LA M QUINA 3 DATOS T CNICOS 3 ESTRUCTURA Y MANDOS DE LA M QUINA 4 USO 4 FUNCIONAMIENTO DE LA BARREDERA 5 VACIADO DEL DEP SITO DE RECOGIDA 5 DESPU S DEL USO DE LA M QUINA 5 MANTENIMIENTO 5 ESQUEMA...

Страница 21: ...ncia autorizados por Advance los cuales cuentan con personal cualificado y disponen de las piezas y accesorios de repuesto originales Si necesita alguna reparaci n o asistencia t cnica no dude en cont...

Страница 22: ...ciones de humedad No usar la barredera en superficies inclinadas No permitir que se utilice como si fuera un juguete Tener mucho cuidado cuando se utiliza cerca de ni os Usar s lo los cepillos suminis...

Страница 23: ...de la barredera 12 Sentido de rotaci n de los cepillos centrales 13 Sentido de rotaci n de los cepillos laterales 14 1 2 2 12 9 8 11 14 13 10 3 4 5 6 6 5 7 7 11 10 14 USO La barredera ha sido concebi...

Страница 24: ...jar las empu aduras 2 y tirar del manillar hacia arriba Volcar el manillar hacia adelante y bloquearlo Para proteger las cerdas de los cepillos colocar la barredera en posici n vertical MANTENIMIENTO...

Страница 25: ...uci n DESMONTAJE MONTAJE DEL CEPILLO PRINCIPAL ADVERTENCIA Durante la sustituci n de los cepillos se aconseja usar guantes ya que podr a haber residuos cortantes encastrados en las cerdas NOTA Solo el...

Страница 26: ...l posterior montaje Quitar la correa de transmisi n D y retirar el cepillo 3 lateral E Sustituir el cepillo lateral 4 Montaje Montar el cepillo lateral en orden contrario al desmontaje 5 teniendo cuid...

Страница 27: ...Recogida poco eficaz Un cordel u otro cuerpo extra o se ha quedado enredado o enganchado en los cepillos principales Quitar el cordel u objeto El dep sito de recogida est lleno Vaciar el dep sito de...

Страница 28: ...A 3 CARACTER STICAS T CNICAS 3 ESTRUTURA E COMANDOS DA M QUINA 4 UTILIZA O 4 FUNCIONAMENTO DA M QUINA DE VARRER 5 ESVAZIAMENTO DO RESERVAT RIO DE RECOLHA 5 AP S UTILIZA O DA M QUINA 5 MANUTEN O 5 PLAN...

Страница 29: ...ntros de assist ncia autorizados Advance que possuem pessoal qualificado e disp em das pe as de substitui o e acess rios originais Para eventuais repara es ou assist ncia t cnica contacte o Fornecedor...

Страница 30: ...a no exterior em condi o de humidade N o utilize a m quina de varrer em superf cie inclinadas N o deixe que seja utilizada como brinquedo Preste muita aten o quando a utilizar com crian as por perto U...

Страница 31: ...do de rota o das escovas centrais 13 Sentido de rota o das escovas laterais 14 1 2 2 12 9 8 11 14 13 10 3 4 5 6 6 5 7 7 11 10 14 UTILIZA O A m quina de varrer foi concebida apenas para limpar superf c...

Страница 32: ...poss vel fechar o guiador 1 Desaperte os man pulos 2 e puxe o guiador para cima Bascule para a frente o guiador e bloqueie o Neste modo para proteger as cerdas das escovas coloque a m quina na vertica...

Страница 33: ...M DA ESCOVA CENTRAL ADVERT NCIA Recomenda se a utiliza o de luvas durante a substitui o das escovas devido poss vel presen a de detritos cortantes presos entre as cerdas NOTA Apenas a escova traseira...

Страница 34: ...C para a montagem subsequente Retire a correia de transmiss o D e retire a escova 3 lateral E Substitua a escova lateral 4 Montagem Monte a escova lateral na ordem inversa em rela o 5 desmontagem pres...

Страница 35: ...ecto Recolha pouca eficaz Um cordel ou outro corpo estranho ficou preso ou bloqueado nas escovas principais Retire o cordel ou o objecto O reservat rio de recolha est cheio Esvazie o reservat rio de r...

Страница 36: ...1464359000 1 2009 11 indb 1 1464359000 1 2009 11 indb 1 23 11 2009 14 49 55 23 11 2009 14 49 55...

Страница 37: ...14600 21st Avenue North Plymouth MN 55447 3408 www advance us com Phone 800 989 2235 Fax 800 989 6566 2010 Nilfisk Advance Inc A Nilfisk Advance Brand...

Страница 38: ...TerraTM 26M PARTS LIST Advance model 9084802010 1464364000 1 2009 11...

Страница 39: ...2009 11 2 Terra 26M 1464364000 1 2009 11 CHASSIS SYSTEM 25 25 15 15 14 29 17 4 6 34 35 24 33 31 19 36 32 32 18 20 21 30 24 22 28 28 28 28 23 2 14 29 36 27 26 7 12 8 13 10 3 5 1 28 9 11 16...

Страница 40: ...SMISSION LONG PU 21 1463618000 2 HANDLE 22 1463621000 2 SUPPORT ADJUSTABLE BROOM 23 1463623000 2 SIDE BROOM 24 1463624000 2 BELT TRANSMISSION SIDE BROOM PU 25 18 SCREW PAN PHIL THD FORM 26 1463626000...

Страница 41: ...14600 21st Avenue North Plymouth MN 55447 3408 www advance us com Phone 800 989 2235 Fax 800 989 6566 2010 Nilfisk Advance Inc A Nilfisk Advance Brand...

Отзывы: