background image

61181300L1-5C

 Section 61181300L1-5C, Issue 3

5

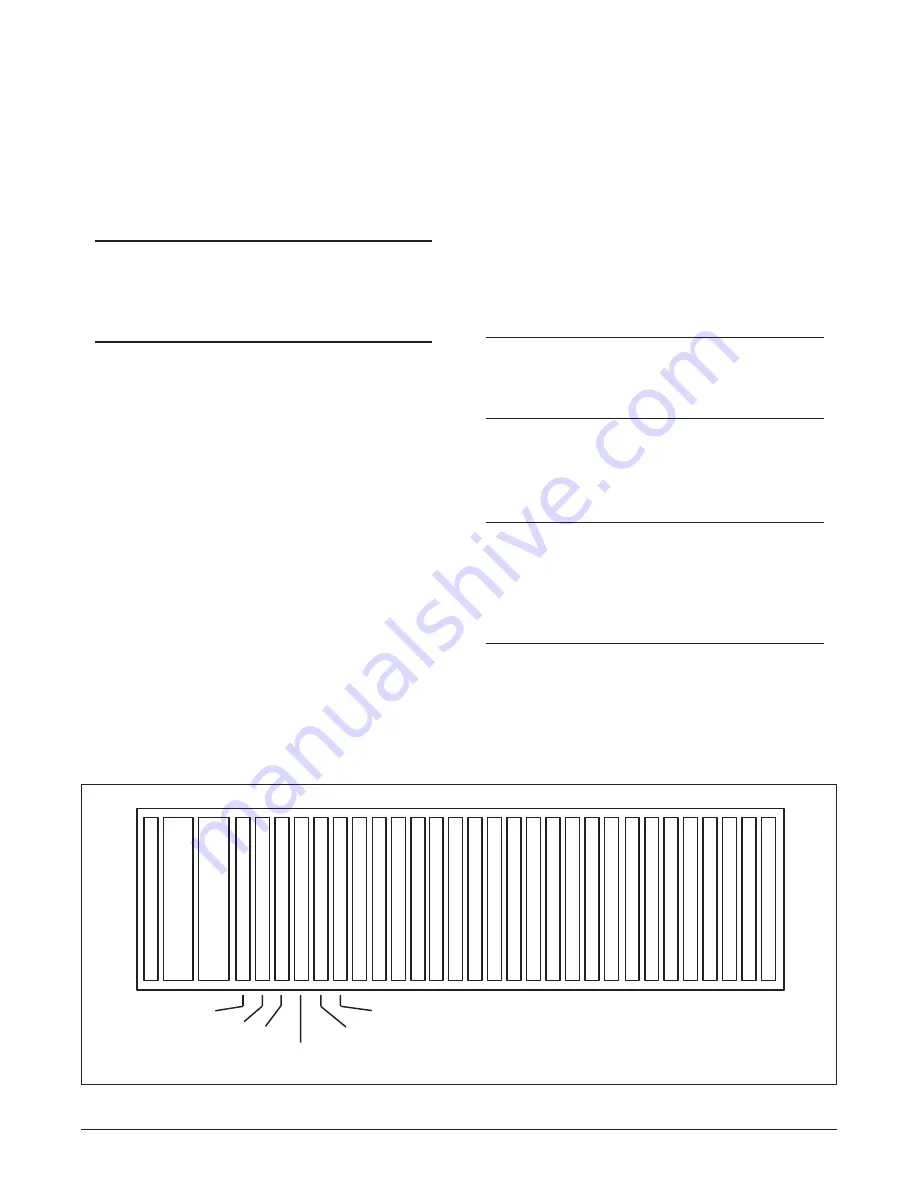
If no protection switching is provided, the Main unit
plugs into any odd-numbered slot.  The next higher
even-numbered slot may contain a blank card or can
be left empty. See

 Figure 2

.

Installing the QFO-C

1. Set the right switch segment S2-2 to Working

“on” or Protect “off” depending on where the
QFO-C is to be located (even- or odd-numbered
slot).

• Odd-numbered slot - set to Working

• Even-numbered slot - set to Protect

NOTE

The left switch segment S2-1 should be in the
“off” position.

2. Plug the transmit and receive fiber cables into the

fiber optic transceiver (U8) and route the cables
as shown in 

Figure 3

.

CAUTION

For proper operation, the ends of the fiber cables
must remain clean. Do not touch the ends of the
cables. When routing the cables, make sure the
cables have no sharp bends.

3. Position the QFO-C into the selected shelf slot.

While holding the fiber cables between the two
cable guides on the top of the QFO-C front panel,
lower the card retention lever and slide the unit
into the shelf assembly.

Figure 2. Total Access 3000 CO Chassis

See Table 3 and Table 4


for Total Access 3000 pin-out

information. See 

Table 5 

and

 Table 6

 for Total

Access 3010 pin-out information.

For further details about QFO-C connections, see
APP-301 and APP-306 in the Application Guide of
the TA 3000 System Manual.

WARNING

Risk of electric shock. Voltages up to 140 Vdc
(with reference to ground) may be present on
telecommunications circuits.

1. Never install telephone wiring during a lightning

storm.

2. Never install telephone jacks in wet locations

unless the jack is specifically designed for wet
locations.

3. Never touch uninsulated telephone wires or

terminals unless the telephone line has been
disconnected at the network interface.

4. Use caution when installing or modifying

telephone lines.

5. This equipment is intended to be used behind

devices that provide primary lightning protection.

6. Never look into the end of the fiber cable.

For 1:1 Automatic Protection Switching (APS), two
identical units are installed into adjacent slots. The
Main unit plugs into any odd-numbered slot and its
Auxiliary unit plugs into the next even-numbered slot
to the right.

S
C
U

                 Total Access 3000 Chassis

Q
F
O
C

Q
F
O
C

Q
F
O
C

Q
F
O
C

1

2

3

4

5

6

7

8

9

10

11

12

13

14

15

16

17

18

19

20

21

22

23

24

25

26

27

28

Main

Auxiliary

Main

Auxiliary

Main

(or Empty)

(No Protection)

Blank Card

B
L
A
N
K

C
A
R
D

Q
F
O
C

NOTE:  The Total Access 3010 (19-inch) chassis has only 22 access slots.

Содержание QFO-C

Страница 1: ...Figure 15 Restore Factory Defaults Screen 17 Figure 16 Status Screen 17 Figure 17 Port Status Screen 18 Figure 18 Status of All Ports Screen 18 Figure 19 Alarms Screen 19 Figure 20 Alarm Reporting Sc...

Страница 2: ...o C P M A B T U O 1 X S D 7 r i a P r o t c e n n o C P M A A N I 1 X S D 8 r i a P r o t c e n n o C P M A A T U O 1 X S D X R N I X R X T T U O X T B C P s t i n o r o t c e n n o c e h t a i v C O...

Страница 3: ...6 8 2 8 2 T R N R B T H W T H W N R B 1 6 9 2 T L S T H W T H W T L S 2 6 0 3 U L B D E R D E R U L B 3 6 1 3 G R O D E R D E R G R O 4 6 2 3 d l e i h S d n u o r G r o l o C p u o r G r e d n i B r...

Страница 4: ...L S L O V L O V T L S 0 5 5 2 5 2 D N G l o n e h p m A n i p 0 5 e h t n o 9 4 d n a 4 2 s n i p r i a p t s e t e h t e v a h 8 d n a 7 s r i a P y l n O e t o N Table 6 Pin out For Pair 6 and 8 on...

Страница 5: ...ion See Table 5 and Table 6 for Total Access 3010 pin out information For further details about QFO C connections see APP 301 and APP 306 in the Application Guide of the TA 3000 System Manual WARNING...

Страница 6: ...de multiplexed into four T1 signals These signals are de jittered and sent to the DSX by the T1 line drivers The line driver circuits provide the appropriate pulse shape for line lengths ranging from...

Страница 7: ...nter MODE SELECT toggle switch on the SCU provides the FCD menu interface The FCD displays strings four characters at a time A string greater than four characters long is displayed as 4 character sub...

Страница 8: ...n Enters a specific SES 15 minute threshold that when exceeded will generate an alarm UAS Threshold 15 Min Enters a specific UAS 15 minute threshold that when exceeded will generate an alarm ES Thresh...

Страница 9: ...T MAJ ALRM Figure 4 Level 1 and the MODE command is issued the VIEW menu displays If the MODE command is issued again the PROV menu displays etc The SELECT command selects a menu element and descends...

Страница 10: ...ES UAS 15 MIN ERR THLD P1 P2 P3 P4 P1 P0 P2 P3 P4 IN SRVC Level 3 ESCAPE 1 5 3 sec SELECT 1 5 sec Level 2B Level 2A Level 1 UNAS MAINT ALRM PROV TEST 24 HR ERR THLD 15 MIN ERR THLD 24 HR ERR THLD DSBL...

Страница 11: ...be installed in the even numbered slot to the right of the Main card The remote terminal RT must also have a Auxiliary card installed in the RT shelf When installed a Main Auxiliary communication is...

Страница 12: ...me QFO C Clei Code M3O1CD0CAA Part Number 1181300L1 Serial Number A903C7322 Product Revision A Software Revision A 00 Manufacture Date 10 99 System Help Screen Entering the Fiber Main Menu Screen From...

Страница 13: ...t of Service Unassigned Selection System Help Screen Figure 7 Provisioning Screen Shelf Slot 10 Total Access System 07 15 99 10 42 Unacknowledged Alarms MINOR Provisioning 1 Service State 2 All Provis...

Страница 14: ...nging the Port Service State From the Service State Screen type the desired port number and press Enter The Port Service Status Screen Figure 9 will appear Type the number corresponding to the desired...

Страница 15: ...ning of All Ports screen Figure 10 type 2 and press Enter to select Loopback Timeout The Loopback Timeout Screen Figure 12 will appear 2 Type the number corresponding to the desired loopback timeout v...

Страница 16: ...Enabled Selection System Help Screen Enabling Disabling AIS to DSX Loss of T1 1 From the Provisioning of All Ports Screen type 3 and press Enter to select AIS to DSX Loss of T1 The AIS to DSX Loss of...

Страница 17: ...ed Alarms MAJOR MINOR Status 1 Port 1 2 Port 2 3 Port 3 4 Port 4 5 All Ports Selection System Help Screen Restore Factory Default Settings 1 From the Provisioning of All Ports Screen type 5 and press...

Страница 18: ...rt From the Status Screen type the number of the desired single port and press Enter The Port Status Screen Figure 17 will appear Viewing the Status of All Ports From the Status Screen type 5 and pres...

Страница 19: ...arm Reporting Screen Accessing the Alarms Screen From the QFO C Main Menu Screen type 4 and press Enter to select Alarms The Alarms Screen Figure 19 displays Viewing Alarms From the Alarms screen type...

Страница 20: ...arm Provisioning The Alarm Provisioning Screen Figure 21 will appear Setting the ES Threshold 15 Min 1 From the Alarm Provisioning Screen type 1 and press Enter to select ES Threshold 15 Min The ES Th...

Страница 21: ...NONE SES THRESHOLD 15 MIN 15 1 15 2 75 SELECTION System Help Screen Setting the SES Threshold 15 Min 1 From the Alarm Provisioning Screen type 2 and press Enter to select SES Threshold 15 Minute The S...

Страница 22: ...OR ALERT INFO SES Threshold 24 Hour 7200 1 1440 2 7200 Selection System Help Screen Setting the ES Threshold 24 Hour From the Alarm Provisioning Screen type 4 and press Enter to select ES Threshold 24...

Страница 23: ...ess System 12 15 99 11 22 Unacknowledged Alarms MAJOR ALERT UAS Threshold 24 Hours 7200 1 1440 2 7200 Selection System Help Screen Setting the UAS Alarm Threshold 24 Hour From the Alarm Provisioning S...

Страница 24: ...02 24 18 Unacknowledged Alarms None Port 1 2 3 4 Test 1 Loopback RT Disabled 2 Loopback DSX Disabled Selection System Help Screen Performing Loopback Testing 1 From the Test Screen type the number th...

Страница 25: ...Port 4 Far End Selection System Help Screen Figure 31 shows the Loopback DSX Screen Type the number of the desired DSX test and press Enter Accessing the Performance Monitoring Screen 1 From the QFO...

Страница 26: ...stem 12 15 99 11 22 Unacknowledged Alarms MAJOR ALERT Port 1 Performance Near End 15 Minute Registers 24 Hour Registers ES SES UAS ES SES UAS ES SES UAS 0000 0000 0000 16 0000 0000 0000 00006 0000 000...

Страница 27: ...Screen 2 Type 2 and press Enter to switch the Working QFO C to protect Figure 35 Setting the Port Circuit ID 1 From the QFO C Main Menu Screen type 8 and press Enter to select Circuit ID The Circuit...

Страница 28: ...not meet its published specifications or fails while in service see ADTRAN Carrier Networks Equipment Warranty Repair and Return Policy and Procedure document 60000087 10A Contact Customer and Product...

Страница 29: ...or Type SC single or duplex Operating Wavelength 1310 nm Transmitter Laser type Output Launch Power 8 dBm minimum 6 dBm typical Receiver Sensitivity 30 dBm minimum 33 dBm typical Receiver Input Level...

Страница 30: ...30 Section 61181300L1 5C Issue 3 61181300L1 5C...

Отзывы: