background image

see the command on the screen, but you are inputting characters.  After you press 
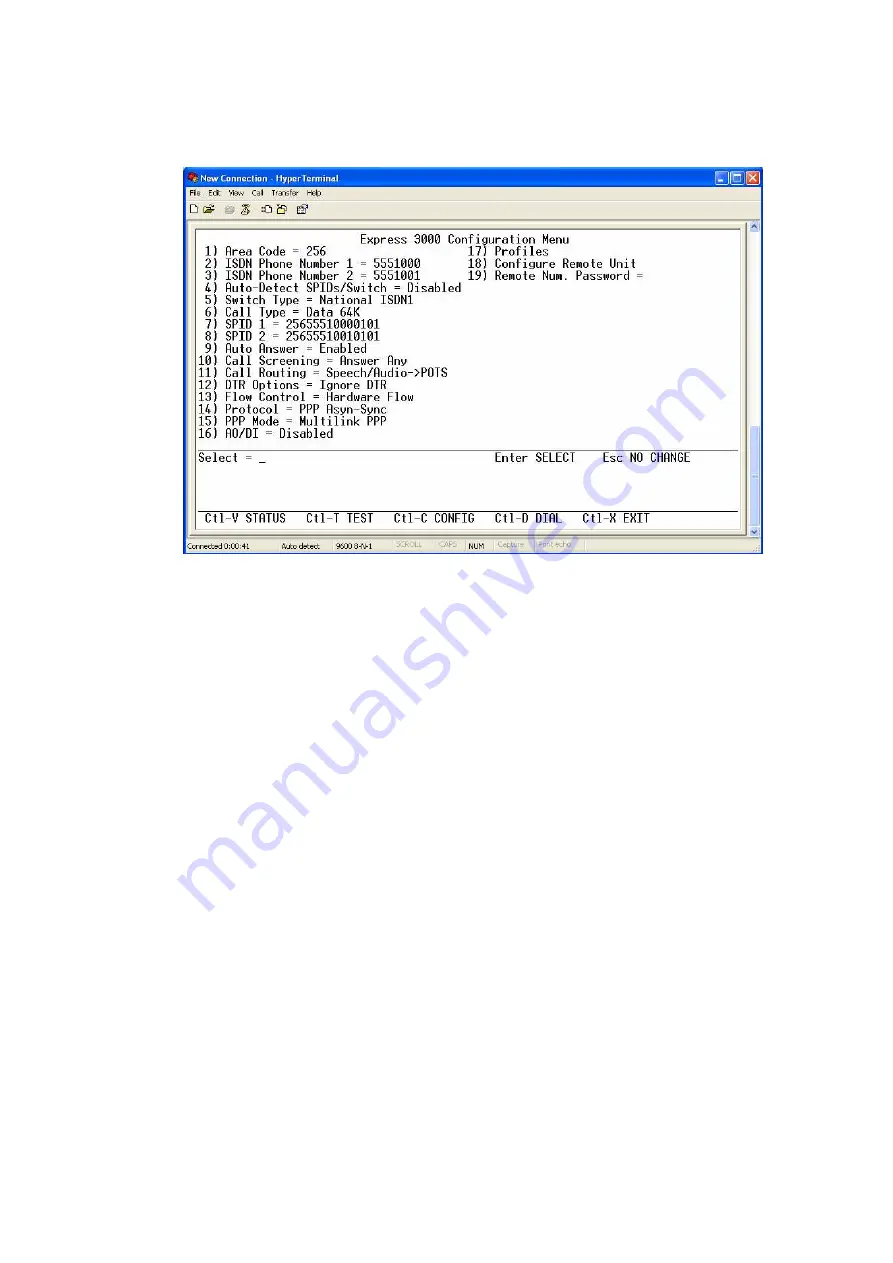
enter, the ADTRAN Express 3000 Configuration Menu should appear. 


10.


Here you will need to enter your information to configure the Express 3000.  To 
configure the unit you will enter the number of the option you wish to change, 
press enter, and then enter the number of the option you wish to select (i.e. to 
change the area code press “1” and enter, then enter the area code and press enter 
again).  Your ISDN phone numbers should be 7 digit numbers that correlate to 
your ISDN line.  Your SPID numbers will most likely be 14 digit numbers, and 
these will also correspond to the ISDN line.  Both of these sets of numbers should 
be provided to you by your service provider.  You will also need to verify the 
Switch Type, which should also be provided by your service provider, it will most 
likely be National ISDN1.  All other options need to match the figure above. 


11.


The power/line light on the front of the Express 3000 should now be solid.  If it is 
not, please contact your service provider and verify your ISDN line information, 
then contact ADTRAN Technical Support. 

Содержание Express 3000

Страница 1: ...he provided cable 3 Power on the ADTRAN Express 3000 by plugging in the power cord 4 From your PC click on the start button go to programs accessories communications HyperTerminal Click on HyperTermin...

Страница 2: ...corresponding COM port 8 You will now be prompted for COM Properties Change Bits per second to 9600 and Flow control to None Click Apply then OK 9 You will now be prompted with a blank screen and a cu...

Страница 3: ...ain Your ISDN phone numbers should be 7 digit numbers that correlate to your ISDN line Your SPID numbers will most likely be 14 digit numbers and these will also correspond to the ISDN line Both of th...

Страница 4: ...n your PC 3 Power on the Netgear FWG114P by plugging in the power cord and restart your computer Network Diagram Configuring the Netgear FWG114P NOTE The steps that follow may differ depending on the...

Страница 5: ...and you will need to select Serial Port Modem or ISDN You will then need to enter your Dial up Account information enter your username and password provided by your service provider and the phone numb...

Страница 6: ...8 On the blue menu on the left of the screen scroll down and select Modem under the Serial Port heading 9 Verify that the settings match the figure below and then click the Modem Properties button...

Страница 7: ...d Off under the Auto answer commands Verify the menu looks like the figure below Then Click Apply 11 This completes the configuration of the Netgear router 12 To finish the configuration process power...

Страница 8: ...main part of the screen Scroll down to the bottom where it says Serial Port Click on the Details button 5 A Serial Port Status window will appear Select the Connect button to connect to the Internet A...

Отзывы: