background image

10

Chassis Overview

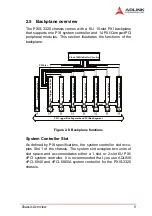
Star Trigger Slot

Slot 2 is designated as the Star Trigger (ST) slot. This slot features
a dedicated trigger line between itself and slots 3 to 15. The star
trigger delivers trigger signals with ultra-low skew (<1ns) to periph-
eral modules. To use the star trigger functionality, you must install
a special star trigger controller in Slot 2.

Peripheral Slots

The PXIS-3320 chassis backplane accommodates up to fourteen
6U PXI/CompctPCI peripheral modules.

Local Bus

The PXI backplane’s local bus is a daisy-chained bus that con-
nects each peripheral slot with the slots on its left and right. Each
local bus is 14 lines wide and can pass analog and digital signals
between modules or provide a high-speed, sideband communica-
tion path that does not affect the PCI bandwidth.

Following PXI specifications, the local bus connects all adjacent
slots except Slots 1 and 2.

Trigger Bus

The backplane’s trigger bus is an 8-line bus that connects all slots
in the same PCI segment. Users can use triggers to synchronize
the operation of several PXI peripheral modules, or use one mod-
ule to control accurate timing sequences of operations performed
on other modules in the system. Modules can pass trigger signals
or clock signals to other modules through the trigger bus, allowing
precise timed responses to asynchronous external events that the
system is monitoring or controlling.

Содержание PXIS-3320

Страница 1: ...nologies Automate the World Manual Rev 2 00 Revision Date October 27 2006 Part No 50 17024 1000 PXIS 3320 PXIS 3320 1000W 15 Slot 6U PXI CompactPCI Chassis with 500W 1000W Hot swappable Power Supply U...

Страница 2: ...he use or inability to use the product or documentation even if advised of the possibility of such damages This document contains proprietary information protected by copy right All rights are reserve...

Страница 3: ...ch com TEL 886 2 82265877 FAX 886 2 82265717 Address 9F No 166 Jian Yi Road Chungho City Taipei 235 Taiwan E mail or fax this completed service form for prompt and satisfac tory service Company Inform...

Страница 4: ......

Страница 5: ...ipheral Slots 10 Local Bus 10 Trigger Bus 10 10 MHz Reference Clock 11 3 Installation 13 3 1 Calculating Power Consumption 13 3 2 Installing the Chassis and Starting Up 14 3 3 Monitoring the System 15...

Страница 6: ...5 Connectors Pin Assignments 27 PXI Connectors Pin Assignments 27 B 3 Bus Segments and Interrupt Routings 33 B 4 Bus Segments and Interrupt Routings 34 B 5 Miscellaneous Connectors Pin Assignments 35...

Страница 7: ...List of Tables iii List of Tables Table 3 1 LED indications 15 Table 4 1 Troubleshooting Power Failures 19...

Страница 8: ...PXIS 3320 1000W front view 6 Figure 2 3 PXIS 3320 and PXIS 1000W right view 7 Figure 2 4 PXIS 3320 and PXIS 1000W top view 7 Figure 2 5 PXIS 3320 and PXIS 3320 1000W rear view 8 Figure 2 6 Backplane...

Страница 9: ...reliable power supply to power intensive peripherals such as high speed digitizers digi tal pin driver receiver and communication modules The system power supply temperature and cooling fan statuses...

Страница 10: ...ne system slot and 14 PXI CompactPCI periph eral slots X Two hot swappable 250 W CompactPCI power supply with universal AC input PXIS 3320 X Filtered forced air cooling architecture X Magnetic circuit...

Страница 11: ...wing items are included in the package PXIS 3320 X 6U PXI CompactPCI chassis with 15 slots and two cPS H325 AC power supply modules X Power cord X User s manual PXIS 3320 1000W X 6U PXI CompactPCI cha...

Страница 12: ...4 Introduction...

Страница 13: ...ensions of the PXIS 3320 and PXIS 3320 1000W chassis identifies the basic and describes the backplane functions and features 2 1 Front View Figure 2 1 PXIS 3320 front view Alarm reset button Power swi...

Страница 14: ...6 Chassis Overview Figure 2 2 PXIS 3320 1000W front view Power switch Alarm reset button LEDs Fan tray cover Fan tray cover Power supply modules Fan tray cover screw...

Страница 15: ...Chassis Overview 7 2 2 Right View Figure 2 3 PXIS 3320 and PXIS 1000W right view 2 3 Top View Figure 2 4 PXIS 3320 and PXIS 1000W top view Handle...

Страница 16: ...8 Chassis Overview 2 4 Rear View Figure 2 5 PXIS 3320 and PXIS 3320 1000W rear view Circuit breaker Power connector...

Страница 17: ...ler slot occu pies Slot 1 of the chassis The system slot occupies two units of slot space and accommodates either a 1 slot or 2 slot 6U PXI cPCI system controller It is recommended that you use ADLINK...

Страница 18: ...ft and right Each local bus is 14 lines wide and can pass analog and digital signals between modules or provide a high speed sideband communica tion path that does not affect the PCI bandwidth Followi...

Страница 19: ...hav ing source impedance matched to the backplane and a skew of 1ns between slots drives the clock signals to each peripheral slot You can use this common reference clock signal to synchronize multipl...

Страница 20: ...12 Chassis Overview...

Страница 21: ...ormation on how to power up and monitor the system 3 1 Calculating Power Consumption Before installing any modules into the PXIS 3320 chassis calcu late the total system power requirement and check th...

Страница 22: ...anel power switch turns the system ON or OFF 3 Plug the AC power cord to a properly grounded wall socket or power strip 4 Make sure that the CPU memory modules and storage device are properly installe...

Страница 23: ...tch The amber LED and green LEDs on the upper right corner of the front panel light up The chassis fans also start to rotate NOTE If the chassis fails to turn on refer to Chapter 4 Trouble shooting an...

Страница 24: ...re or fan failure The alarm reset button resets the alarm monitor system and stops the buzzer LED Function Color Status Indication Power DC rail voltages 3 3 V 5 V 12 V 12 V Green ON Power is supplied...

Страница 25: ...ower ground FGND For applica tions that require the short of signal ground and power ground an external wiring is needed to connect the GND and FGND solder ing pots 3 6 Changing the Power Supply Modul...

Страница 26: ...to operate the alarm buzzer beeps and the fan LED flashes to alert you Reset the alarm by pressing the alarm reset button then replace the defective fan To replace a defective fan 1 Remove the fan tra...

Страница 27: ...ive electrical outlet Try connecting another electrical equipment to this outlet to make sure that it has power Power switch is not at ON position Set the power switch to the ON position The circuit b...

Страница 28: ...velocity stream of air to clean the interior of the chassis Clean around components with a soft bristle brush If you must use liquid for minor interior cleaning use a 75 isopropyl alcohol solution th...

Страница 29: ...ts modules compliant with CompactPCI PICMG 2 0 specifications A 2 Power Supply X PICMG standards PICMG 2 11 compliant X Input voltage 100 to 240 VAC X Input frequency 47 to 63 Hz X Output 250 W each V...

Страница 30: ...4W X Airflow for intake 241 CFM X Airflow for ventilation 241 CFM LED Function Setting Status Indication Power Voltage monitor ing of 3 3 V 5 V 12 V 12 V ON Power is supplied Temperature Temperature m...

Страница 31: ...densing A 7 Backplane X Backplane bare board material UL 94V 0 rated X Backplane connectors Conforms to IEC 917 and IEC 1076 4 101 UL 94V 0 rated A 8 Shock and Vibration X Shock 15 G peak to peak 11 m...

Страница 32: ...24 Specifications...

Страница 33: ...lane Drawing and Pin Assignments 25 B Backplane Drawing and Pin Assignments B 1 Backplane Layout The following figures show the front and rear view of the PXIS 3320 backplane Figure B 1 CBX 6015 front...

Страница 34: ...26 Backplane Drawing and Pin Assignments Figure B 2 CBX 6015 rear view...

Страница 35: ...D 14 GND AD 13 GND 18 GND SERR GND 3 3V PAR C BE 1 GND 17 GND 3 3V IPMB_SCL IPMB_SDA GND PERR GND 16 GND DEVSEL GND V I O STOP LOCK GND 15 GND 3 3V FRAME IRDY GND TRDY GND 12 14 Key 11 GND AD 18 AD 17...

Страница 36: ...IG7 GND 15 GND PXI_BRSVA15 GND FAL REQ5 GNT5 GND 14 GND AD 35 AD 34 AD 33 GND AD 32 GND 13 GND AD 38 GND V I O AD 37 AD 36 GND 12 GND AD 42 AD 41 AD 40 GND AD 39 GND 11 GND AD 45 GND V I O AD 44 AD 43...

Страница 37: ...PAR C BE 1 GND 17 GND 3 3V IPMB_SCL IPMB_SDA GND PERR GND 16 GND DEVSEL GND V I O STOP LOCK GND 15 GND 3 3V FRAME IRDY GND TRDY GND 12 14 Key 11 GND AD 18 AD 17 AD 16 GND C BE 2 GND 10 GND AD 21 GND...

Страница 38: ...PXI_TRIG7 GND 15 GND PXI_BRSVA15 GND N C PXI_STAR6 PXI_LBR6 GND 14 GND AD 35 AD 34 AD 33 GND AD 32 GND 13 GND AD 38 GND V I O AD 37 AD 36 GND 12 GND AD 42 AD 41 AD 40 GND AD 39 GND 11 GND AD 45 GND V...

Страница 39: ...3 3V PAR C BE 1 GND 17 GND 3 3V IPMB_SCL IPMB_SDA GND PERR GND 16 GND DEVSEL GND V I O STOP LOCK GND 15 GND 3 3V FRAME IRDY GND TRDY GND 12 14 Key 11 GND AD 18 AD 17 AD 16 GND C BE 2 GND 10 GND AD 21...

Страница 40: ...PXI_TRIG7 GND 15 GND PXI_BRSVA15 GND N C PXI_LBL6 PXI_LBR6 GND 14 GND AD 35 AD 34 AD 33 GND AD 32 GND 13 GND AD 38 GND V I O AD 37 AD 36 GND 12 GND AD 42 AD 41 AD 40 GND AD 39 GND 11 GND AD 45 GND V...

Страница 41: ...Slot 6 AD26 5 0 INTC INTD INTA INTB B1 Bridge1 AD31 0 2 INTD INTA INTB INTC BUS 2 Slot 7 S1_AD30 S1_1 S1_1 INTB INTC INTD INTA Slot 8 S1_AD29 S1_2 S1_2 INTA INTB INTC INTD Slot 9 S1_AD28 S1_3 S1_3 IN...

Страница 42: ...mber PXI_STAR P2 D17 Slot 2 Star Trigger Slot PXI_STAR0 PXI_STAR12 Slot 3 PXI_STAR0 Slot 4 PXI_STAR1 Slot 5 PXI_STAR2 Slot 6 PXI_STAR3 Slot 7 PXI_STAR4 Slot 8 PXI_STAR5 Slot 9 PXI_STAR6 Slot 10 PXI_ST...

Страница 43: ...ion Screw Terminals NOTE The V I O must be shorted to either 3 3V or 5V The default factory setting is to short V I O to 5V J1 INH DC power inhibit signa Signal Name Pin Pin Signal Name V2SENSE 1 11 V...

Страница 44: ...t signal J8 RST System reset signal J9 FAL Power supply fail input J5 Connector for LED power status J6 Pin Signal Name 1 INH 2 GND J8 Pin Signal Name 1 RST 2 GND J9 Pin Signal Name 1 FAL 2 GND J5 Nam...

Страница 45: ...the P2 of the system slot JP1 10 MHz Reference Clock J2 POWER SENSE CN2 Pin Name 1 IPMB_CLK 2 GND 3 IPMB_DATA 4 IPMB_PWR 5 ALERT Pin Description Pin 1 2 Default Internal 10MHz system clock PXI_CLK10 P...

Страница 46: ...38 Backplane Drawing and Pin Assignments...

Страница 47: ...a voltage selector switch make sure that the switch is set to the proper position for the area The voltage selector switch is set at the factory to the cor rect voltage X For pluggable equipment ensu...

Страница 48: ...X A Lithium type battery is provided for the real time clock CAUTION Risk of explosion if battery is replaced by an incorrect type Dispose used batteries as instructed X The equipment must be service...

Страница 49: ...third party products not manufactured by ADLINK will be covered by the original manufactur ers warranty X For products containing storage devices hard drives flash cards etc please back up your data...

Страница 50: ...table storage environments i e high temperatures high humidity or volatile chemi cals X Damage caused by leakage of battery fluid during or after change of batteries by customer user X Damage from imp...

Отзывы: