background image

7

INSTALLATION

BOILER ROOM

Important

• Keep vents free at all times.
•  Do not store inflammable products in the boiler room.
•  Do not store corrosive products near the boiler, such as paints,

solvents, chlorine, salt, soap and other cleaning products.

•  If you smell gas, do not switch on the light or light a flame. Turn off

the mains gas tap at the meter and inform the appropriate
services immediately.

Access

The boiler room must be large enough to allow good access to the
boiler. The following minimum distances are required around the
boiler:

- front 

500 mm

- side 

100 mm

- behind

150 mm

- above

350 mm

Ventilation

The boiler room must have both low- and high-level ventilation,
in accordance with the local standards and provisions force.

The table below gives an example conforming to the Belgian standards.

Other countries should refer to their own standards.

Base

The base on which the boiler rests must be made of non-combustible
materials.

CHIMNEY CONNECTIONS

IMPORTANT
Boilers must be installed by an approved heating
engineer, in accordance with the prevailing local
standards and regulations.

The duct size may not be smaller than the boiler outlet
duct.

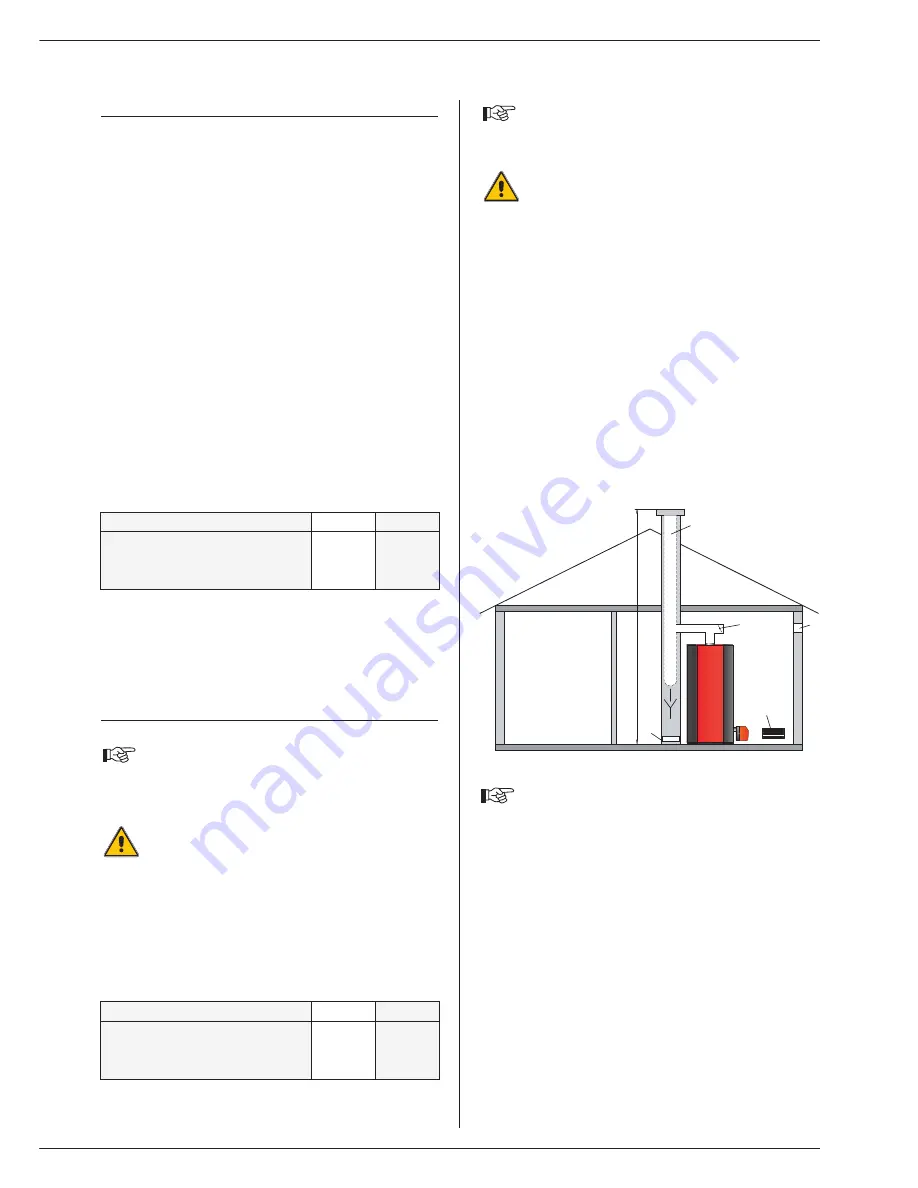
Typical boiler connection: B23

The boiler is connected to the chimney by a metal pipe rising at an
angle from the boiler to the chimney.
A flue disconnection piece is required.
This must be easy to remove to give access to the flue pipes when
servicing the boiler.

Ventilation

200 N

200 F

Min. fresh air requirement

m

3

/h

277

353

Bottom

dm

2

2.45

2.45

Top

dm

2

4.62

5.88

Chimney / minimum flue diameter

200 N

200 F

E = 5 m

Ø F min.

mm

284

320

E = 10 m Ø F min.

mm

250

269

E = 15 m Ø F min.

mm

250

250

Note:
Regulations vary from country to country therefore
the table above is intended only as a guide.

Due to the high efficiency of our boilers, the flue gasses
exit at low temperature. Accordingly, there is risk that
the flue gasses could condense, which could damage
the chimney. In order to avoid this risk, it is strongly
recommended that the chimney be lined.

A condensation drain outlet must be fitted close to the
boiler to prevent condensation products from the
chimney running into the boiler.

To avoid condensation water running out of the
terminal, all horizontal flue runs must fall back towards
the boiler.

B23

D

A

B

C

F

E

A. Top vent
B. Bottom vent
C. Draught regulator
D. Inspection window
E. Height of lined chimney
F. Chimney diameter

When connecting the flue-gas outlet to an existing
chimney, do not take into account the pressure drop
on the “flue gas side”.

Содержание HeatMaster 200 F

Страница 1: ... 641 Primary circuit capacity L 241 241 Hot water connection Ø 2 2 Heating connection Ø 2 2 Chimney connection Ø mm 250 250 Water tank heat transfer surface m2 5 30 5 30 Drained weight Kg 530 550 Pressure loss of the primary circuit mbar 240 240 Combustion efficiency 93 5 93 7 Output CO2 12 8 12 9 Net temperature of the flue gases C 143 140 5 Mass flow rate of combustion products g sec 65 2 83 0 N...

Страница 2: ...L 10 1570 1675 Peak delivery at 45 C L 10 1350 1444 Peak delivery at 60 C L 10 915 961 Peak delivery at 70 C L 10 737 755 Peak delivery at 80 C L 10 586 586 Peak delivery at 40 C L 60 4920 5976 Peak delivery at 45 C L 60 4221 5131 Peak delivery at 60 C L 60 2925 3126 Peak delivery at 70 C L 60 2412 2309 Peak delivery at 80 C L 60 1712 1712 Continuous delivery at 40 C L h 4020 5161 Continuous deliv...

Страница 3: ...pical boiler connection B23 The boiler is connected to the chimney by a metal pipe rising at an angle from the boiler to the chimney A flue disconnection piece is required This must be easy to remove to give access to the flue pipes when servicing the boiler Ventilation 200 N 200 F Min fresh air requirement m3 h 277 353 Bottom dm2 2 45 2 45 Top dm2 4 62 5 88 Chimney minimum flue diameter 200 N 200...

Страница 4: ...ies a temperature and pressure relief valve must be fitted consult your ACV stockist for assistance Example of hot water connection with thermostatic mixer 1 Stop cock 2 Non return valve 3 Pressure reducing valve 4 Expansion relief valve 5 Hot water expansion vessel 6 Hot water secondary pump it fitted 7 Thermostatic mixing valve 8 Drawoff tap 9 Drain cock 10 Stop cock for cleaning 11 Temperature ...

Страница 5: ...Isolating valves 5 Safety valve set to 3 bar with pressure gauge 6 Expansion vessel 7 Drain cock 8 Controller optional 9 Surface mounted sensor optional WARNING The pimary safety valve is supplied with a plastic tube connected to the discharge outlet this is for test purposes only and should be removed The safety valve should be connected to a drain using a metallic pipe eg copper BEWARE In the ca...

Страница 6: ...circuit low water pressure indicator 6 Low water pressure switch 7 Time clock 8 Summer winter switch 9 Hot water priority link 10 Burner lockout indicator 11 Room thermostat connection option 12 Central heating pump 13 HeatMaster shunt pump 14 Burner plug connector 15 Water flow switch connection option 16 Thermal reset high limit thermostat 95 C 17 Control thermostat Electrical connection HeatMas...

Страница 7: ... them 6 Dismantle the chamber plate and remove the burner 7 Brush the flue ways 8 Clean the combustion chamber and the burner 9 Replace the turbulators the chimney reducer and the flue lining check that the seal on the chimney reducer is in good condition Replace the seal if necessary Horizontal flue gas outlet reducer 3 Loosen the nuts and remove the chimney reducer 5 Take out the turbulators fro...

Страница 8: ... 4 Open valve 9 then valve 10 5 Let the water empty into the drain For the tank to be emptied valve 9 must be situated at ground level D A N G E R HOT 1 2 3 4 5 2 6 7 8 9 10 11 I O 1 4 2 3 6 5 8 I O 7 4 9 PLACING THE BURNER IN SAFETY MODE When the burner is in safety mode the safety indicator located on the burner and the control panel lights up The red warning light indicates an operating fault W...

Отзывы: