background image

9CH Mobile NVR Manual 

  34 

1.3-6 Post-alarm Recording 

Post-alarm recording records the video of a camera after a particular alarm/motion is triggered. 
This can be set between 1-100 seconds.    

1.3-7 Pre-alarm recording 

Pre-alarm recording can record the video of a camera before a particular alarm/motion is 
triggered. To enable pre-alarm recording, turn the option on. 

1.3-8 Weighted recording 

When weighted recording is activated, the standard camera recording frame rate is 
increased to the pre-determined rate (set in advance recording), once an alarm is detected 
by 

SVR

. Without an alarm the camera will record at 4FPS. 

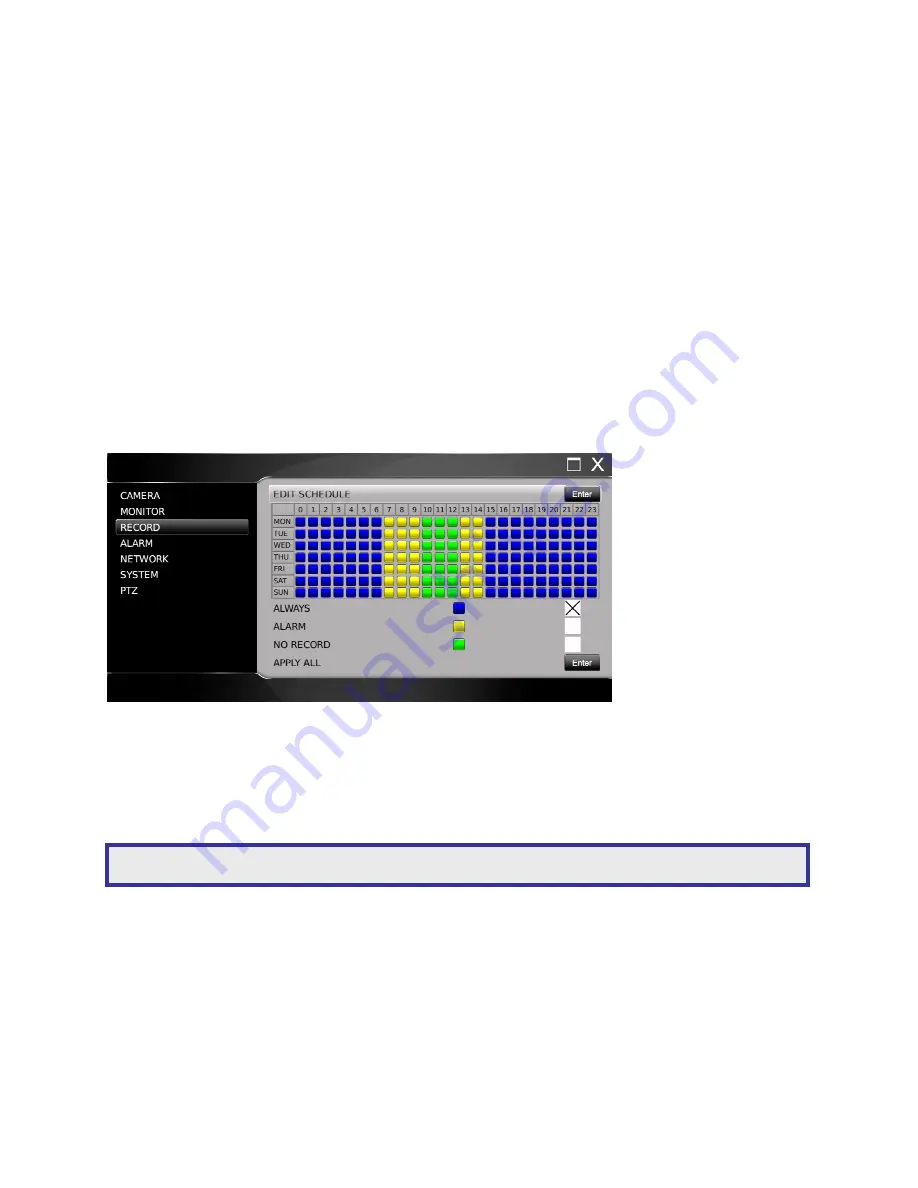
1.3-9 Schedule table 

The schedule table is displayed as hourly intervals 7 days a week. You can chose whether 
you want the 

SVR

 to record constantly (always), on an alarm event (alarm) or not record (no 

record). Your chosen method is indicated by a colour code on the time/date grid. 

1.3-10 HDD overwritten 

The 

SVR

 can be setup for HDD overwrite. If the user does not want the HDD to be overwritten, 

turn the option off. 

Warning:

 The schedule table is a universal table and changes will apply to all cameras on the 

SVR

Содержание AiP-Q9U

Страница 1: ...9CH H 264 MOBILE SVR INSTRUCTION MANUAL...

Страница 2: ...d via the health check report The SVR can be controlled via multiple input methods remote control touch screen monitor or USB mouse When connected to a touch screen monitor Smartphone style features l...

Страница 3: ...spective owners Caution Do not drop or strike the equipment Do not install the equipment near naked flames or heat sources Do not expose this unit to rain moisture smoke or dusty environments Do not c...

Страница 4: ...rols 12 Chapter 8 Alarm Management 14 Chapter 9 Backup Export 15 Chapter 10 Event 17 Chapter 11 Basic web based browser viewing 18 11 1 Web based browser playback 18 11 2 Web based browser backup 19 1...

Страница 5: ...2 2 Logon 45 2 3 Configuring the SVR via web page 46 Appendix A Alarm I Os Audio and RS 232 Connector 52 Appendix B Power Connector 53 Appendix C M12 Network Connector 53 Appendix D Hard Drive Suppor...

Страница 6: ...D Green LAN link light 5 Extra IR receiver Ensure turn off the power before install 3 HDD LED Green blinking HDD recording indicator 6 IR receiver 1 2 Remote control The remote control is a small wire...

Страница 7: ...t forward Fast rewind Next single channel Previous single channel 4 split display 8 split display 9 split display AUDIO Audio mute BACKUP Video backup DVR SVR Addressable SVR control LANGUAGE Language...

Страница 8: ...n to previous menu 1 4 Mouse operations The SVR has a USB mouse interface General mouse operations can be used to navigate the device Pinch Zoom Out Swipe Right mouse click Mouse scroll Left mouse cli...

Страница 9: ...mbols Home short cut keys Menu Pause Alarm Playback Backup Main menu keys PTZ Screen view Shut down Alarm manager Live display Configuration menu Playback Backup Event Additional menu keys Return to p...

Страница 10: ...des To digitally zoom follow the steps below a Via remote control Select desired channel To zoom in and out press zoom button to activate Use directional keys to move around the screen To return to li...

Страница 11: ...in blue To return to live mode press pause icon again Chapter 5 PTZ If the camera is a Pan Tilt and Zoom PTZ camera you can control it via the following methods a Via remote control Select required c...

Страница 12: ...a Via remote control To access playback press the play button b Via touch screen monitor mouse To access playback press then 7 2 Select time and date for playback a Via remote control Use to navigate...

Страница 13: ...Rewind Play Fast forward Step fast forward Pause Stop USB Audio Full screen view Quad view Eight view Nine view a Via remote control Use remote keypad to play stop or pause Use button to rewind Use to...

Страница 14: ...playback press stop or escape To activate WYSIWYG backup insert USB and press backup The USB icon will light to show backup has commenced To stop recording press backup again Note For all methods wit...

Страница 15: ...s reached Press enter to select To scroll through alarm events use up and down direction keys Choose alarm event and press enter Use up and down direction keys to select recorded event Use right and l...

Страница 16: ...send a still image USB will save a still image Playback will take you to the selected event on screen 5 Recorded data 2 Time Frame 3 Unit selector 1 Channels 4 Backup bar Colour code Yellow alarm rec...

Страница 17: ...t to live mode the playback backup icon will illuminate and flash with percentage rate Once complete the illumination and flashing will stop b Via touch screen monitor mouse Press playback backup to b...

Страница 18: ...ated areas selected by the user Metadata event refers to external devices installed by the user a Via remote control To access event manager press menu key Use to locate the event manager icon Press e...

Страница 19: ...full screen double click on required camera view Double click to return to multi screen 11 1 Web based browser playback Press the playback button on the left hand side Choose time and date required i...

Страница 20: ...rt backup file download Web based browser export applies to either backups created through the browser or through the temporary hard drive space at the unit Click required file and save to desired loc...

Страница 21: ...d files FTP download Convert already downloaded files 12 1 Playback exported files Open Backup Manager To select files USB DVD or web based exported files click file open folder Saved files will then...

Страница 22: ...nel will then appear This means the backup manager programme is communicating with your SVR gathering all recorded data Recorded data will appear on the left hand side You can access minute breakdowns...

Страница 23: ...nel backups to single channel AVI files To do this follow the steps below Open Backup Manager Click file convert AVI file Locate desired backup files Choose the channels you wish to convert You can se...

Страница 24: ...HDMI Output USB flash disk USB DVD RW USB mouse 6 DC 12V Input USB touch monitor 7 LAN 3 VGA Output M12 connector Connect power supply monitor network cable and control device Chapter 2 Hard Drive s 2...

Страница 25: ...lect HDD info Installed drives will be listed Select drive s to format Select enter Select OK to complete Chapter 3 Time and Date Settings Enter the setup menu Select system from the left hand options...

Страница 26: ...Chapter 4 Network Settings Enter the setup menu Select network from the left hand options Ensure static is displayed under IP mode Enter your IP address and subnet mask range Note This guide will ref...

Страница 27: ...sign the relevant cameras to a channel by selecting channel number in right hand camera column Exit menu setup and all installed cameras will be displayed By default they are set to record on schedule...

Страница 28: ...tup To setup an IP camera use the following steps 1 1 1 Camera select Use the directional arrows to select camera you wish to edit add 1 1 2 Camera name A user can enter up to 16 characters for a came...

Страница 29: ...ged if required 1 1 6 Video RTSP port By default the SVR IP camera RTSP port is set to 554 This can be changed if required 1 1 7 IP Camera setup To setup an IP camera follow these instructions Camera...

Страница 30: ...e an image for each listed camera to make identification easier Set IP If the IP addresses of the installed IP cameras have not already been configured they can be changed by highlighting the channel...

Страница 31: ...to record GPS information and auto adjust time For Setting up USB GPS receiver follow these instructions Press Enter on Setup Camera POS GPS ATM SETUP Note Different HDMI cables can successfully send...

Страница 32: ...iver Meta data Service select ON POS Emulated Mode select GPS Baud Rate Data Size Parity Stop Bit and Flow Control ensure these has the same setting as the GPS receiver When GPS receiver is activated...

Страница 33: ...reducing power consumption 1 2 3 Monitor standby time Monitor standby time can be adjusted 1 2 4 Default division To select the default screen layout display on power initialize 1 3 Record setup Recor...

Страница 34: ...ndwidth use Record Advance Each Camera can be set to the desired bit rate and frame rate HD settings are for full screen recording whilst SD relates to multi view display and recording The total bit r...

Страница 35: ...e rate is increased to the pre determined rate set in advance recording once an alarm is detected by SVR Without an alarm the camera will record at 4FPS 1 3 9 Schedule table The schedule table is disp...

Страница 36: ...d follow the instructions 1 4 1 Camera select Use the directional arrows to select camera you wish to configure 1 4 2 Alarm input type The NVR s alarm inputs can be configured as normally open N O or...

Страница 37: ...exit the setting menu Move mouse to X icon and press Left mouse click to exit motion zone setting Red indicates motion area 1 4 6 Alarm time Set the period of time 1 100 seconds the alarm output relay...

Страница 38: ...NVR s are accessed on a high bandwidth network such as Gigabit LAN 1 5 1 IP mode Set the SVR to Static DHCP and PPPoE IP modes It is highly recommended that NVR s are accessed on high bandwidth networ...

Страница 39: ...ber SVR has a built in FTP server The FTP service is also used by Backup Manager exe Backup Manager can manage all the NVR s playback clips via a network 1 5 10 MAC Display the MAC address of the SVR...

Страница 40: ...up to 3 network ranges to see cameras across multiple subnet ranges 1 6 System setup To set up the system settings use the following instructions 1 6 1 Date Time Press enter to set Date Time on the S...

Страница 41: ...whether the HDD is formatted or unformatted Select indicates that the HDD is selected Approximate recording hour recording hours based on the HDD s Approximate recording days recording days based on...

Страница 42: ...tor default password 2222 Guest default password 3333 Users 1 to 12 Once a user is selected you can edit passwords enable password protection and set up the following user rights Allow Setup Allow Pla...

Страница 43: ...hould use the file system FAT 16 or FAT 32 Visit our web site at www acumenin com to download the latest firmware and save the file in the directory mentioned above The firmware name of the SVR is Fla...

Страница 44: ...change the preferred language to operate the SVR Press Left or Right to change the language setting 1 6 8 Audio volume To turn on or off live audio volume monitoring set Live Audio option 1 6 9 Health...

Страница 45: ...me The speed number ranges from 1 to 8 the slowest to the fastest The speed might vary based on different PTZ camera s settings Position Use the joystick controller to adjust the preset PTZ to your de...

Страница 46: ...re using Internet browser Add DVR IP address to trusted sites Make sure that your Internet browser allows signed ActiveX plug in to run on your PC Set Download Signed ActiveX plug in controls to Promp...

Страница 47: ...larm recording network and backup can all be set up remotely 2 3 1 Camera setting Camera Source select the video source from IP camera demo or OFF on main monitor IP Address IP address of the IP camer...

Страница 48: ...resolution for a camera 2 3 3 Recording schedule table Users can setup the record schedule table via the Internet browser by specifying the day and time for the recording mode 2 3 4 Alarm setting Buz...

Страница 49: ...hentication Email Account senders email account Email Password senders email account s password JPEG File option for the enable JPEG file attachment Email Test simple the Email function testing 2 3 6...

Страница 50: ...tion of the SVR Max Connections maximum network connections allowed for the SVR Force to Logout force to logout remote access Software Reboot software reboot of SVR system 2 3 7 1 Time Date Current da...

Страница 51: ...R Approximate Rec Days total recording hours available for the HDD s Approximate Rec Hours total recording days available for the HDD s Current Written HDD the HDD of the SVR in writing Already Overwr...

Страница 52: ...ically After finishing the firmware update the HTML page will reload The user can then continue to operate the SVR To perform network firmware update click on Browse button and locate the firmware Not...

Страница 53: ...nnector Appendix C M12 Network Connector ALARM IN 1 Red ALARM IN 2 Blue ALARM IN GND White ALARM OUT COM Black ALARM OUT NO Yellow normal open ALARM OUT NC Orange normal close RS 232 RX Brown RS 232 T...

Страница 54: ...HDD AV 25 WD10JFCX Red 1TB 2 5 inch NAS HDD WD10JPVT 1TB AF Scorpio Blue 2 5 inch SATA HDD 2Y WD7500BPKT Black 750GB 2 5 inch SATAHDD WesternDigital WD5000BPKT 500GB AF Scorpio Black 2 5 inch SATA HDD...

Страница 55: ...GPS Receiver GOSGET BU 373 GOSGET SD 200 GLOBALSAT ND 100S GPS Protocol GPRMC GPGGA Appendix H Supported USB Touch Screen GeChic On Lap1002 Hanns HT271HPB Hanns HT231HPB ViewSonic TD2220 2 Wistron Vie...

Страница 56: ...s Appendix J Troubleshooting FAQ Question Should I use a gigabit network switch or a 10 100 MPBS network switch for connecting to the SVR Touch series Answer It is highly recommended to use a gigabit...

Страница 57: ...d the SVR Touch Solution The default username for the SVR Touch is admin The default password is 1111 If you have changed your username or password you will need to use this Error code URI ERR Explana...

Страница 58: ...day calculator Alarm event DI 2 and DO 2 NO NC Motion Motion grid 20 12 each channel 8 sensitivities Event External alarm IP loss stop recording power recovering motion detection schedule logon HDD f...

Отзывы: