background image


25


TESTING WITH BLOOD SAMPLE                                                               


WARNING: 

To Reduce the Chance of Infection 

  The meter and lancing device are for single use. Never share a lancet or the 

lancing device. 

  Always use a new, sterile lancet. Lancets are for single use only.   

  Avoid getting hand lotion, oils, dirt, or debris in or on the lancets and the lancing 

device. 

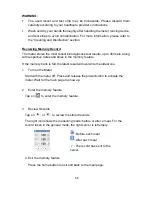
  Wash and dry your hands thoroughly after handling the meter, lancing device, 

and  test  strips  to  prevent  infection.  For  more  information,  please  refer  to  the 
“Cleaning and Disinfection” section. 

  If  the  meter  is  being  operated  by  a  second  person  who  is  providing  testing 

assistance to the user, the meter and lancing device should be decontaminated 

prior to use by the second person. 

  If patient is being assisted with glucose meter testing, the assistant should wear 

gloves throughout. Additionally, the assistant should clean and disinfect meter 

between each use. 


Preparing the Lancing Device for Blood Testing 

Please follow the instructions in the lancing device insert for collecting a 

blood sample. 


Preparing the Puncture Site 

Stimulating  blood  perfusion  by  rubbing  the  puncture  site  before  blood  extraction 

has a significant influence on the glucose value obtained.   

Blood  from  a  site  that  has  not  been  rubbed  exhibits  a  measurably  different 

glucose  concentration  than  blood  from  the  finger.  When  the  puncture  site  was 

rubbed prior to blood extraction, the difference was significantly reduced. 

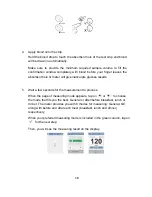
Please follow the suggestions below before obtaining a drop of blood: 


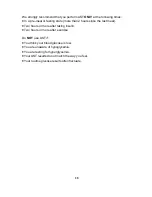
Wash and dry your hands before beginning. 

  Select the puncture site either at fingertips


or another body parts (please see 

section “Alternative Site Testing” (AST) on how to select the appropriate sites).   

Содержание TD-4121

Страница 1: ...1 ActiveCare TD 4121 Blood Glucose Multi Functional Monitoring System Owner s Manual...

Страница 2: ...2...

Страница 3: ...using this product please read the following instructions thoroughly and attentively Regular monitoring of your blood glucose levels can help you and your doctor gain better control of your diabetes Y...

Страница 4: ...anufacturer 3 Do NOT use the device if it is not working properly or if it is damaged 4 Do NOT under any circumstances use the device on neonates or infants 5 This device does NOT serve as a cure for...

Страница 5: ...tial to the durability of your device If you are concerned about its accuracy please contact TaiDoc or place of purchase for help Action upon Delivery Unpacking checking delivery for completeness chec...

Страница 6: ...ing 23 Performing a Control Solution Test 23 TESTING WITH BLOOD SAMPLE 25 Preparing the Lancing Device for Blood Testing 25 Preparing the Puncture Site 25 Performing a Blood Glucose Test 29 Reviewing...

Страница 7: ...are experiencing symptoms that are inconsistent with your blood glucose test results and you have followed all the instructions given in this owner s manual contact your healthcare professional We do...

Страница 8: ...used by a single person and should not be shared It should not be used for the diagnosis of or screening for diabetes or testing on neonates Professionals may test with capillary and venous blood samp...

Страница 9: ...2 Owner s Manual 3 Quick Start User Guide 4 Test Strips 5 Protective wallet 6 1 x 3 7V Li Polymer rechargeable battery 7 Lancet NOTE If any items are missing from your kit or opened prior to use pleas...

Страница 10: ...charge 5 Home Button To enter the meter function and click for confirmation or exit 6 Display Window and Touchscreen The touchscreen allow users to interact with what is displayed directly by the fing...

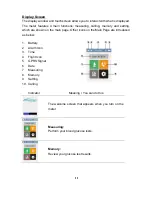
Страница 11: ...g which are shown on the main page Other icons on the Main Page are introduced as below 1 Battery 2 Alarm Icon 3 Time 4 Flight Icon 5 GPRS Signal 6 Date 7 Measuring 8 Memory 9 Setting 10 Calling Indic...

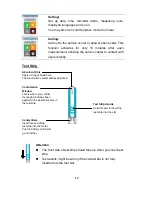
Страница 12: ...nt Hole Apply a drop of blood here The blood will be automatically absorbed Confirmation Window This is where you confirm if enough blood has been applied to the absorbent hole in the test strip Conta...

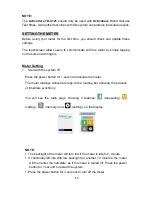
Страница 13: ...he system off Press the power button for 1 second to activate the meter The meter displays ActiveCare logo with a loading bar showing the process of time date synchrony You will see the main page show...

Страница 14: ...ferred mode airplane or general for preference Select the airplane mode when necessary or general mode to activate the meter s telecommunication function 3 Tap on to save and exit Note The airplane mo...

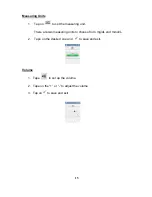
Страница 15: ...set the measuring unit There are two measuring units to choose from mg dL and mmol L 2 Tape on the desired one and to save and exit Volume 1 Tape to set up the volume 2 Tape on the or to adjust the vo...

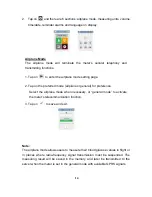
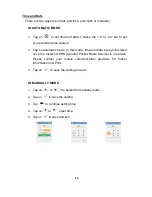
Страница 16: ...mode In this mode time and date are synchronized once the meter s GPRS General Packet Radio Service is in service Please contact your mobile communication providers for further information on GPRS 3 T...

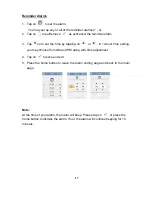
Страница 17: ...ime by tapping on or In 12 hour time setting you may choose from AM and PM along with time adjustment 4 Tap on to save and exit 5 Press the home button to leave the alarm setting page and back to the...

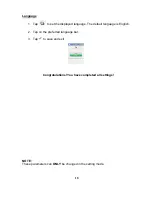
Страница 18: ...the displayed language The default language is English 2 Tap on the preferred language bar 3 Tap to save and exit Congratulations You have completed all settings NOTE These parameters can ONLY be cha...

Страница 19: ...ement To transmit the test result to the server The service center will phone in if the uploaded result is atypical 2 At 6 o clock every morning To transmit data to the server automatically providing...

Страница 20: ...the call Appears a call comes in Tap on to take or to reject the call Appears when you are answering the phone Tap on or to adjust the volume Tap on to hang up the phone Appears when the meter is sea...

Страница 21: ...for immediate assistance The phone number of the service center is programmed prior to your receipt of the meter If not please contact the customer service for assistance Please contact your service p...

Страница 22: ...halt state 3 At the halt state press the home button Then keep on pressing the home button with another finger pressing the power button for 1 second Then release both fingers at the same time 4 Tap...

Страница 23: ...sting process You have dropped or think you may have damaged the meter Performing a Control Solution Test 1 Start with the meter off Press the power button for 1 second to turn on the meter Wait for t...

Страница 24: ...n test result will appear on the display in seconds Compare this result with the range printed on the test strip vial and it should fall within this range If not please read the instructions again and...

Страница 25: ...meter testing the assistant should wear gloves throughout Additionally the assistant should clean and disinfect meter between each use Preparing the Lancing Device for Blood Testing Please follow the...

Страница 26: ...than the fingertip Replace the lancing device cap with the clear cap for AST Pull the cocking control back until it clicks When lancing the palm the forearm and the upper arm you must avoid lancing t...

Страница 27: ...he body other than the fingertips to check their blood glucose levels This system allows you to test on the palm the forearm or the upper arm with results equivalent to fingertip testing What is the a...

Страница 28: ...n 2 hours since the last meal Two hours or more after taking insulin Two hours or more after exercise Do NOT use AST if You think your blood glucose is low You are unaware of hypoglycemia You are test...

Страница 29: ...o the strip slot to start measuring When the main page appears tap on to initiate the blood glucose measurement procedure 2 Perform the blood glucose test as directed on the display Insert a test stri...

Страница 30: ...ive inaccurate glucose results 5 Wait a few seconds for the measurement to process When the page of measuring mode appears tap on or to choose the mode that fits you the best General or after before b...

Страница 31: ...TE Do not press the punctured site against the test strip or try to smear the blood If you do not apply a blood sample to the test strip within 10 minutes the meter will automatically turn into the ha...

Страница 32: ...dates and times in the memory feature If the memory bank is full the latest result will overwrite the oldest one 1 Turn on the Meter Start with the meter off Press and release the power button to act...

Страница 33: ...he meter into a wall outlet to initiate the charging process The battery charging indication will light red when charging is in process When the indicator light green it means the battery is full You...

Страница 34: ...The used meter should be treated as contaminated that may carry a risk of infection during measurement The batteries in this used meter should be removed and the meter should be disposed in accordanc...

Страница 35: ...urate results Do not bend cut or alter a test strip in any way Keep the strip vial away from children since the cap and the test strip may be a choking hazard If swallowed promptly see a doctor for he...

Страница 36: ...a pure sample and an accurate result Store the control solution tightly closed at temperatures between 2 C to 30 C 35 6 F to 86 F Do NOT freeze NOTE Do NOT clean and disinfect the meter while perform...

Страница 37: ...ted Repeat the test with a new test strip Contact the service center if the problem persists Timeout The procedure has taken too long Sample not enough Appears when the amount of blood taken is not en...

Страница 38: ...tting No Strip detect Appears when the strip is not inserted correctly Please re insert the strip and make sure its front side is facing up TEMP too low Appears when ambient temperature is above or be...

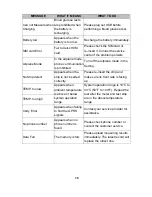
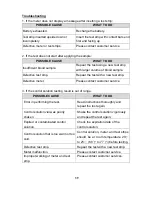
Страница 39: ...new test strip Defective meter Please contact customer service 3 If the control solution testing result is out of range POSSIBLE CAUSE WHAT TO DO Error in performing the test Read instructions thoroug...

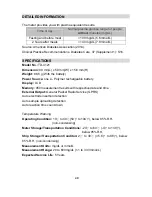
Страница 40: ...the battery Power Source one Li Polymer rechargeable battery Display LCD Memory 450 measurement results with respective date and time External Output General Packet Radio Service GPRS Auto electrode i...

Страница 41: ...nce of 0 5 cm must be maintained between the user s body and the device including the antenna during body worn operation to comply with the RF exposure requirements in Europe To compliance with RF Exp...

Страница 42: ...cal device Caution consult accompanying documents Consult instructions for use Humidity Limitation Temperature limitation Collection for electrical and electronic equipment Use by CE mark Batch code M...

Страница 43: ...this equipment does cause harmful interference to radio or television reception which can be determined by turning the equipment off and on the user is encouraged to try to correct the interference b...

Страница 44: ...ement known as the Specific Absorption Rate or SAR The SAR limit set by the FCC is 1 6W kg Tests for SAR are conducted using standard operating positions accepted by the FCC with the device transmitti...

Страница 45: ...45 TaiDoc Technology Corporation B1 7F No 127 Wugong 2nd Rd Wugu Dist 24888 New Taipei City Taiwan www taidoc com For self testing MedNet GmbH Borkstra e 10 48163 M nster Germany...

Отзывы: