Action Clima FW 230N Скачать руководство пользователя страница 9


CURA E MANUTENZIONE 

CARE AND MAINTENANCE 

PFLEGE UND WARTUNG 


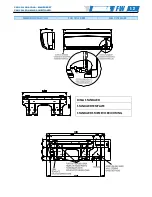
Pulizia del coperchio frontale 

Cleaning the front panel 

Reinigung des stirn-deckels 


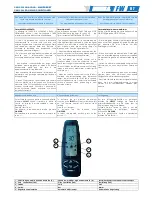
TOGLIERE IL COPERCHIO 


1.

 Usare due mani per tirare i bordi inferiori del 

coperchio di circa 30° verso l’alto.


2.

 Spingere il coperchio verso l’alto con due mani e 

sollevarlo. 


.

 Alzare il coperchio verso l’alto fino al momento 

che si possa togliere (la griglia può essere tolta a 
meno che non venga innalzata sufficientemente). 


REMOVING THE FRONT PANEL 


1.

 Use two hands to pull the lower edges of front 

panel upward around 30%. 


2. 

Push the front panel upward with two hands 

and lift off the panel. 


3. 

Lift up the front panel until it can be removed 

(the grille cannot be removed unless it is raised 
sufficiently). 


DER DECK WEGNEHMEN 


1.

 Benutzen Sie die zwei Hände, um die Unter- Leiste des 

Deckels nach oben von ca.30 cm zu verschieben. 


2. 

Den Deckel mit zwei Hände nach oben 

schieben und heben den. 


3. 

Heben Sie den Deckel bis wann es möglich ist, 

es wegzunehmen (es ist möglich das Gitter 
wegnehmen nur wenn Mann das Gitter viel hoch 
hebt). 


PULIZIA DEL COPERCHIO FRONTALE 


Usare  un  aspirapolvere  per  rimuovere  la  polvere 
accumulata,  poi  pulire  la  griglia  con  un  panno 
pulito e inumidito d’acqua, quindi ripassarlo con un 
panno pulito e asciutto. 


CLEANING THE FRONT PANEL 


Use  a  vacuum  cleaner  to  remove  dust 
accumulations, then wipe the grille with a clean 
cloth  dipped  in  warm  water;  wipe  with  a  clean 
dry cloth to remove any water. 


REINIGUNG DES STIRN- DECKELS 


Benutzen  Sie  einen  Staubsauger,  um  den  Staub 
wegzunehmen. Reinigen Sie das Gitter mit einem 
Tuch  nass  mit  Wasser  und  dann  trocknen  Sie  die 
Teile mit einem trocken Tuch. 


MONTAGGIO DEL COPERCHIO FRONTALE 


1.  

Tenere il coperchio orizzontale e stringere i due 

ganci sulla griglia. 


2. 

Agganciare  i  ganci  in  alto  del  coperchio  ai  fori 

della  griglia  e  premere  i  due  lati  inferiori  del 
coperchio:  in  questo  modo  il  coperchio  si 
bloccherà nella sua sede. 


INSTALLING THE FRONT PANEL 


1.  

Hold the front panel horizontally and fasten 

the two hooks on the front panel grille. 


2.  

Hook the panel top hooks to the grille top 

holes and press the both lower sides of the front 
panel. Then, the front panel locks into place. 


STIRN- DECKEL 


1. 

Halten Sie den Deckel horizontal und ziehen Sie 

die zwei Kupplungen des Gitters fest. 


2. 

Haken Sie die Kupplungen an die Gitter- 

Bohrungen positioniert in der oben Teil des 
Deckels und drucken Sie die zwei  Unter-Seiten 
des Deckels sodass es fixiert bleibt. 


F

F

A

A

N

N


C

C

O

O

I

I

L

L


A

A

D

D


A

A

C

C

Q

Q

U

U

A

A


W

W

A

A

N

N

D

D

G

G

E

E

R

R

Ä

Ä

T

T


F

F

A

A

N

N


C

C

O

O

I

I

L

L


R

R

O

O

O

O

M

M


A

A

I

I

R

R


C

C

O

O

N

N

D

D

I

I

T

T

I

I

O

O

N

N

E

E

R

R


0 8  

Содержание FW 230N

Страница 1: ...VENTILCONVETTORI WALL Ventilatore Tangenziale Motore asincrono WALL FAN COIL UNITS Tangential fan Asynchronous motor IM05 51022061 R00 ...

Страница 2: ... Removing the front panel Pflege und Wartung Reinigung des stirn deckels 8 Cura e manutenzione Pulizia del filtro Care and maintenance Cleaning the air filter Pflege und Wartung Luft filter reinigung 9 Ricerca dei guasti Trouble shooting Fehlersuche 10 Avvertimento Warning Vorsicht 10 Dettagli di funzionamento Operation details Betriebs Merkmale 11 Dimensioni Fan coil Fan coil Sizes Fan coil Maße ...

Страница 3: ...enützen wollen Sie bitte diese Vorkehrung sorgfältig lesen und führen Sie richtig den Vorgang aus In diesem Abteil finden Sie die Anweisungen um ein sicheres und richtiges Betrieb zu haben so wollen Sie bitte alle Informationen folgend VORSICHT und WARNUNG haben die folgende Bedeutungen AVVERTIMENTO WARNING WARNUNG Questo segno indica che se le procedure fossero state eseguite in modo scorretto po...

Страница 4: ...a di sbocco uscita oppure nel coperchio frontale C è una ventola funzionante ad alta velocità dentro l unità quindi potrebbe recare del male Do not insert fingers or objects into the outlet port or indoor unit front panel A fan operates at high speed inside the unit and personal injury could result Be particularly careful regarding small children Einfügen Sie nicht die Finger oder Dinge in der Mas...

Страница 5: ... to prevent troubles caused by battery liquid leakage Always operate with the air filter installed Operating the unit without the air filter could cause excessive dirt to collect on internal parts leading to malfunction Install the indoor unit and remote control unit at least one meter from any television sets or radio Signal radiation could be induced into the system to give erroneous operation W...

Страница 6: ...er GRÜNE LEUCHTE Wenn das Gerät läuft gerade ist das grünes Licht einschaltet Das bedeutet dass das Gerät die gewünschte Temperatur gerade erreicht 8 Indicatore di temporizzatore GIALLO Luce gialla accesa il timer di funzionamento è stato impostato Con il telecomando si può impostare il timer di funzionamento Se la luce è fissa il temporizzatore è in funzione 8 Timer indicator YELLOW The remote co...

Страница 7: ...ratura desiderata Premi ON SEND per inviare le informazioni al termostato Temperature adjustment To adjust desired temperature set point press the set buttons or and set the desired temperature Press ON SEND button to send information to the thermostat Einstellung der Temperatur Um die gewünschte Raumtemperatur einzustellen werden die Taste oder benutzt Drücken Sie die Taste ON SEND um die Informa...

Страница 8: ...unlight or from heating apparatus Do not subject the remote control unit to strong impacts and do not allow water or other liquids to splash on it When the remote control unit is used in rooms furnished with instant lighting type fluorescent lamps the air conditioner may fail to receive control signals correctly Consult with authorized service personnel when purchasing a new fluorescent lamp Das K...

Страница 9: ...numidito d acqua quindi ripassarlo con un panno pulito e asciutto CLEANING THE FRONT PANEL Use a vacuum cleaner to remove dust accumulations then wipe the grille with a clean cloth dipped in warm water wipe with a clean dry cloth to remove any water REINIGUNG DES STIRN DECKELS Benutzen Sie einen Staubsauger um den Staub wegzunehmen Reinigen Sie das Gitter mit einem Tuch nass mit Wasser und dann tr...

Страница 10: ...nd nach oben bewegen bis wann die Kupplungen frei sind Bewegen Sie dann die Filter nach unten und nehmen Sie die Filtern weg PULIZIA DEL FILTRO D ARIA Si può usare sia un aspirapolvere per togliere la polvere accumulata sui filtri oppure lavarli con una soluzione di detergente neutro In questo caso farli asciugare in un posto ombreggiato prima dell uso CLEANING THE AIR FILTER Either use a vacuum c...

Страница 11: ...o ect which have been taken into the air conditioner Die innere Einheit könnte einiges Geruch wie Tabak oder andre Sache abgeben Es handelt sich um Gerüche die in der Luft der Möbel sind CONTROLLARE ANCORA UNA VOLTA CHECK ONCE MORE STANDARD BETRIEB INDIZI Non funziona completamente INDICATIONS Does not operate at all ANZEICHEN Das Gerät funktioniert nicht am 100 ARTICOLI DA CONTROLLARE ITEMS TO CH...

Страница 12: ...s vom 80 Wenn die Maschine mit eine hoch Feuchtigkeit für viel Zeit arbeitet könnte das Wasser verdichten und aud die Einheit tropfen Heizungsbetrieb Wasser 78 C Raumtemperatur ca unten 30 C C CO ON ND DI IZ ZI IO ON NI I D DI I R RI IF FE ER RI IM ME EN NT TO O R RE EF FE ER RE EN NC CE E C CO ON ND DI IT TI IO ON N R Ra af ff fr re es sc ca am me en nt to o C Co oo ol li in ng g m mo od de e Tem...

Страница 13: ...ES FAN COIL MAßE DIMA STANDARD STANDARD TEMPLATE STANDARD STUETZEVORRICHTUNG F FA AN N C CO OI IL L A AD D A AC CQ QU UA A W WA AN ND DG GE ER RÄ ÄT T F FA AN N C CO OI IL L R RO OO OM M A AI IR R C CO ON ND DI IT TI IO ON NE ER R 1 2 ...

Страница 14: ...acco femmina ed effettuare il collegamento alle tubazioni dell impianto Tali tubi devono essere isolati Prearrange two flexible pipes type extensor with female connection and make the unit lines connection These pipes must be insulated Vorbereiten sie zwei flexibel röhre typ extensor mit hohlverbindung und verbinden sie mit der anlage leitungsröhre Die röhre müssen isoliert sein Fissare la dima D ...

Страница 15: ...on off valve with joint in 3 pieces flexible expansible pipes from 200 to 400 mm condensate pump 3 way valves Unterputzt Aufputzt Tropfwanne und Stützevorrichtung mit einem Bügel verstellbar betrachtend die Dicke Putzmörtels 12 mm Absperrventil mit der Verbindung in 3 Stücke Flexible dehnbare Röhre von 200 bis 400 mm Kondensat Pumpe 3 Wege Ventil BACINELLA ESTERNA EXTERNAL CASE AUFPUTZT TROPFWANNE...

Страница 16: ......

Отзывы: