Action Clima FW 230N Скачать руководство пользователя страница 10


CURA E MANUTENZIONE 

CARE AND MAINTENANCE 

PFLEGE UND WARTUNG 


Pulizia del filtro d’aria 

Cleaning the air filter 

Luft filter reinigung 


Se  ci  fosse  sporcizia  sul  filtro  d’aria  si  potrebbe 
ridurre  il  flusso;  e  così  anche  la  prestazione 
dell’unità e di conseguenza potrebbe aumentare il 
rumore.  Assicurarsi  di  pulire  i  filtri  all’inizio  di  una 
stagione  e  durante  il  periodo  di  frequente  uso. 
Pulirli una volta ogni due settimane. 


If  dirt  is  allowed  to  collect  in  the  air  filter,  the 
airflow  will  be  reduced,  leading  to  reduced 
performance  and  increased  operation  noise. 
Be  sure  to  clean  the  filters  at  the  beginning  of 
the  operating  season,  and  about  every  two 
weeks during periods of frequent operation. 


Wenn  es  Verschmutzung  in  dem  Luft-Filter  gibt, 
könnte  der  Strom  reduziert  sein.  In  diesem  Fall 
könnte  die  Leistung  der  Maschine  reduziert  sein 
und es wäre möglich Geräusche hören. Reinigen 
Sie  die  Filter  am  Anfang  des  Saisons  und  je  zwei 
Wochen wenn das Gerät viel arbeitet. 


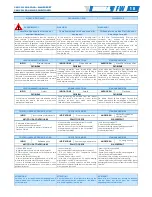
RIMOZIONE DEL FILTRO D’ARIA 


1.

  Togliere il coperchio frontale. 


2.  

Tenere l’impugnatura dei filtri e tirarli verso l’alto 

leggermente fino a liberarli dai due ganci situati  in 
basso. Poi tirarli verso il basso e toglierli. 


REMOVING THE AIR FILTER 


1.  

Remove the front panel. 


2.   

Hold  on  the  air  filter  handles  and  pull  up 

slightly to release the two lower hooks. 
Then pull the air filter down and out. 


LUFT- FILTER ABFÜHRUNG 


1. 

Stirn- Deckel wegnehmen. 


2. 

Der Griff des Filter nehmen und nach oben bewegen bis 

wann die Kupplungen frei sind. Bewegen Sie dann die Filter 
nach unten und nehmen Sie die Filtern weg. 


PULIZIA DEL FILTRO D’ARIA 


Si  può  usare  sia  un  aspirapolvere  per  togliere  la 
polvere  accumulata  sui  filtri,  oppure  lavarli  con 
una  soluzione  di  detergente  neutro.  In  questo 
caso,  farli  asciugare  in  un  posto  ombreggiato 
prima dell’uso. 


CLEANING THE AIR FILTER 


Either  use  a  vacuum  cleaner  to  remove 
accumulated  dust,  or  wash  in  a  neutral 
detergent solution. 
When  washing  the  filter,  allow  it  to  dry  well  in  a 
shaded location.  


LUFT-FILTER REINIGUNG 


Sie können einen Staubsauger benutzen, um den 
Staub  wegzunehmen  oder  können  Sie  auch  die 
Filtern  mit  einer  neutralen  Lösung  waschen.  In 
diesem  Fall  lassen  Sie  dann  die  Filtern  im 
Schatten sich trocknen. 


INSTALLAZIONE DEL FILTRO D’ARIA 


1.  Allineare  i  filtri  al  canale  di  scolo  del  pannello  e 
premerli fin quando non si fermano. 
 
 
2.  Inserire  i  due  ganci  dei  filtri  nei  fori  situati  sulla 
griglia e premerli. 
 
 3. Chiudere il coperchio. 


INSTALLING THE AIR FILTER 


 1. Align the air filter with the ditch of the panel 
and press in until it stops. 
  
 
2. Insert the air filter’s two hooks in the holes in 
the front panel grille and press in. 
 
 3. Close the front panel. 


LUFT- FILTER INSTALLIERUNG 


1. Richten Sie die Filtern an den Abzugskanal der 
Tafel aus und drucken Sie die Filtern bis wann sie 
die richtige Position erreichen. 
 
2.  Stecken  Sie  die  zwei  Kupplungen  der  Filtern  in 
der Gitter- Bohrungen und drucken Sie. 
 
3. Schließen Sie den Deckel. 


F

F

A

A

N

N


C

C

O

O

I

I

L

L


A

A

D

D


A

A

C

C

Q

Q

U

U

A

A


W

W

A

A

N

N

D

D

G

G

E

E

R

R

Ä

Ä

T

T


F

F

A

A

N

N


C

C

O

O

I

I

L

L


R

R

O

O

O

O

M

M


A

A

I

I

R

R


C

C

O

O

N

N

D

D

I

I

T

T

I

I

O

O

N

N

E

E

R

R


0 9  

Содержание FW 230N

Страница 1: ...VENTILCONVETTORI WALL Ventilatore Tangenziale Motore asincrono WALL FAN COIL UNITS Tangential fan Asynchronous motor IM05 51022061 R00 ...

Страница 2: ... Removing the front panel Pflege und Wartung Reinigung des stirn deckels 8 Cura e manutenzione Pulizia del filtro Care and maintenance Cleaning the air filter Pflege und Wartung Luft filter reinigung 9 Ricerca dei guasti Trouble shooting Fehlersuche 10 Avvertimento Warning Vorsicht 10 Dettagli di funzionamento Operation details Betriebs Merkmale 11 Dimensioni Fan coil Fan coil Sizes Fan coil Maße ...

Страница 3: ...enützen wollen Sie bitte diese Vorkehrung sorgfältig lesen und führen Sie richtig den Vorgang aus In diesem Abteil finden Sie die Anweisungen um ein sicheres und richtiges Betrieb zu haben so wollen Sie bitte alle Informationen folgend VORSICHT und WARNUNG haben die folgende Bedeutungen AVVERTIMENTO WARNING WARNUNG Questo segno indica che se le procedure fossero state eseguite in modo scorretto po...

Страница 4: ...a di sbocco uscita oppure nel coperchio frontale C è una ventola funzionante ad alta velocità dentro l unità quindi potrebbe recare del male Do not insert fingers or objects into the outlet port or indoor unit front panel A fan operates at high speed inside the unit and personal injury could result Be particularly careful regarding small children Einfügen Sie nicht die Finger oder Dinge in der Mas...

Страница 5: ... to prevent troubles caused by battery liquid leakage Always operate with the air filter installed Operating the unit without the air filter could cause excessive dirt to collect on internal parts leading to malfunction Install the indoor unit and remote control unit at least one meter from any television sets or radio Signal radiation could be induced into the system to give erroneous operation W...

Страница 6: ...er GRÜNE LEUCHTE Wenn das Gerät läuft gerade ist das grünes Licht einschaltet Das bedeutet dass das Gerät die gewünschte Temperatur gerade erreicht 8 Indicatore di temporizzatore GIALLO Luce gialla accesa il timer di funzionamento è stato impostato Con il telecomando si può impostare il timer di funzionamento Se la luce è fissa il temporizzatore è in funzione 8 Timer indicator YELLOW The remote co...

Страница 7: ...ratura desiderata Premi ON SEND per inviare le informazioni al termostato Temperature adjustment To adjust desired temperature set point press the set buttons or and set the desired temperature Press ON SEND button to send information to the thermostat Einstellung der Temperatur Um die gewünschte Raumtemperatur einzustellen werden die Taste oder benutzt Drücken Sie die Taste ON SEND um die Informa...

Страница 8: ...unlight or from heating apparatus Do not subject the remote control unit to strong impacts and do not allow water or other liquids to splash on it When the remote control unit is used in rooms furnished with instant lighting type fluorescent lamps the air conditioner may fail to receive control signals correctly Consult with authorized service personnel when purchasing a new fluorescent lamp Das K...

Страница 9: ...numidito d acqua quindi ripassarlo con un panno pulito e asciutto CLEANING THE FRONT PANEL Use a vacuum cleaner to remove dust accumulations then wipe the grille with a clean cloth dipped in warm water wipe with a clean dry cloth to remove any water REINIGUNG DES STIRN DECKELS Benutzen Sie einen Staubsauger um den Staub wegzunehmen Reinigen Sie das Gitter mit einem Tuch nass mit Wasser und dann tr...

Страница 10: ...nd nach oben bewegen bis wann die Kupplungen frei sind Bewegen Sie dann die Filter nach unten und nehmen Sie die Filtern weg PULIZIA DEL FILTRO D ARIA Si può usare sia un aspirapolvere per togliere la polvere accumulata sui filtri oppure lavarli con una soluzione di detergente neutro In questo caso farli asciugare in un posto ombreggiato prima dell uso CLEANING THE AIR FILTER Either use a vacuum c...

Страница 11: ...o ect which have been taken into the air conditioner Die innere Einheit könnte einiges Geruch wie Tabak oder andre Sache abgeben Es handelt sich um Gerüche die in der Luft der Möbel sind CONTROLLARE ANCORA UNA VOLTA CHECK ONCE MORE STANDARD BETRIEB INDIZI Non funziona completamente INDICATIONS Does not operate at all ANZEICHEN Das Gerät funktioniert nicht am 100 ARTICOLI DA CONTROLLARE ITEMS TO CH...

Страница 12: ...s vom 80 Wenn die Maschine mit eine hoch Feuchtigkeit für viel Zeit arbeitet könnte das Wasser verdichten und aud die Einheit tropfen Heizungsbetrieb Wasser 78 C Raumtemperatur ca unten 30 C C CO ON ND DI IZ ZI IO ON NI I D DI I R RI IF FE ER RI IM ME EN NT TO O R RE EF FE ER RE EN NC CE E C CO ON ND DI IT TI IO ON N R Ra af ff fr re es sc ca am me en nt to o C Co oo ol li in ng g m mo od de e Tem...

Страница 13: ...ES FAN COIL MAßE DIMA STANDARD STANDARD TEMPLATE STANDARD STUETZEVORRICHTUNG F FA AN N C CO OI IL L A AD D A AC CQ QU UA A W WA AN ND DG GE ER RÄ ÄT T F FA AN N C CO OI IL L R RO OO OM M A AI IR R C CO ON ND DI IT TI IO ON NE ER R 1 2 ...

Страница 14: ...acco femmina ed effettuare il collegamento alle tubazioni dell impianto Tali tubi devono essere isolati Prearrange two flexible pipes type extensor with female connection and make the unit lines connection These pipes must be insulated Vorbereiten sie zwei flexibel röhre typ extensor mit hohlverbindung und verbinden sie mit der anlage leitungsröhre Die röhre müssen isoliert sein Fissare la dima D ...

Страница 15: ...on off valve with joint in 3 pieces flexible expansible pipes from 200 to 400 mm condensate pump 3 way valves Unterputzt Aufputzt Tropfwanne und Stützevorrichtung mit einem Bügel verstellbar betrachtend die Dicke Putzmörtels 12 mm Absperrventil mit der Verbindung in 3 Stücke Flexible dehnbare Röhre von 200 bis 400 mm Kondensat Pumpe 3 Wege Ventil BACINELLA ESTERNA EXTERNAL CASE AUFPUTZT TROPFWANNE...

Страница 16: ......

Отзывы: