background image

30 - How to Use SmarTach

®

 - Advanced Functions -

Copyright

©

 2005 ACTIA

English

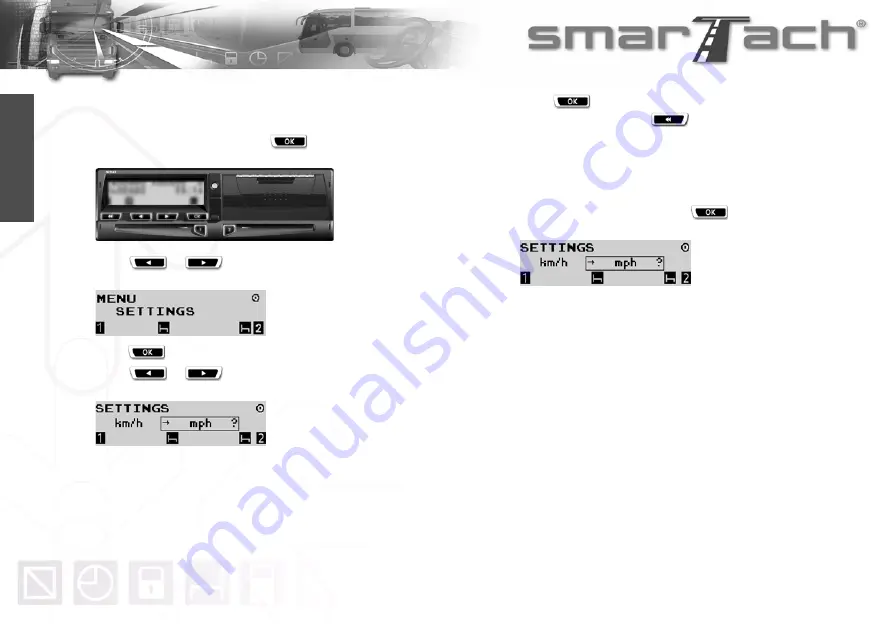
4.1.7 Speed Unit

To modify SmarTach

®

 speed unit, proceed as follows:

1.

In the first level of menus, press 

 to go to the second 

level.

2. 

Press  

or  

as 

many 

times as necessary to go to 

SETTINGS.

3. 

Press 

 to select SETTINGS.

4. 

Press  

or  

as 

many 

times as necessary to go to 

km/h / mph setting.

5. 

Press 

 to select and change the display of 

instantaneous speed or 

 to exit without change:

• km/h (kilometres per hour)
• mph (miles per hour)

Even if mph is chosen, all other tickets and data will remain in 
km/h or km. 
In the following example, press 

 to display 

instantaneous speed in mph:

6. 

Speed unit change is taken into account.

7. 

The last selected main display appears.

Содержание SmarTach

Страница 1: ...nd secure tool designed to replace paper disk tachographs A real partner on the road SmarTach gives you information about your time spent driving and resting and helps you to manage your working day w...

Страница 2: ...Foreword Copyright 2005 ACTIA English...

Страница 3: ...your Smart Card 11 3 5 How to Select your Current Activity 14 3 6 First Level Displays 15 3 6 1 How to Select a Main Display 15 3 6 2 How to Display the Most Useful Information 17 3 7 How to Acknowle...

Страница 4: ...Lock when no Lock has been Placed 57 4 8 2 How to Place a Lock when a Lock has already been Placed 58 4 8 3 How to End a Lock 59 4 9 How Companies can Download Data 59 4 10 How to Display SmarTach Te...

Страница 5: ...87 6 9 8 POWER INTERRUPT 88 6 9 9 MOTION DATA ERROR 88 6 9 10 SECURITY BREACH 88 6 9 11 1 2 CARD FAULT 89 6 9 12 INTERNAL FAULT 89 6 9 13 PRINTER FAULT 89 6 9 14 DOWNLOAD FAULT 89 6 9 15 SENSOR FAULT...

Страница 6: ...iv Contents Copyright 2005 ACTIA English...

Страница 7: ...owing symbols have been used in the present document 1 3 Terminology 1 3 1 Abbreviations EEC European Economic Community UTC Universal Time Co ordinated 1 3 2 Glossary Annex 1B Annex 1B to the amended...

Страница 8: ...nt as needed past activities stored on the driver card Unknown periods of negative duration beginning of unknown period end of unknown period due to time overlaps between two different recording equip...

Страница 9: ...otion sensor defined in the regulation Also called speed sensor SmarTach can use its SmarTach sensor or another compatible and type approved sensor Tripmeter Counter totalling the distance covered by...

Страница 10: ...4 In this Manual Copyright 2005 ACTIA English...

Страница 11: ...ored on smart cards and in SmarTach memory SmarTach users identify themselves with their personal card which also grants access to the appropriate functions and data They will appreciate its ease of o...

Страница 12: ...s been inserted in the left slot slot for the driver Indicates that a card has been inserted in the right slot slot for the co driver Indicates the driver current activity Indicates the co driver curr...

Страница 13: ...upper level menu Press to go to a lower level menu answer Yes confirm a choice acknowledge warnings Back Press to go back to the previous item or menu change the value you are entering Hold down to ch...

Страница 14: ...ning light flashes to draw your attention to the fact that you have requested an action not possible at that moment the manual entry of activities is not finished When the warning light flashes a beep...

Страница 15: ...t data in such a way as to allow for later verification of their integrity and authenticity To meet these security objectives each driver card is strictly personal and each driver is allowed to posses...

Страница 16: ...ta to be displayed downloaded and printed provided that it has not been locked by another company Yellow Workshop Card Issued by the authorities of a Member State Used by a recording equipment manufac...

Страница 17: ...grams Driver Operational Mode Company Company Mode Workshop Calibration Mode Controller Control Mode Table 5 If the mode of operation pictogram flashes continuously the vehicle must go to the workshop...

Страница 18: ...lot closes automatically The following display appears to inform you that SmarTach reads the card During operation symbols move 6 After a moment your name appears For a driver card insertion you must...

Страница 19: ...s to confirm the selected starting location for the period 9 A display appears while the data are processed 10 Your card has been inserted correctly A default display from the first level appears For...

Страница 20: ...activity remains BREAK REST Any declaration of activity is taken into account as soon as you press the corresponding key The vehicle must be stationary No card withdrawal operation must be in progres...

Страница 21: ...ently displayed each providing various types of information 3 Waiting a few seconds without any action on the keyboard SmarTach will automatically set the current display as default permanent Main Dis...

Страница 22: ...ur current activity as co driver Availability 6 Duration of your current activity as co driver 5min 7 Local time 14 52 Table 9 Example 1 bis Driver activities The vehicle is moving No Description In e...

Страница 23: ...rious types of information on the first two lines 3 Waiting a few seconds without any action on the screen SmarTach will automatically return to the Main Display previously chosen No Description In ex...

Страница 24: ...s co driver 13h03 Table 14 Example 5 Continuous driving time Cumulative break time No Description In example 6 1 Your accumulated driving time as driver for current week 01h07 2 Your accumulated drivi...

Страница 25: ...2 Table 16 Example 7 UTC time No Description In example 8 1 Time remaining before you should start your daily rest period as driver 12h56 2 Mode of operation Operational mode 3 Your accumulated drivin...

Страница 26: ...ged the first one press as many times as necessary until the main display appears again 3 A first press on stops flashes and beeps for the last warning if it has happened less than 30 seconds before A...

Страница 27: ...ard withdrawal request 3 Press to confirm Press to cancel withdrawal operation The last displayed information reappears 4 If you are not finishing your daily work period press to not enter the locatio...

Страница 28: ...ry 30 minutes or following an action on the keyboard During wake up it is possible to change activities or to check data on the display SmarTach remains in this state for a few seconds before going ba...

Страница 29: ...d main display One important presentation display summarizes the owners of cards inserted in slots 1 and 2 This display is useful for driver or co driver functions in crew driving as well as to rememb...

Страница 30: ...24 How to Use SmarTach Basic Functions Copyright 2005 ACTIA English...

Страница 31: ...lpful for providing you with a ticket that is easy to understand Note that these printouts may not be provided to authorities for control they are for driver use only Printouts made while SmarTach is...

Страница 32: ...time unless the workshop has deactivated this function To set the difference between UTC time and local time proceed as follows 1 In the first level of menus press to go to the second level 2 Press or...

Страница 33: ...ou try to adjust UTC time in between a message notifies you that it is not possible To adjust UTC time proceed as follows 1 In the first level of menus press to go to the second level 2 Press or as ma...

Страница 34: ...y times as necessary to go to SETTINGS 3 Press to select SETTINGS 4 Press or as many times as necessary to go to CONTRAST 5 Press to select CONTRAST 6 Press or to increase or decrease the contrast for...

Страница 35: ...cted main display appears 4 1 6 Warning Beep To activate or deactivate the warning beep proceed as follows 1 In the first level of menus press to go to the second level 2 Press or as many times as nec...

Страница 36: ...S 3 Press to select SETTINGS 4 Press or as many times as necessary to go to km h mph setting 5 Press to select and change the display of instantaneous speed or to exit without change km h kilometres p...

Страница 37: ...to the second level 2 Press or as many times as necessary to go to COMPANY 3 Press to select COMPANY The following section describes a function only available to companies Your company card must be i...

Страница 38: ...imes as necessary to select the co driver default activity _ or 10 Press to validate or to modify the driver default activity 11 The last selected main display appears 4 1 9 Remind Beep SmarTach can r...

Страница 39: ...alidate the selected condition 8 Press to validate the change or to exit without change In the following example press to choose REMIND BEEP when ignition is turned off 9 The change is taken into acco...

Страница 40: ...ime is required for tickets that can be provided to authorities for control This display only appears if the workshop has activated this function The vehicle must be stationary The ignition switch mus...

Страница 41: ...TC time It cannot be provided to authorities for control End ___________ ____________ The ticket has been printed properly and fully End __________ x ___________ Data that should have been printed are...

Страница 42: ...6 If two cards have been inserted press or to select from which card data are to be printed 7 Press to validate or to change your selection 8 Press or to modify the daily work period to be taken into...

Страница 43: ...lows 1 In the first level of menus press to go to the second level 2 Press or as many times as necessary to go to PRINT REPORT 3 Press to select PRINT REPORT 4 You can print events and faults from Sma...

Страница 44: ...ration has finished the following display appears 4 3 3 Technical Data and Over speeding To print technical data and over speeding proceed as follows 1 In the first level of menus press to go to the s...

Страница 45: ...play Printouts You can see your printouts on the display instead of having them on tickets To display printouts proceed as follows 1 In the first level of menus press to go to the second level 2 Press...

Страница 46: ...enus press to go to the second level 2 Press or as many times as necessary to go to SPECIFIC CONDIT 3 Press to select SPECIFIC CONDIT 4 Press or as many times as necessary to select OUT 5 Press to dec...

Страница 47: ...ion To declare Ferry Train condition proceed as follows 1 In the first level of menus press to go to the second level 2 Press or as many times as necessary to go to SPECIFIC CONDIT 3 Press to select S...

Страница 48: ...ere your daily work period begins proceed as follows 1 In the first level of menus press to go to the second level 2 Press or as many times as necessary to go to ENTER LOCATION 3 Press to select ENTER...

Страница 49: ...nds proceed as follows 1 In the first level of menus press to go to the second level 2 Press or as many times as necessary to go to ENTER LOCATION 3 Press to select ENTER LOCATION 4 Press or as many t...

Страница 50: ...relevant country then press 8 Press to confirm or to cancel 9 The last selected main display appears Pictogram User Location for 1 Driver End of the daily work period 2 Co driver End of the daily work...

Страница 51: ...have to declare the following data The vehicle must be stationary The ignition switch must be turned on the engine does not need to be started No downloading operation must be in progress No printing...

Страница 52: ...work period By combining the examples of sections 4 7 2 and 4 7 3 you will be able to enter both activities having occurred at the end of the previous daily work period and at the beginning of the cu...

Страница 53: ...r 2 flashes 3 Insert your card with the chip facing up and the arrow towards SmarTach into the appropriate slot left slot driver right slot co driver 4 Slide it in gently up to the stop Action Date Ti...

Страница 54: ...y work period 8 Confirm that it is the case press or to select YES Press to validate or to exit 9 The activity entry display appears To enter an availability period from 11 00 to 11 10 press or as man...

Страница 55: ...o 11 31 press or as many times as necessary to select WORK Press to validate 16 To confirm the start date press 17 To confirm the start time press 18 To confirm the end date press 19 To confirm the en...

Страница 56: ...y up to the stop 5 The slot closes automatically The following display appears to inform you that SmarTach reads the card During operation symbols move 6 After a moment your name appears 7 SmarTach di...

Страница 57: ...tivity entry display appears showing the period for which you can enter activites You want to enter a work period from 19 16 to 19 45 To do so press or as many times as necessary to select WORK Press...

Страница 58: ...SmarTach prompts you to enter the date on which you are starting your current daily work period Press to select the correct date and press 17 SmarTach prompts you to enter the time at which you are st...

Страница 59: ...serting your smart card 2 When the slot is ready for card insertion the corresponding pictogramm 1 or 2 flashes 3 Insert your card with the chip facing up and the arrow towards SmarTach into the appro...

Страница 60: ...ou if it corresponds to the end of the previous daily work period Press to select YES 9 SmarTach displays the date and time when your previous daily work period ended and asks you to enter the corresp...

Страница 61: ...location Choose the current location using and or use to exit this question 13 The activity entry display appears showing the period for which you can enter activities Press to validate You want to en...

Страница 62: ...ed Press to cancel In this case you have to enter your activities again Companies are highly recommended to lock their data systematically before SmarTach is used by any driver from the company Marker...

Страница 63: ...select COMPANY LOCK 4 SmarTach prompts you to place the company lock 5 Press to confirm or to exit without a change 6 SmarTach places a marker for the start of the lock and displays for a moment the d...

Страница 64: ...ny lock or to exit without a change 6 The following table describes the two possible cases the active lock has been placed by your company the active lock has been placed by another company 7 The last...

Страница 65: ...many times as necessary to go to 6 Press to end the lock or to exit without a change 7 SmarTach places a marker for the end of the current lock The date and time at which the lock end marker was place...

Страница 66: ...y to go to INFORMATION 3 Press to select INFORMATION 4 The following data are available examples Product general identification Version details for Hardware and Software Date on which SmarTach must be...

Страница 67: ...undergo an identical inspection for which it must Use an EC conforming tachograph for dangerous goods vehicles Use a speed sensor also EC conforming that is compatible with the tachograph Comply with...

Страница 68: ...specific screen is displayed according to the case If a reader slot is open the following screen appears Turn the ignition switch on and carry out the necessary action to close the reader slots If a...

Страница 69: ...wledge warnings As the screen back lighting is off screen legibility is not optimal Never open the front connector cover which acts as a protection for the calibration downloading connector If the fro...

Страница 70: ...64 SmarTach for Dangerous Goods Vehicles Copyright 2005 ACTIA English...

Страница 71: ...s the speed of the vehicle and the distance travelled from a signal provided by the speed sensor executes pairing with the speed sensor connected allowing that sensor to be identified and authenticate...

Страница 72: ...and use of the device Warning causes are displayed on screen The user must acknowledge warnings Warnings activate the warning light on the front panel and in certain conditions a beep As the SmarTach...

Страница 73: ...s must have enough paper available 3 Any driver subject to the provisions of EEC Regulation No 3820 85 shall request his card from the competent authority of the Member State where he has his normal r...

Страница 74: ...press or destroy data stored in SmarTach or on the driver card or printouts to be produced to an inspecting officer 14 It shall also be forbidden to manipulate SmarTach the speed sensor and their conn...

Страница 75: ...ch housing must not be opened by its users For this reason SmarTach has 5 tamper protection labels including 2 red ones on the sides of the front panel It is strictly forbidden to remove these labels...

Страница 76: ...he printer head substrate surface is coated with glass so mechanical stresses shocks dust and scratches should be avoided to prevent damage Avoid condensation If condensation occurs do not use the pri...

Страница 77: ...to remove the roll or empty drum Then unwind the new paper roll out through the top towards you with the blank side upwards 3 Insert the roll in its recess following the instructions provided on the...

Страница 78: ...lean the printer head with a cotton swab slightly moistened with alcohol 2 Then remove paper residue from the inside of the printer using a soft cloth 6 5 SmarTach Technical Data SmarTach is fully ope...

Страница 79: ...stored in the card Insertion date and time Vehicle odometer value at card insertion Slot in which the card is inserted Withdrawal date and time Vehicle odometer value at card withdrawal Information a...

Страница 80: ...torage rules Table 34 continued Events Driving without an appropriate card Date and time of beginning of event Date and time of end of event Card type number and issuing Member State of any card inser...

Страница 81: ...the last 365 days Data recorded Recording conditions Storage rules Table 34 continued Events Motion data error Date and time of beginning of event Date and time of end of event Card type number and i...

Страница 82: ...and time old and new values Storage rule Known calibration parameters at the moment of activation of SmarTach its very first calibration following its activation its first calibration on the current v...

Страница 83: ...ain Over speeding controls performed Date and time of last over speeding control Date and time of first over speeding following the last over speeding control Number of over speeding events since the...

Страница 84: ...Data recorded Recording conditions Storage rules Table 35 continued Events Time overlap on insertion of card date and time for end of last activity read on the card is later than the current time on...

Страница 85: ...SmarTach Date and time the session was opened Vehicle registration number and registering Member State Specific conditions At each entry for the card holder while the card was inserted Date and time...

Страница 86: ...ach in relation to the type of valid smart cards inserted in the left and right slots In these cases SmarTach shall use only the card inserted in the left slot driver Operating mode Left slot driver E...

Страница 87: ...on company or control modes Operational mode for remote data download only Table 38 When Description Operational mode Any personal identification surname and first name s not corresponding to a tachog...

Страница 88: ...aly IRL Ireland L Luxembourg NL The Netherlands P Portugal S Sweden UK United Kingdom Alderney Guernsey Jersey Isle of Man Gibraltar Table 40 Code Country AZ Azerbaijan BG Bulgaria BIH Bosnia Herzegov...

Страница 89: ...GE Georgia H Hungary IS Iceland LT Lithuania M Malta MC Monaco MK Macedonia RSM San Marino TR Turkey UA Ukraine V Vatican City YU Yugoslavia WLD Rest of the world Table 40 continued Code Region AN And...

Страница 90: ...the validity begin date The card may not be used before this date 2 Check the direction for insertion of the card chip to the top and arrow directed towards the device and reinsert the card in the rig...

Страница 91: ...the warning Table 42 continued Driver card Company card A workshop card was already in SmarTach before you inserted your card Withdraw the workshop card from SmarTach Case 1 If the company card which...

Страница 92: ...and actions having acknowledged warning There are several possible causes You have a driver card You have a company card Case 1 Vehicle moves off while your driver card is not inserted in the left sl...

Страница 93: ...arning SmarTach does not allow complete manual entry of driver activities between withdrawal of the card and its current insertion Make sure that the operations performed with this card on the previou...

Страница 94: ...it is fitted 6 9 10 SECURITY BREACH Event fault Security breach attempt Attempt to violate security system Causes and actions having acknowledged warning There are a number of possible causes Authent...

Страница 95: ...ent fault Recording equipment fault Causes and actions having acknowledged warning SmarTach printer fault Confirm the fault by reprinting several times If the problem continues SmarTach must be checke...

Страница 96: ...ing There are several possible causes Continuous driving has reached 4h15 Stop vehicle before reaching 4h30 of continuous driving Wait for 45 minutes of cumulated rest Continuous driving has reached 4...

Страница 97: ...d 6 10 2 Combination of Pictograms Defined by Annex 1B Driving Crew driving Driving time for one week Driving time for two weeks Events Insertion of a non valid card Card conflict Time overlap Driving...

Страница 98: ...iscellaneous Location start of daily work period Location end of daily work period OUT Out of Scope begin OUTOut of Scope end 6 10 3 Additional Pictograms Driving time over daily work period Daily wor...

Страница 99: ...clared available while Driver A is driving Several rest times were declared during the period until 16 20 when it was time to change drivers Insertion of smard cards for second period same vehicle and...

Страница 100: ...94 Appendices Copyright 2005 ACTIA English...

Страница 101: ...he day starting at 00 00 UTC while card out of tachograph if any 11 Activities done with card in slot 1 as driver Table 46 11 Same as 11 with card in slot 2 as co driver 12 VRN and odometer of the veh...

Страница 102: ...96 Appendices Copyright 2005 ACTIA English...

Отзывы: