


22
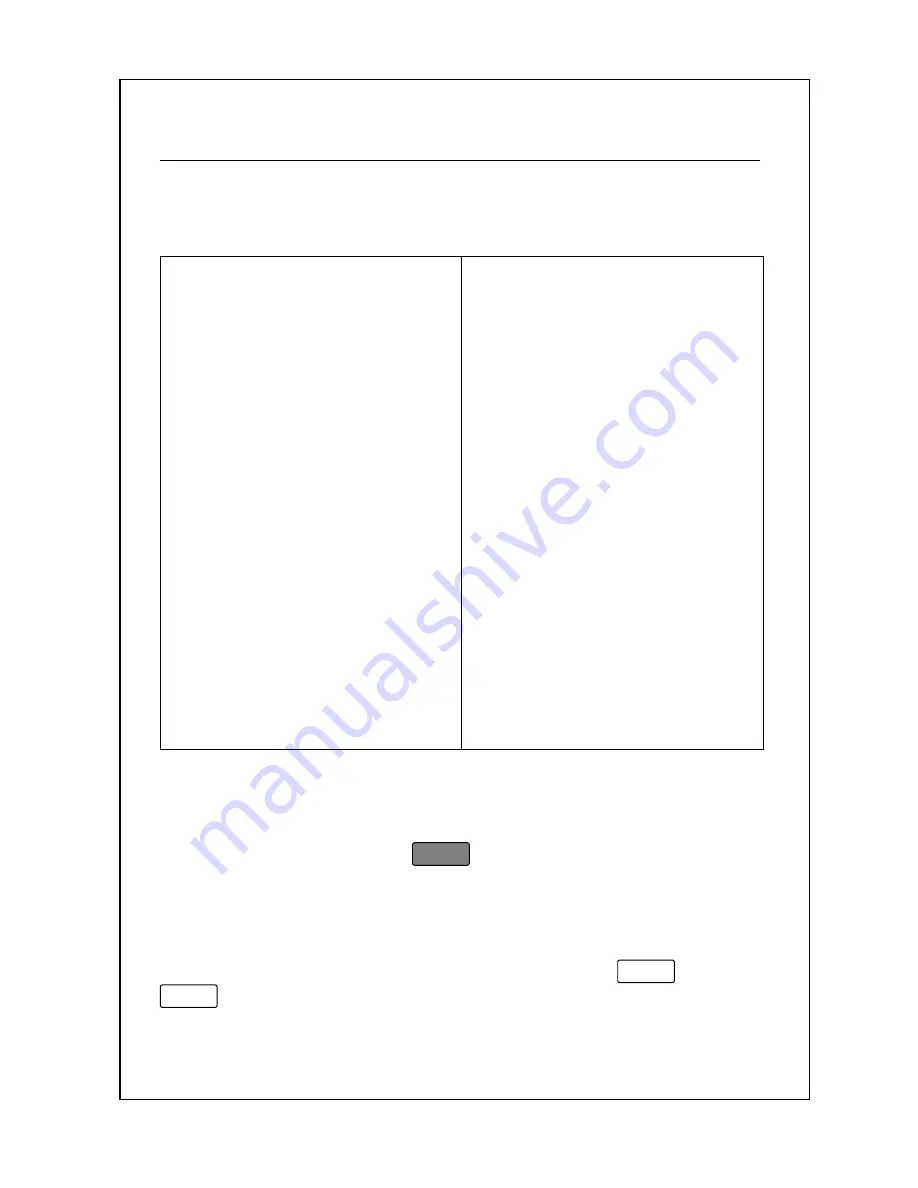
Main Menu
The Main Menu is where you can set all of your PLU programming,
system options, and sales reports. The LS-100 menu tree is organized
as follows:
1: PLU: Create & Edit
2: PLU: Speed Keys
3: Store Settings
1: Edit Store Name
2: Edit Group Name
3: Edit Misc. PLU
4: Time & Date
5: Scale Settings
1: Min Weight for Auto Print
2: Group Assignment
3: Scale Number
4: Date Format
5: Back Light Settings
6: Barcode Settings
6: X/Z: Sales Reports
1: X: Group Sales Report
2: X: PLU Sales Report
3: Z: Scale Sales Report
7: Label Settings
1: Label Feed Adjustment
2: Label Format Setting
3: Print Field Control
8: SET: System Settings
1: Self Test
1: A/D Board
2: Key Board
3: Display
4: RS-232C
5: Printer
6: Sensors
7: Sensor Cal
2: Print PLU List
3: Trans Data
4: Price Change
5: Memory Status
6: Display PLU List
7: Delete a PLU
8: Delete All PLUs
9: Password Change
F1: PLU Quick Price Change
F2: Temp. Date Print Inhibit
Italicized
items are menu items that are NOT displayed by the scale
although they are accessible by typing there corresponding menu
numbers. “PLU Quick Price Change” menu item is accessible from
the Main Menu by pressing
F1
. The 8
bolded
Items are listed
by the scale in the Main Menu.
The above chart can be used to quickly access specific menu
items. For example, if you are at the Main Menu and want to
change the scale number you would simple press
5
and then
3
.
Содержание LS-100
Страница 1: ...ACOM O WNER S M A NU AL MODEL LS 100 LABEL PRINTING SCALE VER 1 70 ...
Страница 74: ...70 Notes ...
Страница 75: ...71 Notes You Acom Authorized Dealer is ...


