background image

46

®

Loading Your Own pictures

1

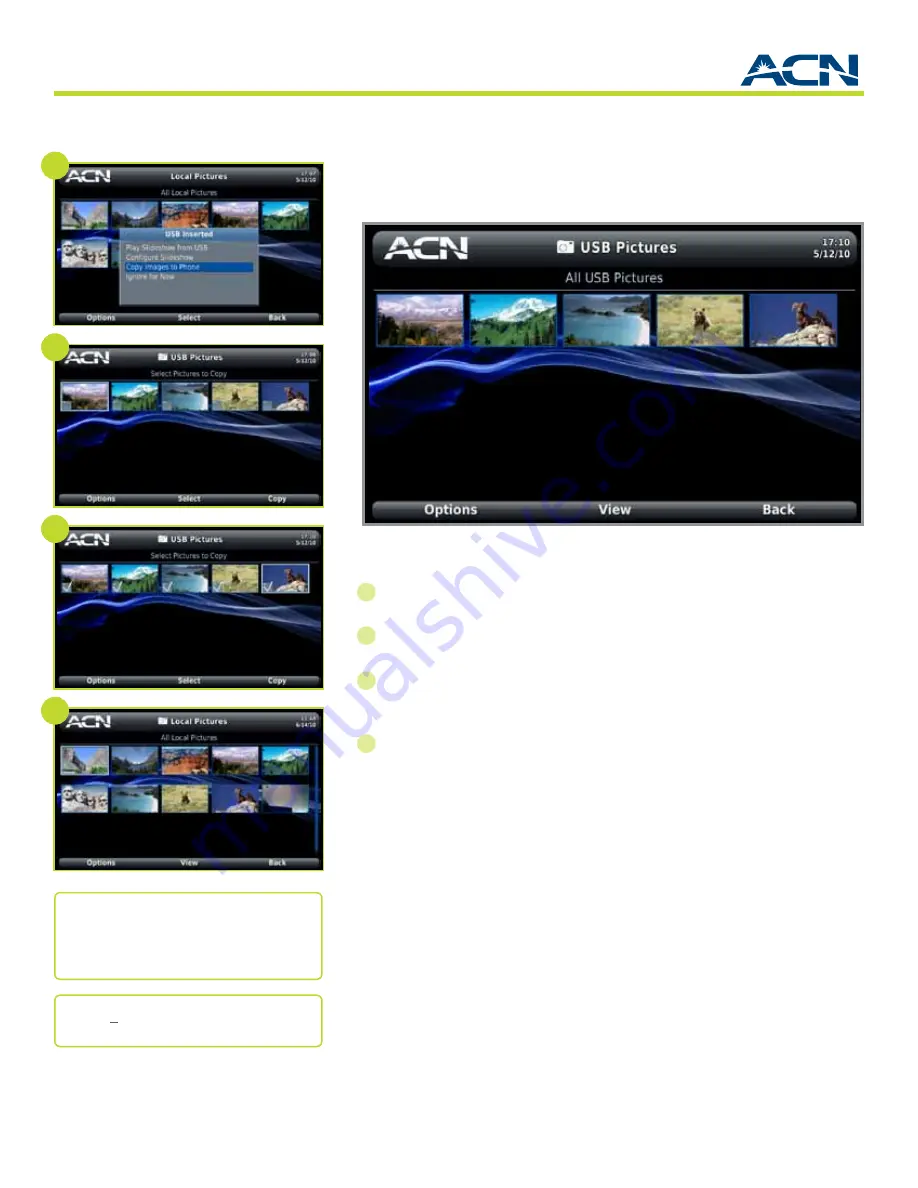
  Insert USB flash drive into the USB port on the back of the phone. 

(

See Getting 

to Know Your Phone: Back View: USB.

)

 A pop-up displays.

Use directional arrow keys to select


Copy Images To Phone

.


Press 

OK


or 

Select

.


A screen displays showing all the images on the USB drive.

Use the directional arrow keys to navigate to an image and press 

OK

 or 

Select


to mark the image for copying. A checkmark appears. To deselect, press 

OK

 or 

Select


again. 

When you are finished selecting images, select

 Copy

. The image(s) are copied 

and appear in your Local Pictures.

After inserting the flash drive, you can also choose to “Make USB Images My 
Local Slideshow.” This option automatically copies the pictures from the USB 
to the phone and configures the phone to use the images from the USB as 
the Slideshow.  When the message “Copy complete” is presented, the user can 
remove the USB
If you choose “Add USB Images My Local Slideshow,” your USB pictures will 
automatically be copied to the phone and added to the current Slideshow.  
When the message “Copy complete” is presented, remove the USB.

Digital Photo Frame

ChapTer 11

4

2

1

3

Note: 

This pop-up will appear anytime 

you insert your USB drive unless you are in 

a call. You do not need to be on the Local 

Pictures screen to insert your USB drive.

Note: 

You can store up to 500 pictures on 

the IRIS V.

Содержание Iris V

Страница 1: ...IRIS video phone V User Manual...

Страница 2: ...changes in the product de scribed in this manual at any time ACN Inc AND ITS AFFILIATES PROVIDE THIS MANUAL WITHOUT WARRANTY OF ANY KIND EITHER EXPRESS IM PLIED OR STATUTORY INCLUDING BUT NOT LIMITED...

Страница 3: ...IDEO IMAGE POSSIBLE 10 GETTING TO KNOW YOUR NEW PHONE 11 FRONT VIEW 11 BACK VIEW 12 KEYPAD 13 NAVIGATING 15 IN PHONE HELP 15 ENTERING TEXT 16 MAKING AND RECEIVING CALLS 17 DIALING A CALL 17 MAKING A C...

Страница 4: ...A CALL 33 DELETING A CALL 33 SETTINGS 34 CONFIGURING APPEARANCE 34 CONFIGURING THEME 34 CONFIGURING DISPLAY 35 CONFIGURING SOUND 37 CONFIGURING NETWORK 38 CONFIGURING DATE AND TIME 39 Administrator SE...

Страница 5: ...cy make a video or audio conference call redial a call put a call on hold answer a waiting call You can also continue to use your existing conventional phone Simply plug your conventional phone into t...

Страница 6: ...load speed ACN Digital Phone Service Recommended Setup Router with Ethernet cable Unpacking and Checking Package Contents Check to make sure that your box contains each of the items pictured above 1 M...

Страница 7: ...Do not install the video phone in an unsafe place or on an unstable surface Use a soft fabric when cleaning the LCD or camera Do not use strong chemical solutions or abrasive materials to clean your v...

Страница 8: ...he network the blue light on the upper left of the keypad will progress from flashing to on steadily Your phone is ready to use During the start up process a screen will display that enables you to se...

Страница 9: ...to a Line Ethernet port on your modem If you are an ACN High Speed Internet customer connect the Ethernet cable to Port 4 on your ACN modem router device 4 Plug in and turn on the modem Note It could...

Страница 10: ...steadily Getting the Best Video Image Possible Avoid strong backlighting Strong backlighting occurs when you are sitting with a window or white wall behind you The camera attempts to compensate for t...

Страница 11: ...our phone Keypad lights indicate the status of some of your phone s functions 3 Camera The camera transmits your image to the person you ve called To get the best image possible refer to Setting Up th...

Страница 12: ...AN The LAN port is used if a modem is being used in conjunction with a PC 5 WAN The WAN port connects your phone to a Wide Area Network You will use this to connect your phone to the Internet using an...

Страница 13: ...The corresponding function message will appear directly above the Soft Key on the lower portion of the LCD screen 2 Navigation Keys Directional Arrow Keys navigate through the on screen menu options O...

Страница 14: ...ou have only old messages you ve saved the light will be on steadily If you have new messages the light will be flashing 6 Function Keys Hold places a call on hold retrieves a call from hold The hold...

Страница 15: ...een or menu press Back If you press the Back key enough times you will end up on the Homescreen To move between selections use the directional arrow keys that surround the OK key On some screens the r...

Страница 16: ...t To add a symbol press the 1 key until you get the symbol you need For additional symbols you press the key Use the directional arrow keys to select a symbol from the table that displays Fields wher...

Страница 17: ...see what you ll look like by selecting Options Self View on the Homescreen You will see yourself displayed on the full screen 4 If the person you ve called answers on an audio only phone Audio Only Ca...

Страница 18: ...your Contacts from most screens 2 Use the directional arrow keys to highlight the contact you wish to call Press OK or select Dial 3 If the contact has more than one phone number select the number to...

Страница 19: ...lue to indicate it is engaged Taking a Snapshot During a video call you can take a snapshot of the screen 5 Select Snapshot A snapshot of the screen displays Select Save to save the snapshot If you do...

Страница 20: ...K key Pressing the Speakerphone key Lifting the handset Send to Mail puts the caller into your video voice mailbox The Homescreen displays any calls you missed Making Audio Only Calls There are two ty...

Страница 21: ...emember the following All three parties must be using an IRIS V during the call It can take up to three minutes for audio and video synchronization to fully tune The person who is originating the vide...

Страница 22: ...ming call You can also do this by pressing OK 2 If you select Hold Answer your current call is placed on hold while you answer the new call 3 You can switch between the two calls by selecting Flash 4...

Страница 23: ...Video Mail by selecting Mail Play a slideshow by selecting the Options Play Slideshow This option only appears if there are images available to play for the current Slideshow settings Preview your ima...

Страница 24: ...call is used to display 1 Header Title Note the Homescreen is untitled 2 Extension in use indication 3 Optional Date and Time Display 4 Input method indication 5 Activity indication To add remove the...

Страница 25: ...Provides options to configure and personalize your phone Voice and Video Mail Provides access to the video voice mailbox Digital Photo Frame Enables you to view and manage your images and create a sl...

Страница 26: ...w messages Number of urgent messages Number of saved messages The Message Indicator Light the right most light below the screen also provides information about your mail Off no messages On steadily sa...

Страница 27: ...pop up question Do you want to use external video If you do nothing the display will return to the phone screen in 30 seconds To return your video and audio from an external device to the phone Select...

Страница 28: ...ups Selecting and Dialing a Contact 1 From the Menu use the directional arrow keys to select the Contacts icon 2 Use the directional arrow keys to select a contact You can find a contact in a long lis...

Страница 29: ...ow Your New Phone Entering Text Select Assign to Group button to assign the contact to a group See Using Contact Groups Use the right and left directional arrow keys to select the tabbed screens 2 Sel...

Страница 30: ...han one number choose a number from the pop up 4 Select the Calls tab to view all calls made to and received from a contact Use directional arrow keys to select a number 5 Select Options and use the d...

Страница 31: ...Groups Press OK or Select The Select Group pop up displays Use directional arrow keys to select a group Press OK or Select 5 Your Contacts screen will now display only members of the group selected W...

Страница 32: ...Menu use the directional arrow keys to select the Call History icon Press OK or Select 2 The Call History screen displays the All calls tab Icons indicate if a call was incoming outgoing or missed 3 U...

Страница 33: ...g contact data Select Back to save contact and return to Call History Viewing the Details of a Call To view a call from the Call History screen use the directional arrow keys to select an entry on eit...

Страница 34: ...to select Appearance and press OK or Select Configuring Theme 3 Choose a Theme The theme chosen determines the look of the header and footer on each screen In addition each theme offers a set of colo...

Страница 35: ...e Homescreen displays LCD Off Turn off the screen Based off the time you select Select the amount of time your phone should be idle before the screensaver is activated Highlight the entry box and pres...

Страница 36: ...ve Image button to remove a wallpaper image without selecting a new one 5 Choose a Language Select Yes to confirm you want to change language The phone will restart and the screens will be updated to...

Страница 37: ...t and Speakerphone Volumes for your phone Highlight the entry box and press Edit or OK Use the up and down directional arrow keys to select a value or use the keypad to enter a value between 0 and 100...

Страница 38: ...nitiating a 3 way video conference call set your bandwidth to Low If you do not know your connection speed you can visit click here Be sure to run this test from a computer that is connected directly...

Страница 39: ...mined by the region selected 3 Select Time and Date Formats The formats selected are used anywhere the time and date are displayed on the phone including within Call History Select Back when you are f...

Страница 40: ...40 Administrator Settings YOU ARE UNABLE TO ADJUST ITEMS IN THE ADMINISTRATOR MENUS PLEASE CONTACT ACN TECHNICAL SUPPORT FOR ASSISTANCE at 888 414 1958 U S or 866 913 3445 Canada Settings Chapter 10...

Страница 41: ...into the back of the phone and select Play Sideshow from USB from the pop up menu You can modify and play a slideshow from the Digital Photo Frame screens 1 From the Menu use the directional arrow ke...

Страница 42: ...e Getting to Know Your Phone View USB Use directional arrow keys to select Use USB Press OK or Select A checkmark appears To deselect press OK or Deselect Choose Albums if you select Use Local Picture...

Страница 43: ...display names of images as they display in the slideshow Use directional arrow keys to select Display Names Press OK or Select A checkmark appears Play as screensaver Choose whether you want the slide...

Страница 44: ...ave not added to any album 4 Manage your picture albums using the Options menu Add pictures to the current album by selecting Options Add to Album Use the directional arrow keys to navigate to an imag...

Страница 45: ...cal Pictures screen displays Use directional arrow keys to scroll through pictures 3 To view details and a larger version of a picture use directional arrow keys to select an image Press OK or View 4...

Страница 46: ...ures After inserting the flash drive you can also choose to Make USB Images My Local Slideshow This option automatically copies the pictures from the USB to the phone and configures the phone to use t...

Страница 47: ...ate to an image and press OK or Select to mark the image for copying A checkmark appears To deselect press OK or Select again When you are finished selecting images select Copy The image s are copied...

Страница 48: ...Pictures screen displays 2 Use directional arrow keys to scroll through pictures 3 To view picture details use directional arrow keys to select an image Press OK or View 4 While viewing an image you c...

Страница 49: ...lect 2 The Information screen displays details about your phone that you may be asked to provide during a service call 3 Use the right directional arrow key to move to the Help tab The Help screen dis...

Страница 50: ...le is connected to the WAN port Verify the handset is connected to video phone Power cycle the phone by disconnecting the DC Power Connector and then reconnecting it If a called party uses a video pho...

Страница 51: ...y to port Do not use house wiring or external CID Caller ID device or answering machine Verify that the phone is functioning properly without phone connected to port Verify that the phone cable from I...

Страница 52: ...Best Video Image Possible Try adjusting the brightness of your LCD screen Settings Configuring Display If the video phone is installed on a private network or behind a firewall you may not be receivi...

Страница 53: ...Have the other party confirm that their mute setting is off If the video phone is installed on a private network or behind a firewall you may not be receiving the other party s audio If the video pho...

Страница 54: ...r phone after a certain number of rings 41 Call Forwarding No Answer To Voice Mail Deactivation Disables Call Forwarding to Voice Mail when you do not answer your phone after a certain number of rings...

Страница 55: ...l 22 answering calls 20 dialing a call 17 in call functions 19 making a call from your contacts or call history 18 making a conference call 21 making audio only calls 20 putting a call on hold 21 redi...

Страница 56: ...images see digital photo frames in call functions 19 adjust call volume 19 mute unmute call 19 put call on speakerphone 19 incoming call 20 information 49 internet service 6 K keypad 15 alpha numeric...

Страница 57: ...oubleshooting R redial 22 requirements 6 digital phone service 6 internet service 6 ringer 37 ringtone group 30 types 37 volume 37 S safety instructions 7 screensaver 35 send to mail 20 settings 34 42...

Страница 58: ...troubleshooting 50 53 audio problems 53 general problems 50 video problems 52 typing see text entering U unmute 19 unpacking 6 usb see also viewing usb pictures 12 V video output 12 video privacy 14...

Отзывы: