acid rain technology Maestro Скачать руководство пользователя страница 2

Introduction

Maestro is a 6 channel clocked modulation controller inspired by the automation lanes found in
digital audio workstation software, brought into eurorack and made playable and performable.
Maestro will push and pull the parameters of your other modules with rapid or slowly evolving
voltages, always in perfect sync with each other and the rest of your system.
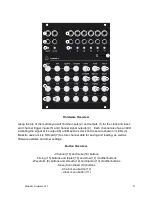
Maestro Features

- 6 channels of live switchable looping/one shot waveforms
- A clock system that keeps all waveforms in sync, even when switching them manually in a live
performance setting. Maestro keeps track of the number of clock pulses elapsed since the last
reset and synchronizes the phase of all channel waveform outputs together
- Internal or external clocking to sync with any modular gear
- A "Chain" function that allows different waveforms to be sequentially played to form complex,
evolving streams of control voltage
- A "One Shot" function that turns any channel of Maestro into a complex CV generator,
following the rhythm of an external gate or trigger
- Instantly recallable save and load slots from the uSD card cached in internal memory. You can
save and recall entire module state or individual channel settings to perform dramatic changes
to Maestro's output without missing a beat
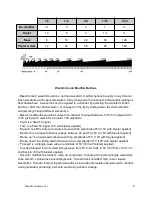
Module Installation

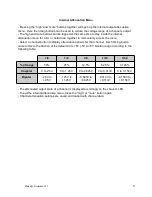
- Maestro requires 20hp of space in a eurorack case, and the module is 25mm deep with the
power header connected - easily compatible with slim/shallow cases
- Maestro requires 65mA of current on the +12V rail and 18mA on the -12V rail of a eurorack
power supply.  Please ensure you have enough power available in your case before installing
Maestro.
- The red line on the edge of the included eurorack power ribbon cable should be aligned with
the “-12v” text on the back of Maestro, and with the -12v rail of your power supply bus board.
Maestro is protected from plugging the power cable in backwards (the unit will not power on)
however we encourage you to take care in making sure Maestro is plugged in correctly before
powering on your case.

Maestro Firmware V1.1

2

Содержание Maestro

Страница 1: ...Maestro Firmware V1 1 Updated March 19 2021 ...

Страница 2: ...hat turns any channel of Maestro into a complex CV generator following the rhythm of an external gate or trigger Instantly recallable save and load slots from the uSD card cached in internal memory You can save and recall entire module state or individual channel settings to perform dramatic changes to Maestro s output without missing a beat Module Installation Maestro requires 20hp of space in a ...

Страница 3: ...and Maestro s clock and reset are shown on LEDs 3 Maestro uses a micro SD card 7 to store channel data for saving and loading as well as firmware updates and other settings Button Overview Channel 19 and mute 18 buttons Timing 15 buttons and triplet 16 and slow 17 modifier buttons Waveform 8 buttons and smooth 12 and bipolar 13 modifier buttons Save 9 and load 10 buttons Chain menu button 14 Clock...

Страница 4: ...Timing and Modifier Buttons The timing buttons determine the multiplication or division of the clock tempo for a given channel A timing can be applied to a channel by selecting the timing button before or after the channel button or changed on the fly by holding down the channel button and jamming through different timings The tempo is displayed on the clock LED The timing buttons range from note ...

Страница 5: ...ixed 0V signal 5V with bipolar applied Square is a 50 duty cycle square wave with an amplitude of 5V 10V with bipolar applied Random is a stepped random voltage between 0V and 5V 5V to 5V with bipolar applied Ramp up is a rising sawtooth wave with an amplitude of 5V 10V with bipolar applied Ramp down is a falling sawtooth wave with an amplitude of 5V 10V with bipolar applied Triangle is a triangle...

Страница 6: ... here Holding smooth while manually increasing or decreasing the internal clock will move in increments of 1 bpm Ramp up is simple tap tempo where the bpm determined by space between last 2 taps on the ramp up button Random sets a random internal clock tempo between 60 and 180 bpm Mute stops the internal clock when no external clock is patched into Maestro Clock PPQN Setting In the clock menu the ...

Страница 7: ... that slot Any settings for other channels in that save slot will remain untouched Pressing the clock button inside the save menu will allow you to save the internal clock tempo to a save slot in addition to any selected channel s data Pressing save again without selecting a save slot will exit the save menu without saving Load Menu Pressing load brings you into the load menu where you can recall ...

Страница 8: ...ly the chain and pressing chain a final time without selecting a channel button will simply exit the chain menu without applying the chain Holding down the random button before pressing chain will generate a random chain and illuminate the channel buttons to prompt you to apply the chain A chain may be a maximum of 32 waveforms long Channel Inputs One Shot Mode Each channel has an input jack locat...

Страница 9: ...tion options for that channel Each timing button name refers to the fraction of the default 0V to 5V 5V to 5V bipolar range according to the following table 1 2 1 4 1 8 1 16 1 32 of range 50 25 12 5 6 25 3 125 Unipolar 0 to 2 5V 0 to 1 25V 0 to 0 625V 0 to 0 313V 0 to 0 156V Bipolar 2 5V to 2 5V 1 25V to 1 25V 0 625V to 0 625V 0 313V to 0 313V 0 156V to 0 156V The attenuated output state of a chan...

Страница 10: ...t back into the Maestro with the your case power off Power up your case and watch Maestro run through the firmware update animation buttons will slowly illuminate in rows from the bottom left to top right Once the animation is complete your maestro is updated and ready for use Firmware Update Changelog V1 1 March 15 2021 ADDED PPQN Settings in clock menu ADDED Internal attenuation menu ADDED Inter...

Отзывы: