background image

Engl

sh

4

Videos

Man menu


Internal Memory

Micro SD Card

     USB Flash Drive


Item


00:05

00:28

Fast forward

Rewnd

Play /Pause

Exit Video mode

Adjust Volume


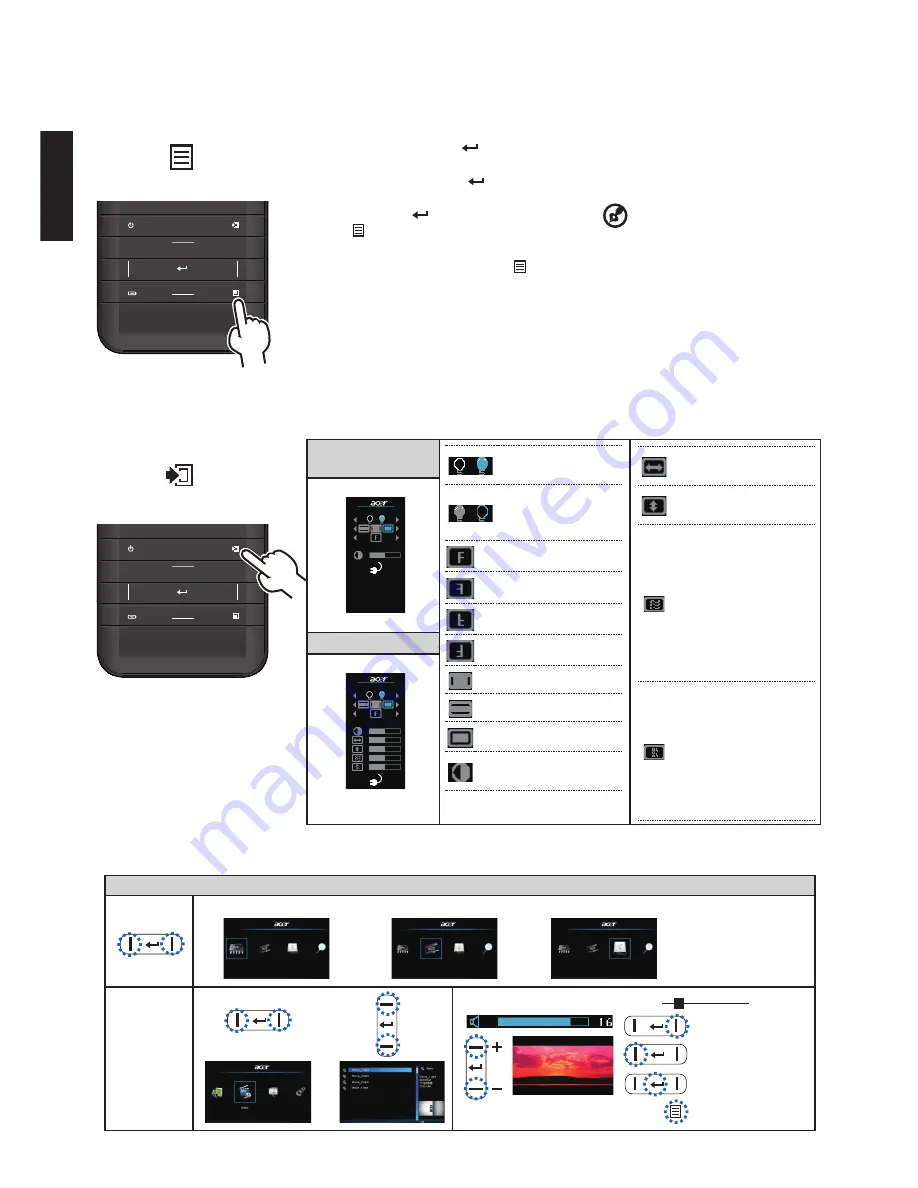
1. Dsplay the Man Menu. (

2. Hghlght the desred opton ( | 


| ) 

3. Enter the desred opton. (

)

4. Highlight the desired item. ( | 

_


 | )

5. Select the tem. (

)

6. Press (

) to go up one drectory.

Under external sgnal mode, press ( ) to brng 

out the OSD.

The OSD dsappears n 5 seconds f there s no 

OSD operaton.

The projector wll automatcally shut down f the 

projector s dle at ts man menu or sub menu 

for 3 mnutes. (Only n the battery state.)

How to Use the Menu

Source: Composite AV, VGA, Component and HDMI

Composte, HDMI or 

Component source


VGA source


Front Desktop.

Rear Desktop.

Front Inverted.

Rear Inverted.

4x3 aspect ratio.

16x9 aspect ratio.

Auto aspect rato.
Contrast: adjust 

contrast

Brght mode: Full 

LED power.
STD mode: 

Standard LED 

power.

H. Poston: adjust the 

horzontal poston.

V. Position: adjust the 

vertcal poston.
Frequency: change 

the dsplay data 

frequency to match 

the frequency of your 

computer’s graphc 

card. Use ths functon 

only f the mage 

appears to flicker 

vertcally.
Phase: synchronze 

the sgnal tmng of 

the dsplay wth the 

graphc card. If the 

mage appears to be 

unstable or flickers, 

use ths functon to 

correct t.

User Controls

Source: Internal Memory, Mcro SD Card, and USB Flash Drve

.............................


Note:

 External sgnal mode 

s applcable for connectng 

VGA, Composite, HDMI and 

Component sgnals. 

Note:


The first time you use 

the projector, you can select 

your preferred language from 

the quck menu after the 

startup screen dsplays. 

Содержание C20 Series

Страница 1: ...e Follow all warnings and instructions marked on the product Turning the product off before cleaning Unplug this product from the wall outlet before cleaning Do not use liquid cleaners or aerosol cleaners Use a damp cloth for cleaning Caution for plug as disconnecting device Observe the following guidelines when connecting and disconnecting power to the external power supply unit Install the power...

Страница 2: ... or water the product has been dropped or the case has been damaged the product exhibits a distinct change in performance indicating a need for service the product does not operate normally after following the operating instructions Note Adjust only those controls that are covered by the operating instructions since improper adjustment of other controls may result in damage and will often require ...

Страница 3: ...ening To protect your hearing follow these instructions Increase the volume gradually until you can hear clearly and comfortably Do not increase the volume level after your ears have adjusted Do not listen to music at high volumes for extended periods Do not increase the volume to block out noisy surroundings Decrease the volume if you can t hear people speaking near you Disposal instructions Do n...

Страница 4: ...straps 16 Lens 1 IR Rece ver 18 DC Input 19 Screw Hole for Tr pod Convertor 20 Battery Cover 5 20 3 1 2 9 8 7 18 10 11 12 13 14 19 15 17 16 6 4 Package Overview Th s projector comes w th all the tems shown below Check to make sure your un t s complete Contact your dealer mmed ately f any th ng s m ss ng Projector Battery Power adaptor w th AC Plug Un versal to D Sub Cable 2 5mm to 3 5mm A V Cable ...

Страница 5: ...ully charged Th s process may take up to 2 5 hours Note Led nd cator Operat on Battery charg ng Charge complete Charging the Battery 2 1 3 4 5 Getting Started Note After the projector s turned off the battery may not start charg ng r ght away due to over temperature protect on Warning Battery charg ng The accessory batteries have a small amount power at the time of purchase The first charge should...

Страница 6: ... Cable Jack RCA 8 Adapter for Pod Phone Adjusting the Projected Image screensize 20 screensize 20 0 974m Desired Distance Height 25cm Des red D stance m Screen S ze D agonal nch W cm x H cm 0 245 5 0 11 x 6 0 500 10 3 23 x 13 0 00 14 4 32 x 18 0 974 20 0 44 x 25 1 500 30 8 68 x 38 2 000 41 1 91 x 51 2 500 51 3 114 x 64 3 215 66 0 146 x 82 Note To ensure the projector works well w th your computer ...

Страница 7: ...ktop Rear Desktop Front Inverted Rear Inverted 4x3 aspect ratio 16x9 aspect ratio Auto aspect ratio Contrast adjust contrast Bright mode Full LED power STD mode Standard LED power H Position adjust the horizontal position V Position adjust the vertical position Frequency change the display data frequency to match the frequency of your computer s graphic card Use this function only if the image app...

Страница 8: ...erted Version Displays firmware version To install converter tool 1 Connect the projector for data transfer 2 Browse internal memory of Projector like a USB memory stick to download converter mptg exe from a folder Converter 3 Execute the file mptg exe on your PC NB and follow the onscreen instructions to finish installation Click converter to select a PowerPoint or PDF files and start conversion ...

Страница 9: ...how mode and photo w ll be output automat cally v a C20 How to play photos If us ng Phone Photos Follow below steps 1 Press appl cat on Photo on ma n screen and choose album 2 Press n thumbna l page Please make sure Photo sett ng n advance Follow below If by Pod Nano Photos Settings If by Pod Class c Sl deshow Sett ngs a TV Out choose On b TV Signal choose NTSC If us ng Phone Follow below steps 1 ...

Страница 10: ... turned off due to the high temperature emitted by the projector Message Reminder 1 Out of the range Please see Compatibility Modes 2 High battery consumption Please change the battery Mode Resolution V Sync Hz VGA 640x480 60 800x600 60 1024x768 60 1280x720 60 1280x800 60 Composite Component HDMI 480i 480P 60 576i 576P 50 720P 50 60 1080i 50 60 Multimedia Format Video File Format Video Format Max ...

Отзывы: