92
Chapter 3
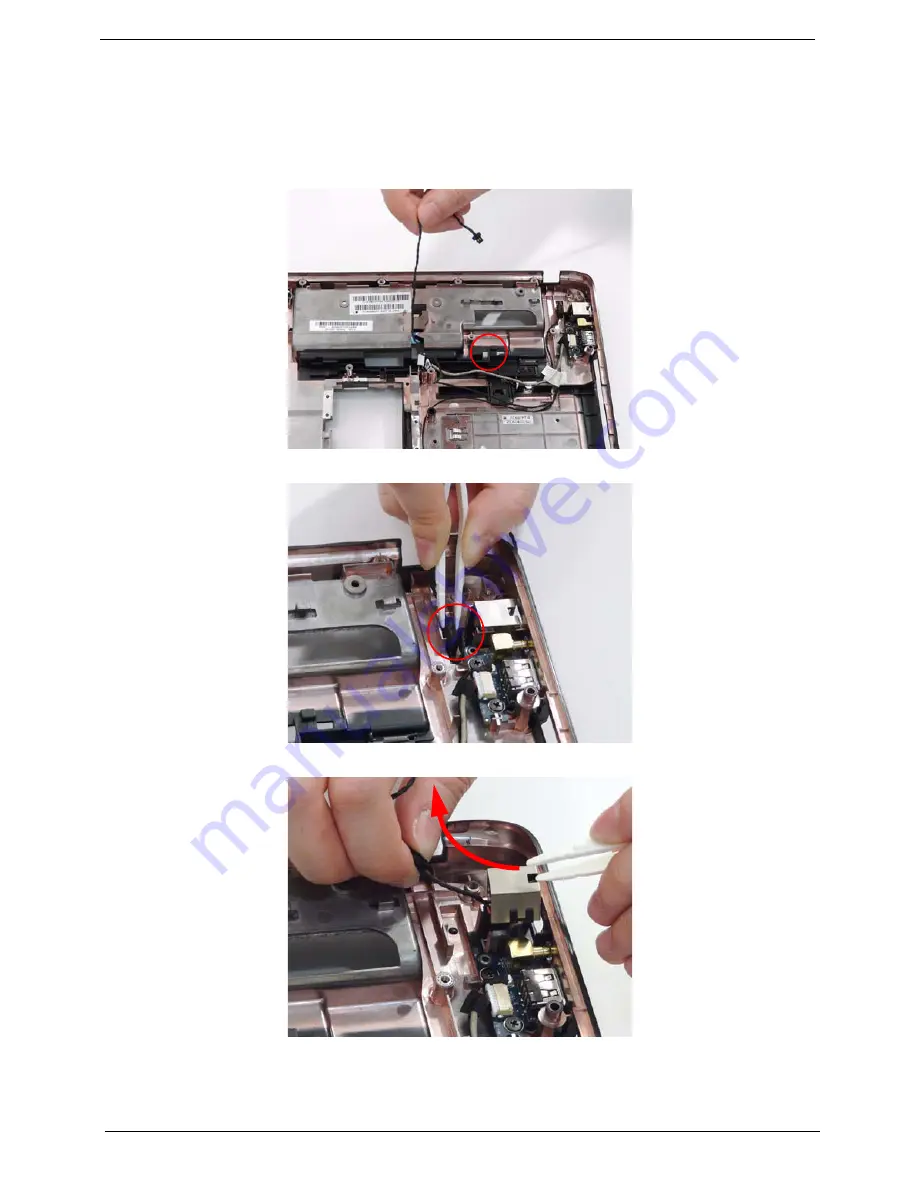
Removing the RJ-11 Port
1.
See “Removing the Upper Cover” on page 70.
2.
See “Removing the Right Speaker Module” on page 84.
3.
See “Removing the Main Board” on page 90.
4.
Remove the RJ-11 cable from its housing.
5.
Using the tweezers to grasp the end of the cable to detach from the base.
6.
Insert the tweezers in the RJ-11 port and push up to detach and lift the port from the base.
Содержание Aspire 5230
Страница 6: ...VI ...
Страница 14: ...4 Chapter 1 System Block Diagram ...
Страница 64: ...52 Chapter 3 6 Remove the HDD cover as shown 7 Remove the WLAN cover as shown ...
Страница 85: ...Chapter 3 73 6 Turn the upper cover over The upper cover appears as follows ...
Страница 106: ...94 Chapter 3 7 Lift the Thermal Module clear of the Mainboard ...
Страница 112: ...100 Chapter 3 6 Disconnect the left and right Inverter board cables as shown ...
Страница 126: ...114 Chapter 3 3 Replace the RJ 11 cable in its housing ...
Страница 137: ...Chapter 3 125 2 Replace the bracket as shown 3 Replace the single securing screw ...
Страница 140: ...128 Chapter 3 2 Connect the seven cables on the mainboard as shown B C D E F G A ...
Страница 146: ...134 Chapter 3 7 Replace the adhesive strip to secure the cable 8 Replace bracket and secure with provided screw ...
Страница 152: ...140 Chapter 3 ...
Страница 193: ...Chapter 6 181 ...
Страница 200: ...188 Appendix B ...
Страница 202: ...190 Appendix C ...
Страница 205: ...193 Windows 2000 Environment Test 184 Wireless Function Failure 154 WLAN Board 54 ...
Страница 206: ...194 ...


