Chapter 2
37
Example 1: Read DMI Information from Memory
Input:
dmitools /r
Output:
Manufacturer (Type1, Offset04h): Acer
Product Name (Type1, Offset05h): Aspire one xxxxx
Serial Number (Type1, Offset07h): 01234567890123456789
UUID String (Type1, Offset08h): xxxxxxxx-xxxx-xxxx-xxxx-xxxxxxxxxxxx
Asset Tag (Type3, Offset04h): Acer Asstag
Example 2: Write Product Name to EEPROM
Input:
dmitools /wp Acer
Example 3: Write Serial Number to EEPROM
Input:
dmitools /ws 01234567890123456789
Example 4: Write UUID to EEPROM
Input:
dmitools /wu
Example 5: Write Asset Tag to EEPROM
Input:
dmitools /wa Acer Asstag
Using the LAN MAC Utility
Perform the following steps to write MAC information to eeprom:
1.
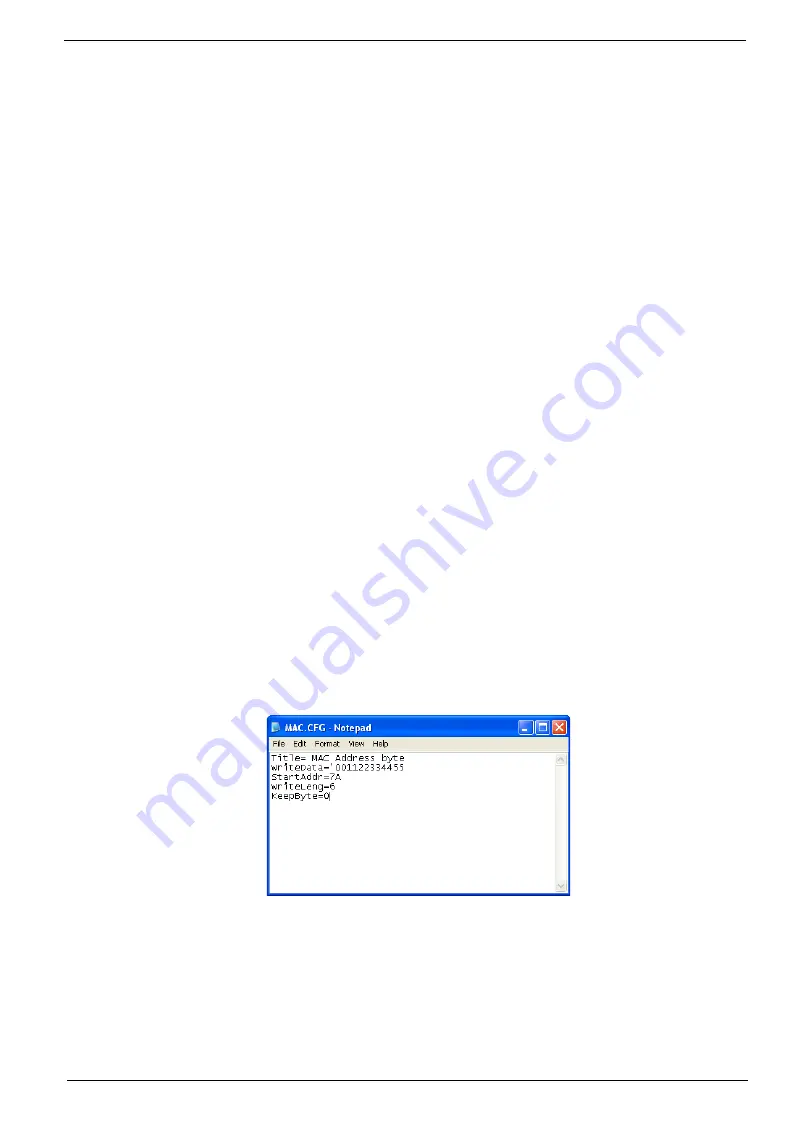
Use a text editor, for example Notepad, to edit the MAC.CFG file as shown:
•
WriteData= '001122334455' <------- MAC value
•
StartAddr=7A <------- MAC address
•
WriteLeng=6 <------- MAC value length
•
KeepByte=0 <------- can be any value
2.
Boot into DOS.
3.
Execute
MAC.BAT
to write MAC information to eeprom.
Содержание Aspire 1420P Series
Страница 6: ...vi...
Страница 10: ...x Table of Contents...
Страница 13: ...Chapter 1 3 System Block Diagram...
Страница 32: ...22 Chapter 1...
Страница 48: ...38 Chapter 2...
Страница 60: ...50 Chapter 3 4 Remove the one 1 screw 5 Remove the 3G module Step Screw Quantity Screw Type 3G Module M2 3 1...
Страница 64: ...54 Chapter 3 4 Unlock the FPC 5 Remove the FPC and keyboard...
Страница 66: ...56 Chapter 3 4 Remove the hinge cap 5 Remove the hinge bezel...
Страница 70: ...60 Chapter 3 10 Pull the upper cover away...
Страница 80: ...70 Chapter 3 6 Remove the two 2 screws 7 Remove the LED board Step Screw Quantity Screw Type LED Board M2 4 2...
Страница 85: ...Chapter 3 75 11 Lift up the main board from the inside edge and pull away 12 Remove the CRT cable...
Страница 94: ...84 Chapter 3 7 Pry up the bezel top edge and remove...
Страница 100: ...90 Chapter 3 6 Pull up the LCD cable from the adhesive 7 Pull the touchscreen cable from the adhesive...
Страница 105: ...Chapter 3 95 6 Remove the antenna cable from the retention guide hooks 7 Peel the antenna foil off the cover...
Страница 119: ...Chapter 3 109 7 Insert the stylus...
Страница 127: ...Chapter 3 117 7 Connect the touchscreen cable Replacing the CRT Board 1 Connect the CRT cable 2 Turn the CRT board over...
Страница 134: ...124 Chapter 3 6 Lock the main board connector 7 Replace the I O cable in the IO board 8 Lock the I O board connector...
Страница 142: ...132 Chapter 3 2 Replace the hinge cap 3 Replace the three 3 screws Step Screw Quantity Screw Type Hinge Covers M2 3 3...
Страница 144: ...134 Chapter 3 4 Press down the keyboard top edge Replacing the 3G Module 1 Replace the 3G module...
Страница 148: ...138 Chapter 3 2 Replace the HDD in the bay 3 Adhere the black tape 4 Replace the HDD FPC...
Страница 149: ...Chapter 3 139 5 Lock the HDD FPC Replacing the Module Cover 1 Insert the side of the module cover into the slots...
Страница 150: ...140 Chapter 3 2 Replace the module pressing firmly around the edges 3 Tighten the six 6 captive screws...
Страница 152: ...142 Chapter 3 3 Lock the battery Replacing the Dummy Card 1 Insert the dummy card into the slot...
Страница 202: ...192 Appendix A...
Страница 212: ...202...
Страница 215: ...205...
Страница 216: ...206...

