34
Chapter 2
Remove HDD/BIOS Password Utilities
This section provide you with removing HDD/BIOS method:
Remove HDD Password:
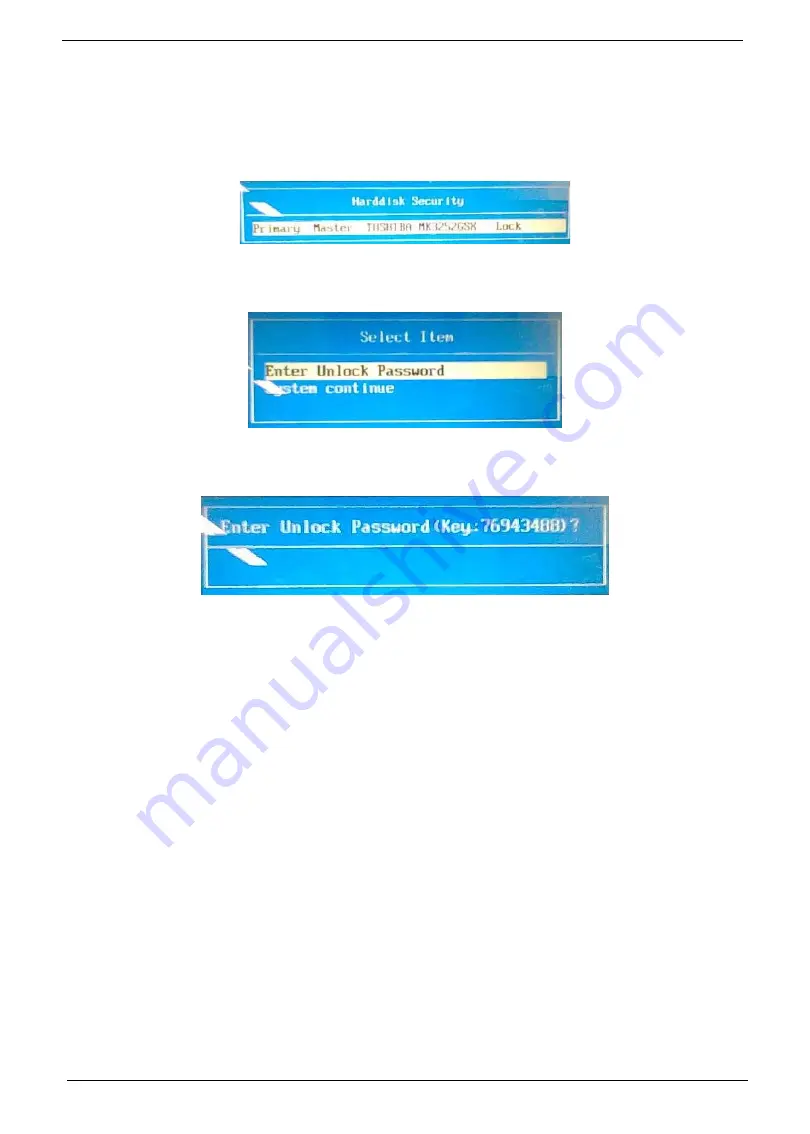
When the user keys in the wrong password three times, the system reports the following error code to user.
To unlock the HDD password, perform the following steps:
1.
Press
Enter
to display the Select Item screen.
2.
Select
Enter Unlock Password
and press
Enter
.
An Unlock Password displays.
3.
Make a note of the key,
76943488
in the example.
4.
Boot up the system to a removable bootable drive containing DOS and the UnlockHD.EXE program and
open a DOS prompt. For instructions on changing boot priority see “Boot” on page 29.
5.
Enter the
UnlockHD.EXE
command and input the key to create an unlock code. Make a note of the
result, for example
46548274
.
6.
Reboot to the hard disk and wait for the error code to reappear.
7.
Press
Enter
to display the Select Item screen.
8.
Select
Enter Unlock Password
and press
Enter
.
9.
Enter the unlock code generated by UnlockHD.EXE.
10.
Save and exit the BIOS to complete the process.
Содержание Aspire 1420P Series
Страница 6: ...vi...
Страница 10: ...x Table of Contents...
Страница 13: ...Chapter 1 3 System Block Diagram...
Страница 32: ...22 Chapter 1...
Страница 48: ...38 Chapter 2...
Страница 60: ...50 Chapter 3 4 Remove the one 1 screw 5 Remove the 3G module Step Screw Quantity Screw Type 3G Module M2 3 1...
Страница 64: ...54 Chapter 3 4 Unlock the FPC 5 Remove the FPC and keyboard...
Страница 66: ...56 Chapter 3 4 Remove the hinge cap 5 Remove the hinge bezel...
Страница 70: ...60 Chapter 3 10 Pull the upper cover away...
Страница 80: ...70 Chapter 3 6 Remove the two 2 screws 7 Remove the LED board Step Screw Quantity Screw Type LED Board M2 4 2...
Страница 85: ...Chapter 3 75 11 Lift up the main board from the inside edge and pull away 12 Remove the CRT cable...
Страница 94: ...84 Chapter 3 7 Pry up the bezel top edge and remove...
Страница 100: ...90 Chapter 3 6 Pull up the LCD cable from the adhesive 7 Pull the touchscreen cable from the adhesive...
Страница 105: ...Chapter 3 95 6 Remove the antenna cable from the retention guide hooks 7 Peel the antenna foil off the cover...
Страница 119: ...Chapter 3 109 7 Insert the stylus...
Страница 127: ...Chapter 3 117 7 Connect the touchscreen cable Replacing the CRT Board 1 Connect the CRT cable 2 Turn the CRT board over...
Страница 134: ...124 Chapter 3 6 Lock the main board connector 7 Replace the I O cable in the IO board 8 Lock the I O board connector...
Страница 142: ...132 Chapter 3 2 Replace the hinge cap 3 Replace the three 3 screws Step Screw Quantity Screw Type Hinge Covers M2 3 3...
Страница 144: ...134 Chapter 3 4 Press down the keyboard top edge Replacing the 3G Module 1 Replace the 3G module...
Страница 148: ...138 Chapter 3 2 Replace the HDD in the bay 3 Adhere the black tape 4 Replace the HDD FPC...
Страница 149: ...Chapter 3 139 5 Lock the HDD FPC Replacing the Module Cover 1 Insert the side of the module cover into the slots...
Страница 150: ...140 Chapter 3 2 Replace the module pressing firmly around the edges 3 Tighten the six 6 captive screws...
Страница 152: ...142 Chapter 3 3 Lock the battery Replacing the Dummy Card 1 Insert the dummy card into the slot...
Страница 202: ...192 Appendix A...
Страница 212: ...202...
Страница 215: ...205...
Страница 216: ...206...

