


196
Appendix B
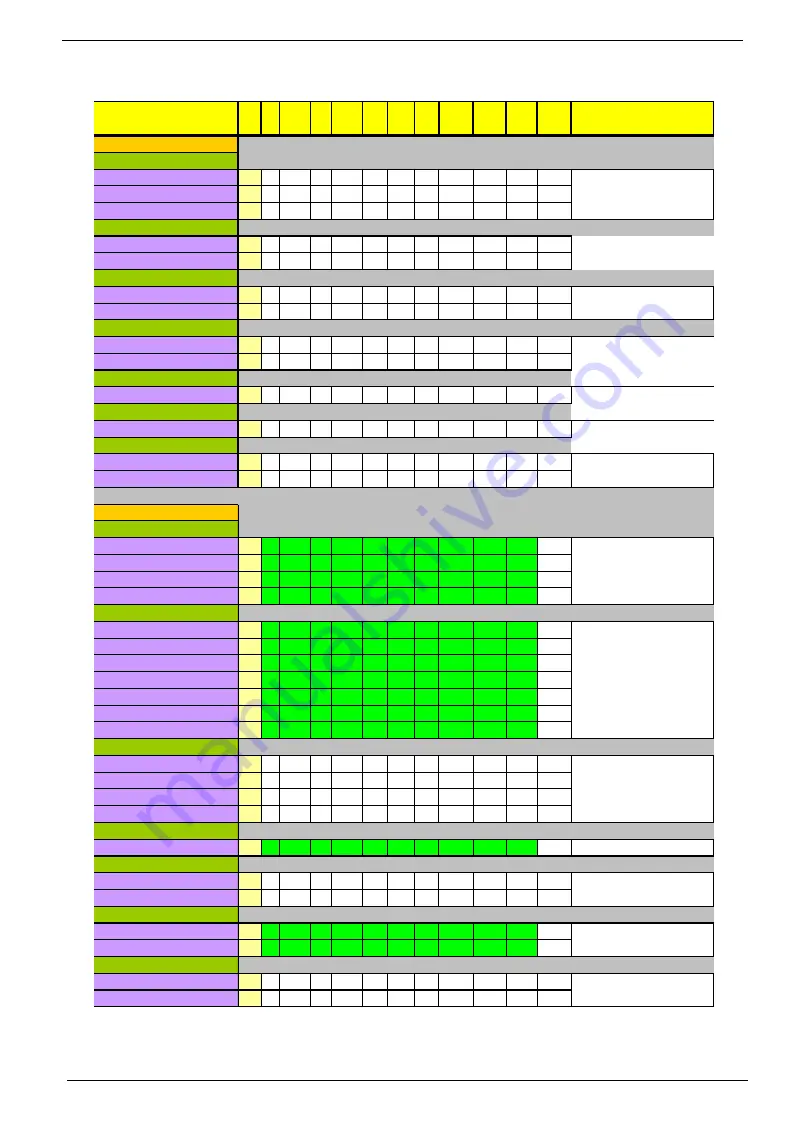
MS Compatibility Test Report
L1
N/A
N/A
N/A
N/A
N/A
N/A
N/A
N/A
N/A
N/A
L1
N/A
N/A
N/A
N/A
N/A
N/A
N/A
N/A
N/A
N/A
L1
N/A
N/A
N/A
N/A
N/A
N/A
N/A
N/A
N/A
N/A
L1
N/A
N/A
N/A
N/A
N/A
N/A
N/A
N/A
N/A
N/A
L1
N/A
N/A
N/A
N/A
N/A
N/A
N/A
N/A
N/A
N/A
L1
N/A
N/A
N/A
N/A
N/A
N/A
N/A
N/A
N/A
N/A
L1
N/A
N/A
N/A
N/A
N/A
N/A
N/A
N/A
N/A
N/A
L1
N/A
N/A
N/A
N/A
N/A
N/A
N/A
N/A
N/A
N/A
L1
N/A
N/A
N/A
N/A
N/A
N/A
N/A
N/A
N/A
N/A
L1
N/A
N/A
N/A
N/A
N/A
N/A
N/A
N/A
N/A
N/A
L1
N/A
N/A
N/A
N/A
N/A
N/A
N/A
N/A
N/A
N/A
L1
N/A
N/A
N/A
N/A
N/A
N/A
N/A
N/A
N/A
N/A
L1
N/A
N/A
N/A
N/A
N/A
N/A
N/A
N/A
N/A
N/A
L1
Pass
Pass
Pass
Pass
Pass
Pass
Pass
Pass
Pass
Pass
L1
Pass
Pass
Pass
Pass
Pass
Pass
Pass
Pass
Pass
Pass
L1
Pass
Pass
Pass
Pass
Pass
Pass
Pass
Pass
Pass
Pass
L1
Pass
Pass
Pass
Pass
Pass
Pass
Pass
Pass
Pass
Pass
L1
Pass
Pass
Pass
Pass
Pass
Pass
Pass
Pass
Pass
Pass
L1
Pass
Pass
Pass
Pass
Pass
Pass
Pass
Pass
Pass
Pass
L1
Pass
Pass
Pass
Pass
Pass
Pass
Pass
Pass
Pass
Pass
L1
Pass
Pass
Pass
Pass
Pass
Pass
Pass
Pass
Pass
Pass
L1
Pass
Pass
Pass
Pass
Pass
Pass
Pass
Pass
Pass
Pass
L1
Pass
Pass
Pass
Pass
Pass
Pass
Pass
Pass
Pass
Pass
L1
Pass
Pass
Pass
Pass
Pass
Pass
Pass
Pass
Pass
Pass
L1
N/A
N/A
N/A
N/A
N/A
N/A
N/A
N/A
N/A
N/A
L1
N/A
N/A
N/A
N/A
N/A
N/A
N/A
N/A
N/A
N/A
L1
N/A
N/A
N/A
N/A
N/A
N/A
N/A
N/A
N/A
N/A
L1
N/A
N/A
N/A
N/A
N/A
N/A
N/A
N/A
N/A
N/A
L1
Pass
Pass
Pass
Pass
Pass
Pass
Pass
Pass
Pass
Pass
L1
N/A
N/A
N/A
N/A
N/A
N/A
N/A
N/A
N/A
N/A
L1
N/A
N/A
N/A
N/A
N/A
N/A
N/A
N/A
N/A
N/A
L1
Pass
Pass
Pass
Pass
Pass
Pass
Pass
Pass
Pass
Pass
L1
Pass
Pass
Pass
Pass
Pass
Pass
Pass
Pass
Pass
Pass
L1
N/A
N/A
N/A
N/A
N/A
N/A
N/A
N/A
N/A
N/A
L1
N/A
N/A
N/A
N/A
N/A
N/A
N/A
N/A
N/A
N/A
HD TV (HDMI)
Toshiba TV 37HL869 (1366*768)
no support
1. Check TV display quality. No serious flicker.
Acer AT4220 (1920*1200)
no support
LCD TV
Gateway TV 26" (1280*768)
1. Check TV display quality. No serious flicker.
Toshiba TV 37HL869 (1366*768)
1. Hot plug the projector. Use hot key to switch the displa
TV
FERGUSON DV3(QSMC)
no support
1. Check TV display quality. No serious flicker.
2. Check NTSC/PAL mode and no garbage or flicker.
3. Check if hot key is supported.
SONY Trinitron 14" VPL-CX5
no support
ACER AL2423W (1920*1200)
no support
Projector
3M Projector
CMV CM-930D 17" LCD (1280*1024)
no support
Gateway TV 26" (1280*768)
no support
Toshiba TV 37HL869 (1366*768)
External Monitor - DVI
VP730b 17'' (1280*1024)(QSMC)
no support
ACER AL2423W (1920*1200)
Gateway TV 26" (1280*768)
External Monitor - LCD
COMPAQ FP 7317 17" (1024*768)(QSMC)
Please follow CRT monitor test procedure
Gateway FPD1730 17"(1280*1024)(QSMC)
View Sonic (1680*1050)
CMV CM-930D 17" (1280*1024)
View Sonic PF775
Please follow CRT monitor test procedure.
Graphic Series GT775
Philip 109P
Dell 21"
AVerMedia AVerTV DVB-T Expresss
no support
Display Port
External Monitor - CRT
BandLuxe C100
no support
TV tuner
AVerMedia AVerTV Hybrid Express card
no support
GigaLAN
Maxell Express card|34 GigabitEthernet adapter
no support
3G
Card Reader
APIOTEX 24 in 1 Express Card Adapter
no support
ExpressCard Reader 12 in 1
no support
eSATA II
eSATA II Dual Ports Express Card
no support
1.Plug in Express card.
2.make sure it can works.
APIOTEK eSATAII 300 Express Caed Adapter
no support
USB 2.0
APIOTEX USB2.0 Quad Express Card Adapter
no support
1.Plug in Express card.
2.Plug in USB device and make sure it can works.
APIOTEX COMBO Express Card Adapter
no support
AboCom Express Card|54 1394B 800Mbs
no support
APIOTEX COMBO Express Card Adapter
no support
Express Card
1394
AboCom Express Card|54 1394A 800Mbs
no support
S3
Removal
S3
Insert
Hibernate
Removal
Bug NO. /
Comment
Expected Result
1.Plug in Express card. And connect a 1394 HDD
device
2.Make sure it can read and write.
1.Plug in TV tuner card.
2.make sure it can works.
Please follow CRT monitor test procedure
Test Item
Level
Driver
Initial
Hibernate
Insert
Reboot
1. Check no yellow bang"!" in device manager.
2. Connect to Internet and download a 5MB file.
3. Connect to Saturn and download a 100MB file.
1.Plug in Express card, should be a driver letter pop in
my computer taskbar.
2.Plug in a Lan line, and connect to Lan, and make sure
it can upload and download.
1.Plug in Express card, should be a driver letter pop in
my computer taskbar.
2.Plug in SD, MS, or XD make sure it can read and
writer.
Graceful
Removal
Hot
Insert
Surprise
Removal
Cold
Insert
Содержание Aspire 1420P Series
Страница 6: ...vi...
Страница 10: ...x Table of Contents...
Страница 13: ...Chapter 1 3 System Block Diagram...
Страница 32: ...22 Chapter 1...
Страница 48: ...38 Chapter 2...
Страница 60: ...50 Chapter 3 4 Remove the one 1 screw 5 Remove the 3G module Step Screw Quantity Screw Type 3G Module M2 3 1...
Страница 64: ...54 Chapter 3 4 Unlock the FPC 5 Remove the FPC and keyboard...
Страница 66: ...56 Chapter 3 4 Remove the hinge cap 5 Remove the hinge bezel...
Страница 70: ...60 Chapter 3 10 Pull the upper cover away...
Страница 80: ...70 Chapter 3 6 Remove the two 2 screws 7 Remove the LED board Step Screw Quantity Screw Type LED Board M2 4 2...
Страница 85: ...Chapter 3 75 11 Lift up the main board from the inside edge and pull away 12 Remove the CRT cable...
Страница 94: ...84 Chapter 3 7 Pry up the bezel top edge and remove...
Страница 100: ...90 Chapter 3 6 Pull up the LCD cable from the adhesive 7 Pull the touchscreen cable from the adhesive...
Страница 105: ...Chapter 3 95 6 Remove the antenna cable from the retention guide hooks 7 Peel the antenna foil off the cover...
Страница 119: ...Chapter 3 109 7 Insert the stylus...
Страница 127: ...Chapter 3 117 7 Connect the touchscreen cable Replacing the CRT Board 1 Connect the CRT cable 2 Turn the CRT board over...
Страница 134: ...124 Chapter 3 6 Lock the main board connector 7 Replace the I O cable in the IO board 8 Lock the I O board connector...
Страница 142: ...132 Chapter 3 2 Replace the hinge cap 3 Replace the three 3 screws Step Screw Quantity Screw Type Hinge Covers M2 3 3...
Страница 144: ...134 Chapter 3 4 Press down the keyboard top edge Replacing the 3G Module 1 Replace the 3G module...
Страница 148: ...138 Chapter 3 2 Replace the HDD in the bay 3 Adhere the black tape 4 Replace the HDD FPC...
Страница 149: ...Chapter 3 139 5 Lock the HDD FPC Replacing the Module Cover 1 Insert the side of the module cover into the slots...
Страница 150: ...140 Chapter 3 2 Replace the module pressing firmly around the edges 3 Tighten the six 6 captive screws...
Страница 152: ...142 Chapter 3 3 Lock the battery Replacing the Dummy Card 1 Insert the dummy card into the slot...
Страница 202: ...192 Appendix A...
Страница 212: ...202...
Страница 215: ...205...
Страница 216: ...206...


