Chapter 1
11
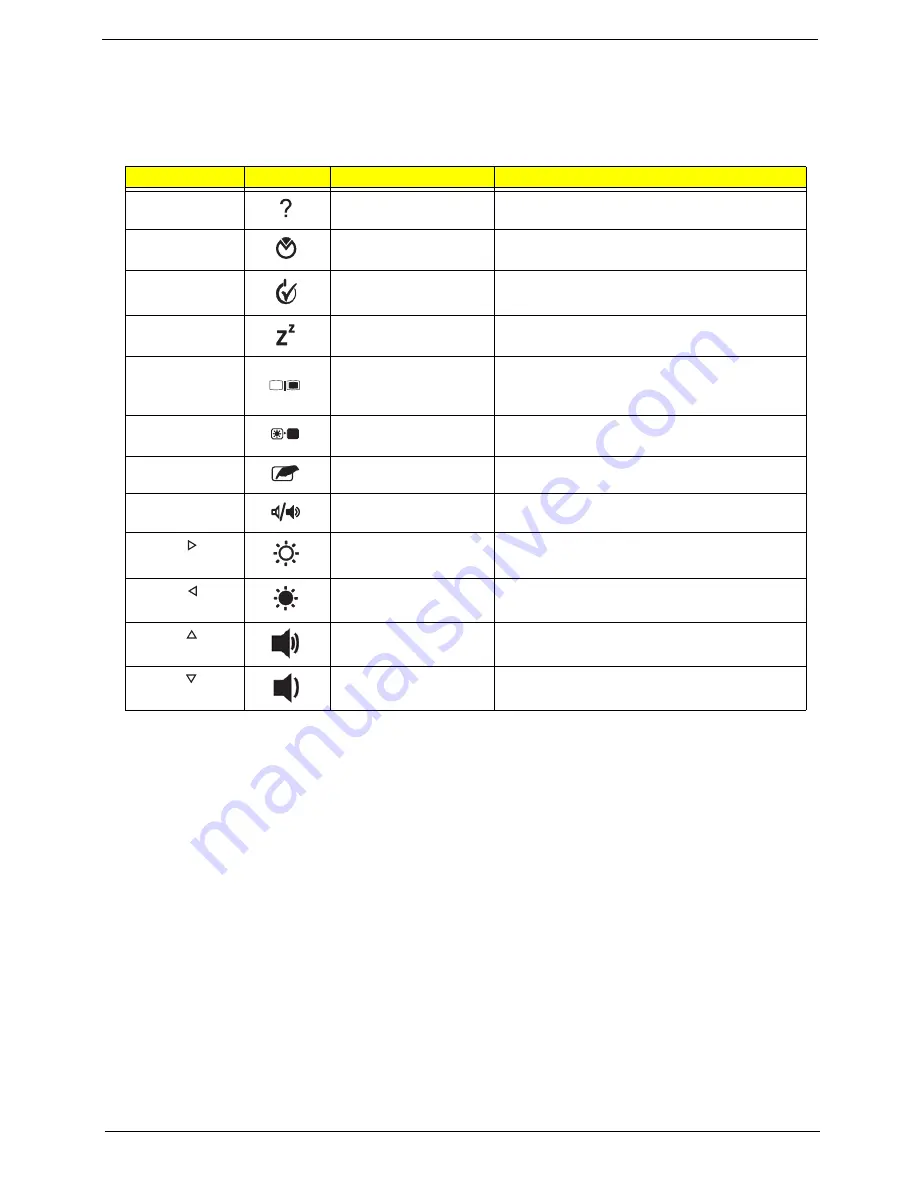
Hot Keys
The computer employs hotkeys or key combinations to access most of the computer's controls like screen
brightness and volume output.
To activate hotkeys, press and hold the
<Fn>
key before pressing the other key in the hotkey combination.
Hotkey
Icon
Function
Description
<Fn> + <F1>
Hotkey help
Displays help on hotkeys.
<Fn> + <F2>
Acer eSettings
Management
Launches Acer eSettings Management in Acer
Empowering Technology.
<Fn> + <F3>
Acer ePower
Management
Launches Acer ePower Management in Acer
Empowering Technology.
<Fn> + <F4>
Sleep
Puts the computer in Sleep mode.
<Fn> + <F5>
Display toggle
Switches display output between the display
screen, external monitor (if connected) and
both.
<Fn> + <F6>
Screen blank
Turns the display screen backlight off to save
power. Press any key to return.
<Fn> + <F7>
TouchPad toggle
Turns the internal TouchPad on and off.
<Fn> + <F8>
Speaker toggle
Turns the speakers on and off.
<Fn> + < >
Brightness up
Increases the screen brightness.
<Fn> + < >
Brightness down
Decreases the screen brightness.
<Fn> + < >
Volume up
Increases the sound volume.
<Fn> + < >
Volume down
Decreases the sound volume.
Содержание AOD250
Страница 6: ...VI ...
Страница 10: ...X Table of Contents ...
Страница 28: ...18 Chapter 1 ...
Страница 45: ...Chapter 2 35 3 Execute MAC BAT to write MAC information to eeprom ...
Страница 46: ...36 Chapter 2 ...
Страница 52: ...42 Chapter 3 4 Lift the Memory cover up to remove 5 Lift the 3G cover up to remove ...
Страница 60: ...50 Chapter 3 6 Disconnect the FFC and remove the Keyboard ...
Страница 70: ...60 Chapter 3 4 Remove the WLAN Board from the Mainboard ...
Страница 78: ...68 Chapter 3 4 Lift the Thermal Module clear of the Mainboard ...
Страница 101: ...Chapter 3 91 IMPORTANT Ensure that the LCD Cable runs as shown to avoid trapping when the Bezel is replaced ...
Страница 104: ...94 Chapter 3 3 Connect the Camera cable as shown ...
Страница 113: ...Chapter 3 103 7 Run the LVDS cable along the cable channel as shown 8 Connect the LVDS cable to the Mainboard ...
Страница 126: ...116 Chapter 3 4 Replace the single screw to secure the HDD in place ...
Страница 155: ...Chapter 5 145 Power board Item Description SW1 Power button LED1 Power LED ...
Страница 208: ...Appendix A 198 ...
Страница 216: ...206 Appendix B ...
Страница 218: ...208 Appendix C ...
Страница 222: ...212 ...


