background image

1

English

1


English

 -10

OPERATION 


Always check the direction of the rotation before use. Do not change direction 
while the tool is doing the work.


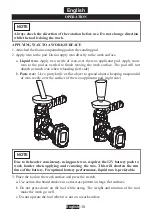
APPLYING WAX TO A WORK SURFACE 

1. Attached the foam compounding pad on the sanding pad.  
2. Apply wax to the pad. Do not apply wax directly to the work surface. 

a. 

Liquid wax

: Apply two swirls of wax over the wax applicator pad. Apply more 

wax to the pad as needed to finish waxing the work surface. The pad will not 
absorb as much wax when reloading. (left side) 

b. 

Paste wax:

 Use a putty knife or flat object to spread about a heaping teaspoonful 

of wax evenly over the surface of the wax applicator pad. (right side) 


Due to its heavier consistency, using paste wax requires the 12V battery pack to 
work harder when applying and removing the wax. This will shorten the run 
time of the battery. For optimal battery performance, liquid wax is preferable.


3. Place the tool on the work surface and press the switch. 

a. Use across-the-board strokes in a crisscross pattern on large flat surfaces. 
b. Do not press down on the tool while using. The weight and rotation of the tool 

make the work go well. 

c. Do not operate the tool when it is not on a work surface. 

NOTE


NOTE


Содержание ARS2016

Страница 1: ...OLVING FIRE ELECTRIC SHOCK OR SERIOUS PERSONAL INJURY SAVE THIS OWNER S MANUAL FOR FUTURE REFERENCE AND REVIEW IT FREQUENTLY FOR SAFE OPERATION NE PAS TENTER D OPERER L OUTIL TANT QUE VOUS N AVEZ PAS LU ET COMPRIS TOUTES LES INSTRUCTIONS ET REGLES DE SECURITE CONTENUES DANS CE MANUEL SINON VOUS RISQUEZ DES ACCIDENTS TELS QU UN INCENDIE UNE ELECTROCUTION OU DES BLESSURES CORPORELLES GRAVES CONSERVE...

Страница 2: ... LABELS The safety instructions provided in this manual are not intended to cover all possible conditions and practices that may occur when operating maintaining and cleaning power tools Always use common sense and pay particular attention to all the DANGER WARNING CAUTION and NOTE statements of this manual This is the safety alert symbol It is used to alert you to potential personal injury hazard...

Страница 3: ... Some examples of these chemicals are Lead from lead based paints Crystalline silica from bricks and cement and other masonry products and arsenic and chromium from chemically treated lumber Your risk from these exposures varies depending on how often you do this type of work To reduce your exposure to these chemicals work in a well ventilated area and work with approved safety equipment such as d...

Страница 4: ...ly Do not wear loose clothing or jewellery Keep your hair clothing and gloves away from moving parts Loose clothes jewellery or long hair can be caught in moving parts Avoid accidental starting Be sure switch is in the locked or off position before inserting battery pack Carrying tools with your finger on the switch or inserting the battery pack into a tool with the switch on invites accidents Use...

Страница 5: ... tools with care Keep cutting tools sharp and clean Properly maintained tools with sharp cutting edge are less likely to bind and are easier to control Check for misalignment or binding of moving parts breakage of parts and any other condition that may affect the tool s operation If damaged have the tool serviced before using Many accidents are caused by poorly maintained tools Use only accessorie...

Страница 6: ...a Use extra caution when moving overhead and pay particular attention to overhead wires which may be hidden from view Anticipate the path of falling branches and debris ahead of time Do not operate this tool for long periods of time Vibration caused by the operating action of this tool may cause permanent injury to fingers hands and arms Use gloves to provide extra cushion take frequent rest perio...

Страница 7: ...a firm grip on the power tool and position your body and arm to allow you to resist vibration forces Never place your hand near the rotating part Wear appropriate personal hearing protection during use Under some conditions and duration of use noise from this product may contribute to hearing loss SYMBOLS The label on your tool may include the following symbols The symbols and their definitions ar...

Страница 8: ... CONTROLS AND COMPONENTS 1 3 Polishing pad 2 Battery indicator 3 Side Handle 4 Speed Control Shifter 5 Spindle Lock 6 Trigger lock 7 Variable Speed Switch 8 Anti slip Soft Grip 9 Battery Pack Release Button 10 Battery Pack 6 7 8 1 9 3 2 10 5 4 ...

Страница 9: ... 9 and pull the battery pack 10 out of tool TO INSTALL BATTERY PACK Push the battery pack 10 onto tool until it locks in place INSTALLING THE BACKING PADS 1 Remove the battery pack 2 Wipe the accessories and spindle to remove dust and debris Inspect the parts for damage Replace if needed 3 Press in the spindle lock and thread the backing pad into the spindle Hand tighten securely 4 To remove backi...

Страница 10: ...Trigger Always allow the motor to come to a complete stop before locking the trigger Always lock the trigger or remove the battery pack before performing maintenance changing accessories storing the tool and any time the tool is not in use To lock the trigger push the trigger lock from the LOCK side of the tool To unlock push the trigger lock to the UNLOCK side of the tool INSTALLING SIDE HANDLE T...

Страница 11: ...ide b Paste wax Use a putty knife or flat object to spread about a heaping teaspoonful of wax evenly over the surface of the wax applicator pad right side Due to its heavier consistency using paste wax requires the 12V battery pack to work harder when applying and removing the wax This will shorten the run time of the battery For optimal battery performance liquid wax is preferable 3 Place the too...

Страница 12: ...s is representative Actual containers may vary BUFFING EXCESS WAX FROM SURFACE OR POLISHING A WAXED SURFACE 1 Put the wool bonnet or the polishing bonnet Make sure the bonnet band securely and evenly around the foam pad 2 Place the tool on the surface and press the switch to the start position 3 Buff or polish the wax on the work surface in the same order it was applied a Use across the board stro...

Страница 13: ... a work surface in direct sunlight 8 Do not leave wax on a work surface for an extended time period 9 When wax is difficult to remove do not force down on the tool Remove the wax buildup by hand 10 Follow up the advice provided with the wax to avoid wax removal problems or paint damage TIPS FOR CAR CARE 1 Applying buff and polish the car three to four times per year to ensure paint protection 2 Wa...

Страница 14: ...ur model Accessories that may be suitable for one tool may become hazardous when used on another tool Recommended accessories for use with your tool are available at extra cost from your local service center IMPORTANT To assure product SAFETY and RELIABILITY repairs maintenance and adjustments should be performed by certified service centers or other qualified service organizations always using id...

Страница 15: ...STRUCTIONS EN CAS DE BESOIN FUTUR SACHEZ RECONNAITRE LES SYMBOLES LES MOTS ET LES AVIS DE SECURITE Le but des instructions de sécurité fournies dans ce manuel n est pas de couvrir tous les cas possibles pouvant se présenter pendant le fonctionnement la maintenance et le nettoyage des outils Faites toujours preuve de bon sens et faites particulièrement attention aux instructions marquées DANGER AVE...

Страница 16: ...s AVIS indiqués IDENTIFICATION D ÉTIQUETTE D AVERTISSEMENT Lisez les manuels avant d utiliser le produit Port de protection oculaire Port d une protection auditive Port d un masque anti poussière Les outils vibrent lorsque vous les utilisez Positionnez votre corps de manière bien équilibrée et stable Ne jouez pas au plus malin lorsque vous utilisez cet outil REMARQUE ...

Страница 17: ...ues AVERTISSEMENT La manipulation des cordons d alimentation vous expose à du plomb un composant chimique connu pour causer le cancer des anomalies congénitales ou d autres problèmes de reproduction Lavez vous les mains après manipulation ESPACE DE TRAVAIL Gardez votre espace de travail propre et bien éclairé Le désordre et le manque d éclairage sont des conditions propices aux accidents N utilise...

Страница 18: ...ils avec le doigt sur l interrupteur ou l installation de la batterie avec l interrupteur sur MARCHE sont des situations propices aux accidents Utilisez des équipements de sécurité Portez toujours des protections oculaires L utilisation d équipement de sécurité comme un masque anti poussière des chaussures de sécurité anti dérapantes un casque de sécurité ou des protections auditives réduiront les...

Страница 19: ...fants et des personnes qui ne sont pas habilitées à utiliser ces outils Les outils sont dangereux dans les mains d utilisateurs non formés Lorsque la batterie n est pas utilisée conservez la à l abri des objets métalliques comme les trombones les pièces de monnaie les clés les ciseaux les vis ou autre petit objet en métal risquant de connecter deux bornes entre elles Un court circuit des bornes de...

Страница 20: ...e Évitez tout contact En cas de contact accidentel rincez abondamment à l eau Si du liquide entre en contact avec vos yeux consultez votre médecin Le liquide éjecté de la batterie cause des irritations ou des brûlures RÉPARATION Faites réparer votre outil électrique par un technicien qualifié en utilisant uniquement des pièces de rechange identiques Ceci permet de préserver la sécurité de l outil ...

Страница 21: ... auditifs des gants et un tablier capable de stopper les petits éléments abrasifs ou des fragments des pièces de fabrication La protection oculaire doit pouvoir stopper les débris volants générés par différentes opérations Le masque anti poussière ou le respirateur doit pouvoir filtrer les particules générée par vos actions Une exposition prolongée à des bruits forts et intenses causera des pertes...

Страница 22: ...symboles suivants Les symboles et leurs définitions sont SYMBOLE NOM DESCRIPTION V Volts Tension potentiel no Vitesse à vide Vitesse de rotation à vide kg Kilogrammes Poids Courant direct Type de courant min Tours par minute Tours vitesse de surface courses etc par minute ...

Страница 23: ...atin de ponçage 3 2 Indicateur de batterie 3 Poignée latérale 4 Commande de vitesse 5 Verrou de la broche 6 Bouton de commande marche avant arrière 7 Interrupteur à vitesse variable 8 Poignée anti dérapante 9 Bouton de libération de la batterie 10 Batterie 6 7 8 1 9 3 2 10 5 4 ...

Страница 24: ...ussez la batterie 10 dans l outil jusqu à ce qu elle s enclenche correctement Installation des plateaux porte disque 1 Retirer le bloc piles 2 Essuyer les accessoires et la broche afi n d enlever la poussière et les débris Inspecter les pièces afin de s assurer qu elles ne sont pas endommagées Procéder à des remplacements au besoin 3 Appuyer sur le verrou de la broche et visser le plateau porte di...

Страница 25: ...ette Attendre toujours l arrêt complet du moteur avant de verrouiller la gâchette Toujours verrouiller la gâchette ou retirer le bloc piles avant de procéder à un entretien de changer des accessoires d entreposer l outil ainsi que lorsque celui ci n est pas utilisé Pour verrouiller la gâchette pousser le verrou de la gâchette du côté de VERROUILLAGE de l outil Pour déverrouiller la gâchette pousse...

Страница 26: ...irage de la surface de travail Le disque n absorbera pas autant de cire lors de la recharge b Cire en pâte utilisez un couteau à mastiquer ou un objet plat pour étaler une cuillerée à café de cire sur la surface du disque applicateur En raison de sa consistence plus épaisse la cire en pâte entraîne une plus grande consommation de la batterie 12V pour l application et l extraction de la cire Ceci r...

Страница 27: ... Les conteneurs de solution pour le cirage ou le lustrage indiqués dans les illustrations sont représentatifs Les conteneurs actuels peuvent varier LUSTRER LA CIRE EN EXCES OU LUSTRER UNE SURFACE CIREE 1 Mettez le bonnet en laine ou le bonnet de lustrage Assurez vous que la bande du bonnet est fermement et uniformément attachée autour du disque en mousse 2 Placez l outil sur la surface et mettez l...

Страница 28: ...a cire sur une surface de travail pendant une période prolongée 9 Si la cire est difficile à retirer ne forcez pas sur l outil Retirez la cire accumulée à la main 10 Suivez les conseils d utilisation fournis avec la cire pour éviter les problèmes d extraction de la cire ou de dommage de la peinture CONSEILS POUR L ENTRETIEN DES VOITURES 1 Appliquez lustrez et polissez votre voiture trois à quatre ...

Страница 29: ...es accessoires adaptés à un outil peuvent devenir dangereux s ils sont utilisés avec un autre outil Les accessoires recommandés pour votre outil sont disponibles auprès de votre centre de services local pour un coût supplémentaire IMPORTANT Pour garantir la SÉCURITÉ et la FIABILITÉ les réparations la maintenance et les réglages doivent être effectués par des centres de services certifiés ou d autr...

Страница 30: ... FUTURO RECONOCER LOS SÍMBOLOS PALABRAS Y ETIQUETAS DE SEGURIDAD Las instrucciones de seguridad ofrecidas en este manual no pretenden cubrir todas las condiciones y prácticas posibles que puedan ocurrir al utilizar mantener y limpiar las herramientas de corriente Utilice siempre el sentido común y preste especial atención a todos los avisos de PELIGRO ADVERTENCIA PRECAUCIÓN y NOTA en este manual É...

Страница 31: ...e entenderla por completo IDENTIFICACIÓN DE LA ETIQUETA DE ADVERTENCIA Lea los manuales antes de utilizar el producto Lleve protección para los ojos Lleve protección para los oídos Lleve máscara antipolvo Las herramientas con alimentación pueden vibrar al usarlas Mantenga el cuerpo firme y equilibrado No se sobreesfuerce al utilizar esta herramienta NOTA ...

Страница 32: ...VERTENCIA Si coge el cable de corriente de los productos con cable podría exponerle al plomo un químico que provoca según el estado de California cáncer y defectos de nacimiento u otros daños reproductivos Lávese las manos tras manipularlos ÁREA DE TRABAJO Mantenga el área de trabajo limpia y bien iluminada Las áreas atestadas y oscuras invitan a los accidentes No utilice herramientas de potencia ...

Страница 33: ...ptor o mientras inserta la batería en una herramienta y el interruptor está encendido on podría sufrir un accidente Utilice equipo de seguridad Lleve siempre protección en los ojos El equipo de seguridad como una máscara antipolvo zapatos de seguridad antideslizantes casco duro y protección auditiva cuando se utiliza en las condiciones adecuadas reducirá las lesiones personales Retire cualquier ll...

Страница 34: ...l alcance de los niños y otras personas inexpertas Las herramientas son peligrosas en manos de usuarios inexpertos Cuando una batería no se utiliza guárdela lejos de otros objetos de metal como clips para papel monedas llaves clavos tornillos u otros pequeños objetos de metal que puedan conectar un terminal con otro Si los terminales de la batería se unen podría provocar chispas quemaduras o un fu...

Страница 35: ... bien con agua Si el líquido entra en contacto con los ojos además de lavarse busque ayuda médica El líquido expulsado de una batería puede causar irritación o quemaduras SERVICIO Lleve su herramienta de potencia para su reparación a un técnico cualificado que utilice sólo partes de repuesto idénticas Esto hará que la herramienta de potencia mantenga su seguridad Las reparaciones de la herramienta...

Страница 36: ...fragmentos abrasivos o cortantes La protección de los ojos debe ser capaz de detener restos aéreos generados por varias operaciones La máscara antipolvo o respirador deben ser capaces de filtrar las partículas generadas por su operación La exposición prolongada a ruido de alta intensidad puede provocar pérdida auditiva Mantenga a los curiosos a una distancia segura lejos del área de trabajo Cualqu...

Страница 37: ...ímbolos y sus definiciones son los siguientes SÍMBOLO NOMBRE EXPLICACIÓN V Voltios Voltaje potencial no Sin Velocidad de Carga Velocidad rotatoria sin carga kg Kilogramos Peso Corriente Directa DC Tipo de corriente min Revoluciones por Minuto Revoluciones velocidad de superficie impactos etc por minuto ...

Страница 38: ...hadilla lijadora de 3 2 Escobilla de carbón intercambiable externa 3 Mando lateral 4 Control de velocidad 5 Seguro del husillo 6 Seguro de gatillo 7 Interruptor de velocidad variable 8 Agarre suave antideslizante 9 Botón de liberación de la batería 10 Batería 6 7 8 1 9 3 2 10 5 4 ...

Страница 39: ...la PARA INSTALAR LA BATERÍA Presione la batería 10 contra la herramienta hasta que quede ajustada en su lugar Instalación de los discos de respaldo 1 Extraiga la batería 2 Limpie con un paño los accesorios y el husillo para eliminar el polvo y la basura Revise que las piezas no estén dañadas Reemplace si es necesario 3 Presione el seguro del husillo y enrosque el disco de respaldo en el husillo Ap...

Страница 40: ...el gatillo Siempre permita que el motor se detenga por complete antes de bloquear el gatillo Siempre bloquee el gatillo o quite la batería antes de realizer mantenimiento cambiar accesorios guardar la herramienta y en cualquier momento en que la herramienta no esté en uso Para bloquear el gatillo empuje el seguro del gatillo desde el lado de la herramienta que dice LOCK Para desbloquearlo empuje e...

Страница 41: ...sitando para finalizar el encerado de la superficie de trabajo La almohadilla no absorberá tanta cera conforme se vaya rellenando b Cera en pasta Utilice un aplicador de masilla u objeto plano para una cucharadita de cera por igual sobre la superficie de la almohadilla aplicadora de cera Debido a su consistencia más pesada el uso de la cera de pasta requiere el uso de la batería de 12V para trabaj...

Страница 42: ...ecesario en superficies de formas irregulares 2 Si la almohadilla se desprende durante el uso puede que esté utilizando demasiada cera o que esté utilizando la herramienta sin estar sobre la superficie de trabajo 3 Los contenedores de solución de pulimento y cera mostrados en las ilustraciones sirven sólo como referencia Los que utilice pueden variar RASPAR EL EXCESO DE CERA DE LA SUPERFICIE O PUL...

Страница 43: ... herramienta sobre una misma zona en la superficie de trabajo 4 Levante la herramienta de la superficie de trabajo antes de apagarla No apague la herramienta mientras descansa sobre la superficie de trabajo 5 No utilice la herramienta sin una almohadilla la almohadilla de esponja o la superficie de trabajo podrían dañarse 6 No realice ajustes en la herramienta durante su utilización 7 No aplique r...

Страница 44: ...e salir de fábrica El lubricante debería durar hasta el final de la vida útil de la herramienta No necesita más lubricación CAMBIAR LAS ESCOBILLAS 1 Afloje la tapa de las escobillas de carbón intercambiables externas 2 2 Quite la escobilla de carbón del soporte 3 Inserte una escobilla de carbón nueva 4 Vuelva a apretar la tapa 5 Antes de utilizar haga funcionar la herramienta unos minutos para dej...

Страница 45: ... FIABILIDAD del producto las reparaciones mantenimiento y ajustes deberán realizarse en centros de servicio oficiales u otros servicios técnicos cualificados utilizando siempre componentes idénticos PROTECCIÓN DEL MEDIOAMBIENTE Antes de tirar una unidad dañada consulte a su Agencia de Protección Medioambiental si existen restricciones especiales sobre la retirada de herramientas o para devolverlas...

Страница 46: ......

Страница 47: ......

Страница 48: ......

Отзывы: